VitOS Manager
User Operation Manual
August 16, 2023
contents
3.4.3. Refresh Audio Output Selector
3.5.3. Data Disk (Limited To Devices With Data Disks)
3.6.1.1. Orbiter Plugin Version
3.6.1.2. What is Orbiter Plugin?
3.6.1.2.1. Open or Download VitOS Orbiter
3.6.1.3. Orbiter Plugin Status
3.6.1.4. Audio Output Information
3.6.1.4.3. Refresh Audio Output Information
3.6.1.6. Uninstall Orbiter Plugin
3.6.1.7. Install Orbiter Plugin
3.6.1.7.1. Cancel The Installation
3.6.2.2.1. Open or Download Roon App
3.6.2.4.1. Reset Database & Config
3.6.2.5. Audio Output Information
3.6.2.5.3. Refresh Audio Output Information
3.6.2.6. Uninstall Roon Server
3.6.2.7.1. Cancel The Installation
3.6.3.1. Spotify Connect Version
3.6.3.2. What Is Spotify Connect?
3.6.3.2.1. Open or download Spotify Connect
3.6.3.3. Spotify Connect Status
3.6.3.5. Audio Output Information
3.6.3.5.3. Refresh Audio Output Information
3.6.3.6. Uninstall Spotify Connect
3.6.3.7. Install Spotify Connect
3.6.3.7.1. Cancel The Installation
3.6.4.5. Audio Output Information
3.6.4.5.3. Refresh Audio Output Information
3.6.4.7.1. Cancel The Installation
3.6.5.4.1. Transcode Settings Operation
3.6.5.4.2. PCM Transcode Format
3.6.5.4.3. DSD Transcode Format
3.6.5.6. Data Disk (Limited To Devices With Data Disk)
3.6.5.9.1. Reset Database & Config
3.6.5.10. Uninstall ReadyMedia
3.6.5.11.1. Cancel The Installation
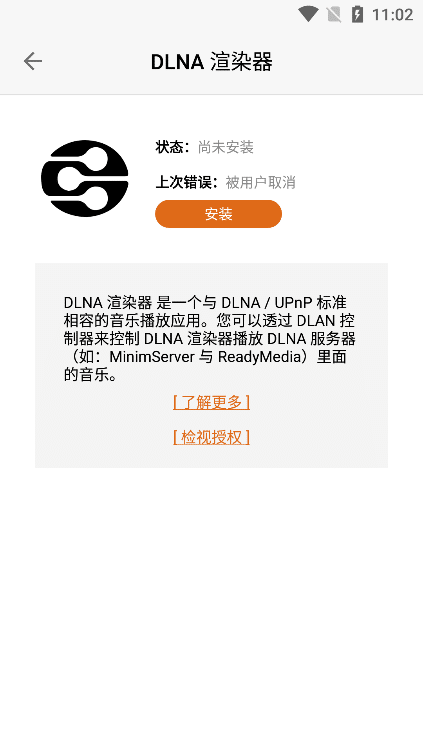
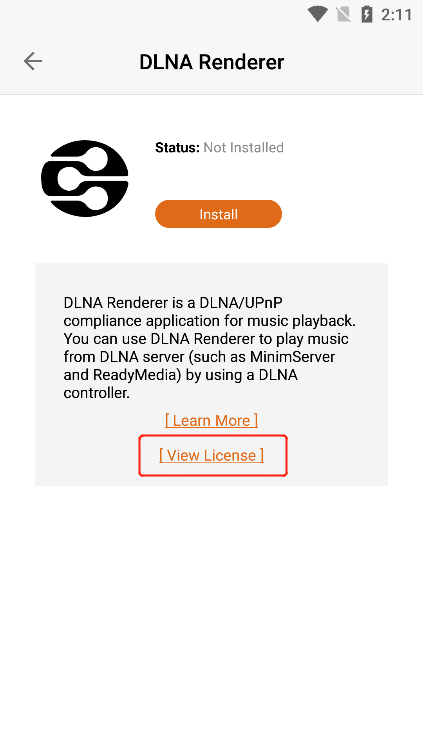
3.6.6.1. DLNA Renderer Version
3.6.6.2. What Is DLNA Renderer?
3.6.6.5. Audio Source Output Information
3.6.6.5.3. Refresh Audio Output Information
3.6.6.6. Uninstall DLNA Renderer
3.6.6.7. Install DLNA Renderer
3.6.6.7.1. Cancel The Installation
3.7. Music Backup(Only For Devices With Data Disks)
3.7.4. View Last Backup Details
3.8. Music Import (Only For Devices With Data Disks)
3.8.4. View Last Import Details
1. Software Overview
1.1. Overview
VitOS Manager is mainly a software for managing servers , it can be used for iOS \ Android devices (including mobile phones and tablets), it can be used to manage the Silent Angel-Z1 music server of VitOS system , you can: find the Z1 in the same network , install Roon server, set network settings, import music from USB hard drive, …, etc.
2. Operating Environment
This software can run on Android and iOS mobile phones.
3. Instructions
3.1. Software Installation
Android users can search for "VitOS Manager" in the app market to download and install;
Apple users can search for "VitOS Manager" in the APP Store to download and install.
3.2. Software Running
After the installation is complete, the user can Click the desktop icon to enter the APP to find the VitOS device interface.
3.2.1. Assist
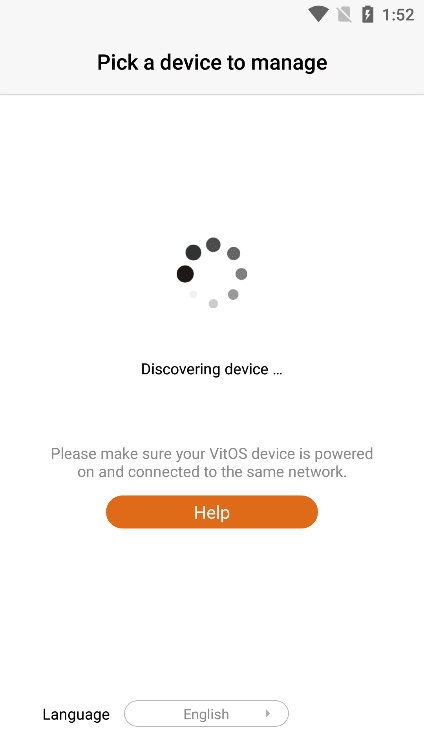
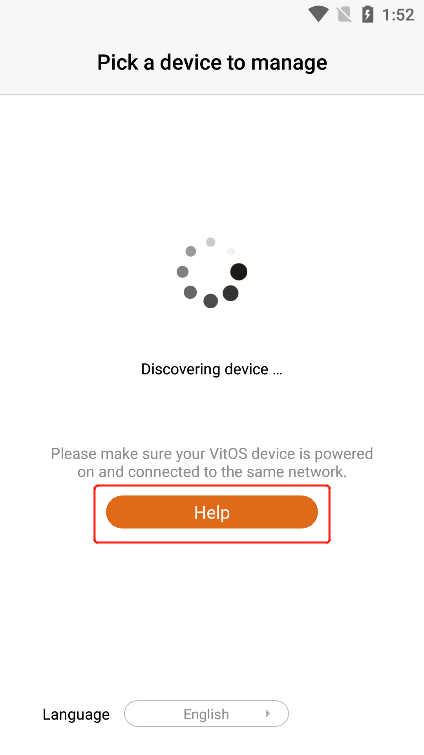
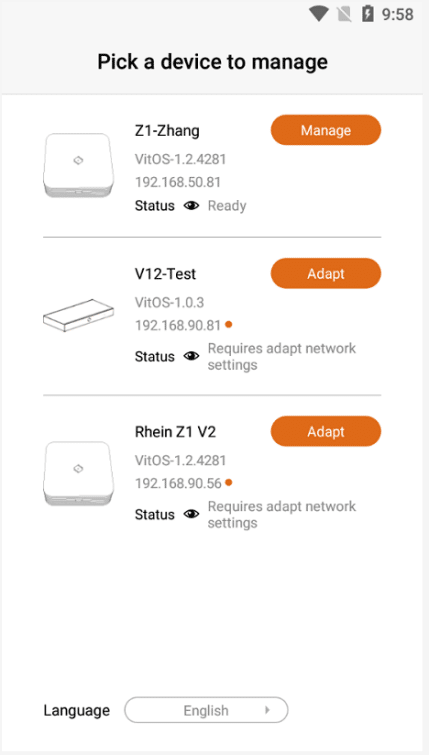
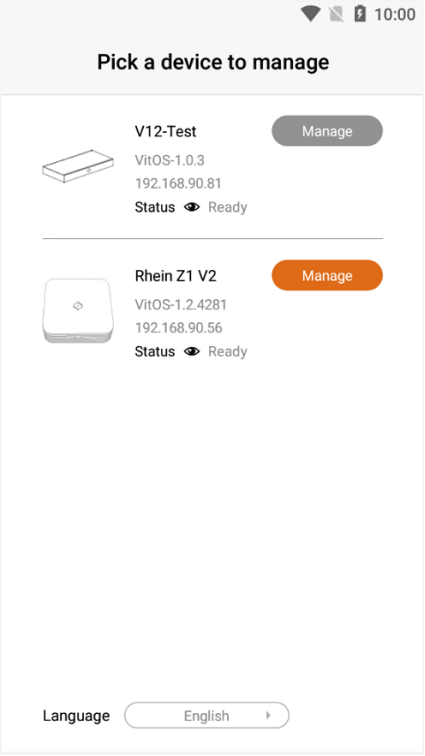
If the device is not found, you can Click the "Help" button to enter the " Discover Guide " interface.
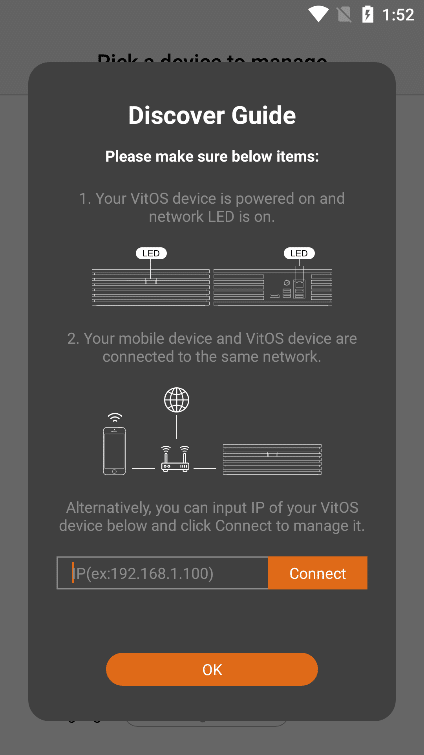
If your VitOS device has been confirmed and your VitOS device has not been found, you can manually add an IP address to find your VitOS device.
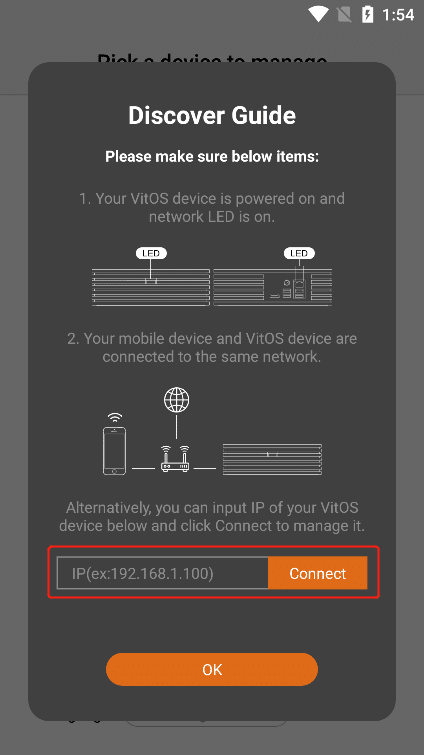

If the device is not found, you can Click the " Manage Other Devices " button to enter the " Select Device " interface.
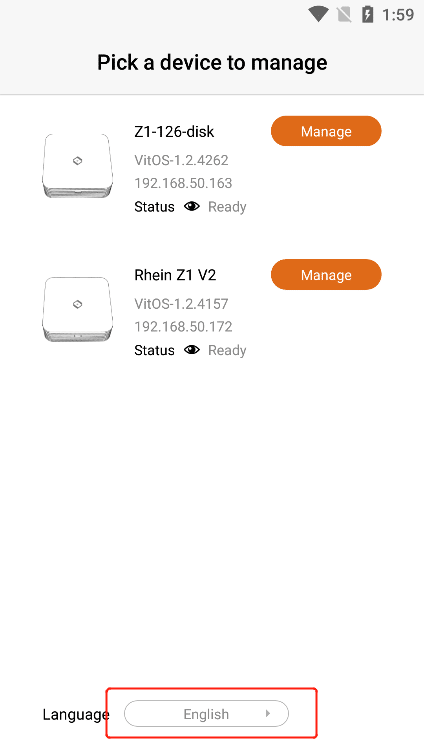
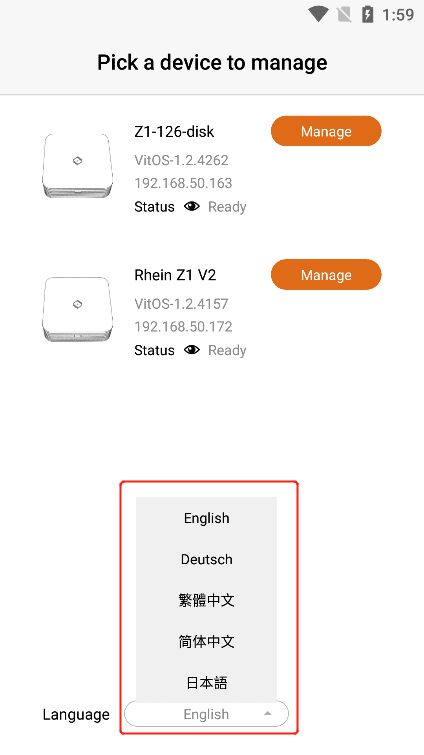
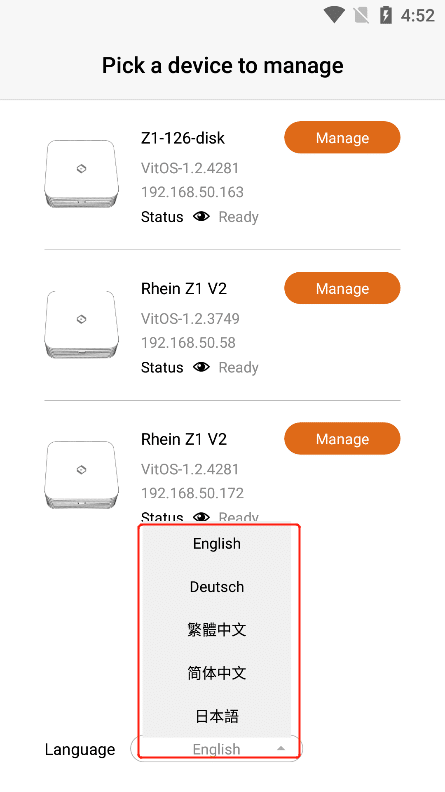
3.2.2. Language
Select the selection box of "Language" to switch the language of the software.
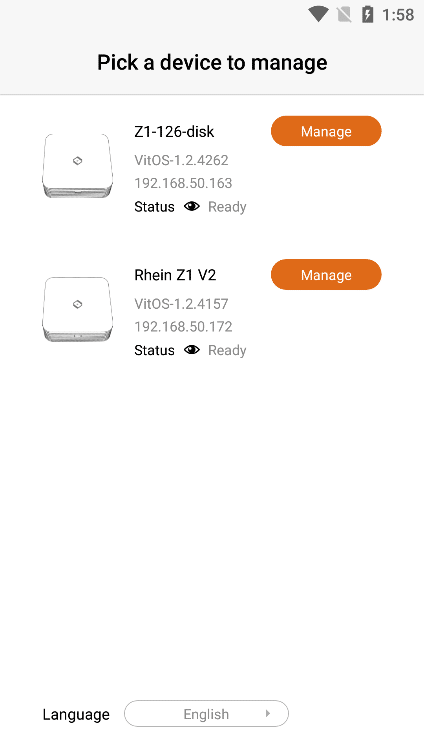
3.2.3. Device Information
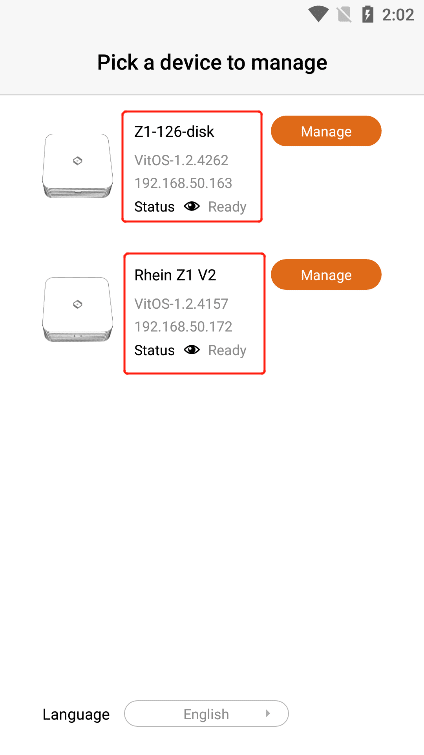
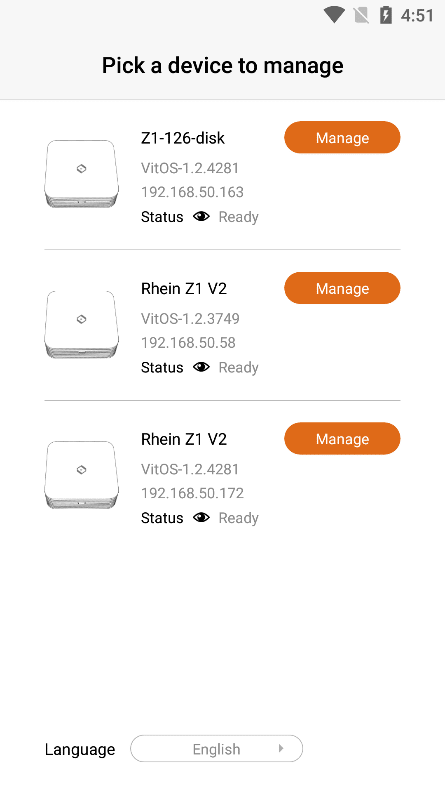
In the list of selected devices, the corresponding devices will display information such as "Device Name", " Device Firmware Version Number ", " Ip Address ", and " Device Status ".
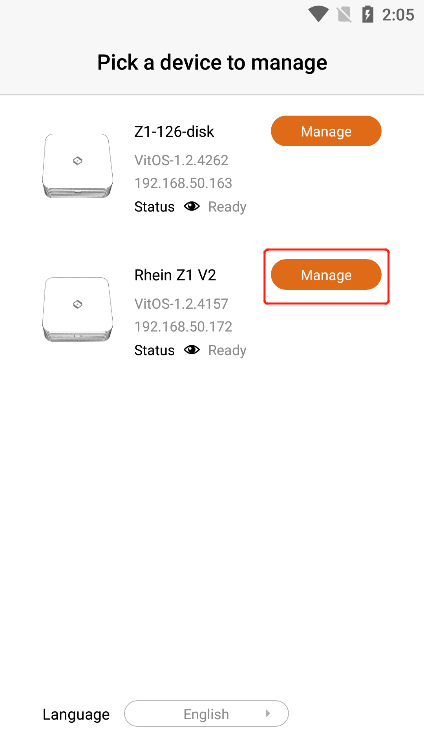
3.2.4. Manage
Click the "Manage" button on the right side of your vitos device to enter the app. (Note: V12 devices are only for searching and cannot be managed.)
3.2.5. Debug
Click the "Debug" button of the V12 device, it will show that the grayed out button of the "Manage" of the V12 device cannot be Clicked, and Click the "Debug" button of the Z1 device, and the "Manage button of the Z1 device will be displayed.
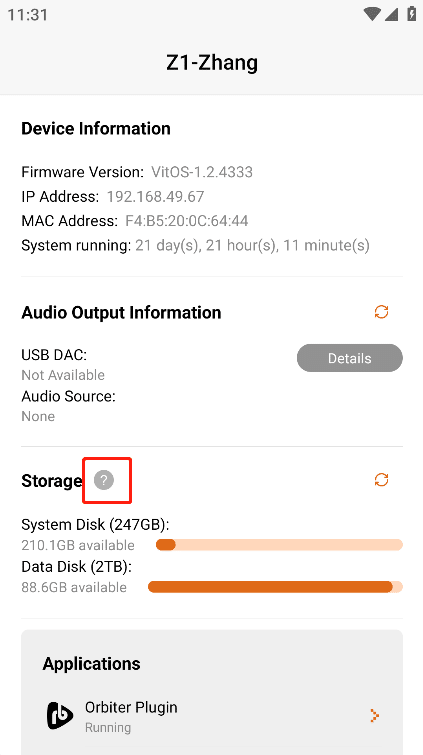
3.3. Device Information
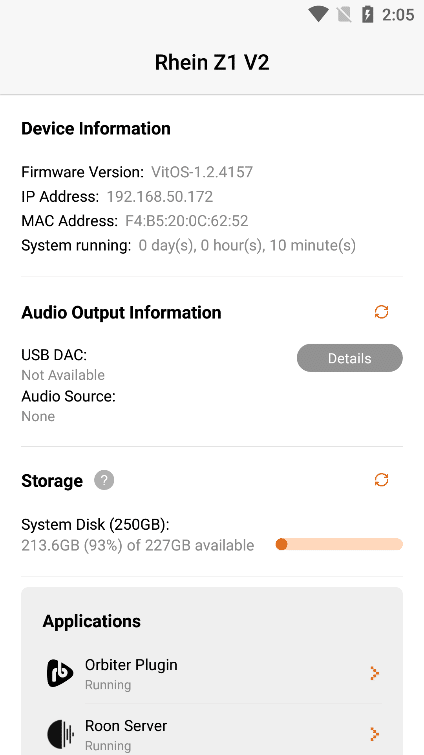
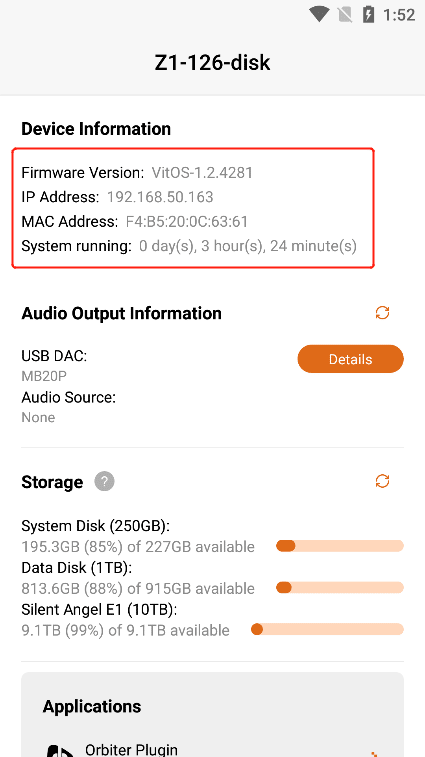
On the top of the main interface, you can find the information of the current Z1 device, such as "Firmware Version", "IP Address", "MAC Address" and "System Running".
3.4. Audio Output Information
3.4.1. USB DAC Details
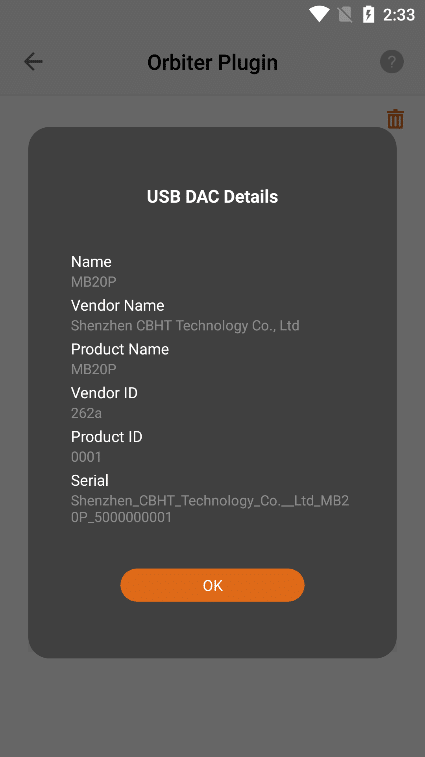
Confirm that the current Z1 device is connected to the "USB DAC" , and Click the "Details" button to the right of the "USB DAC" to view the details of the USB DAC connected to the current Z1 device.
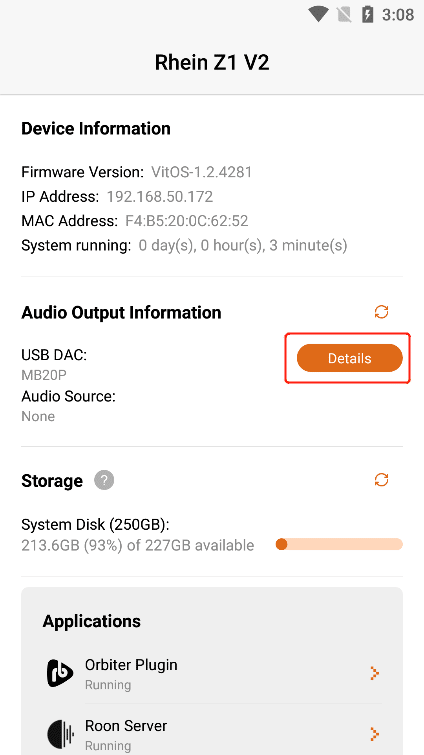

3.4.2. Audio Source
You can connect the Z1 device to play music through applications such as "Orbiter Plugin" , " Airplay2 " , "DLNA Renderer", " Spotify Connect" , " Roon Server" , etc. "Audio Source" shows the application name of the music you are currently playing , if the Z1 device is not connected to play music, it will display "None" , and if the Z1 device is connected to pause or not play music, it will display "None" .
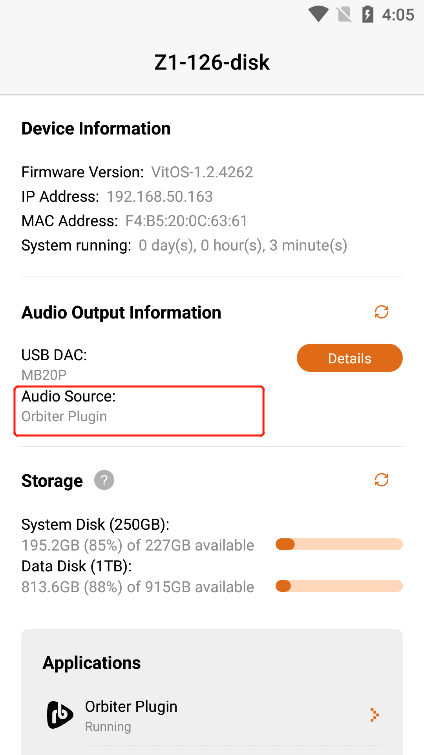
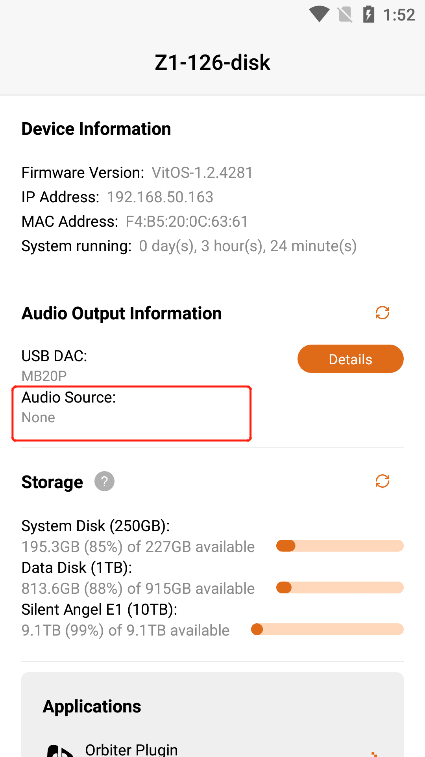
3.4.3. Refresh Audio Output Selector
If the latest information is not updated in "USB DAC" or "Audio Source" , you can Click the "Refresh" button to update the data.
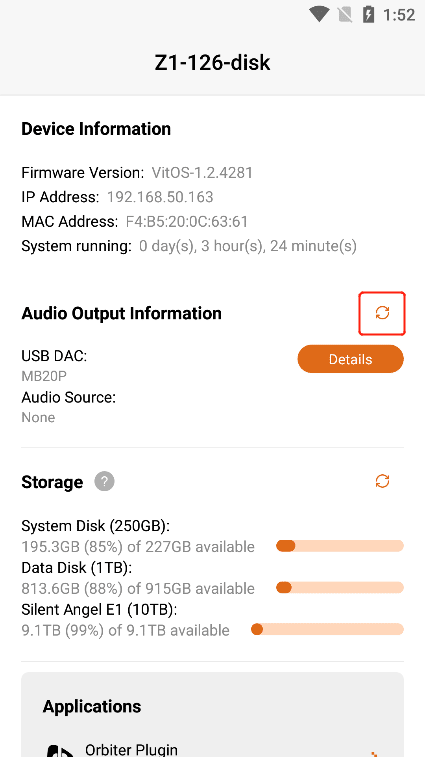
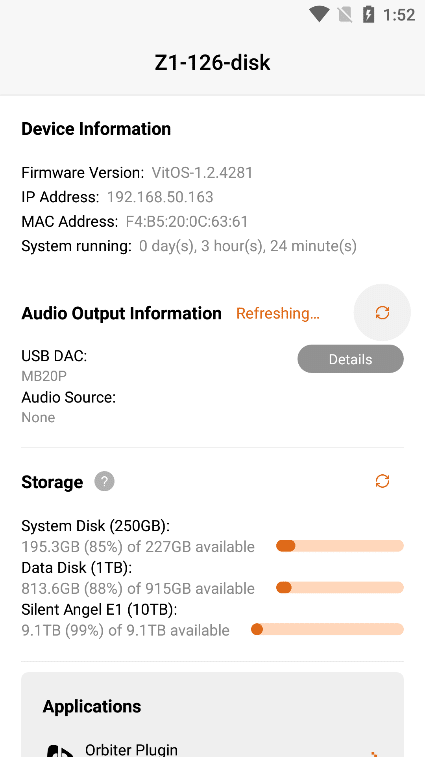
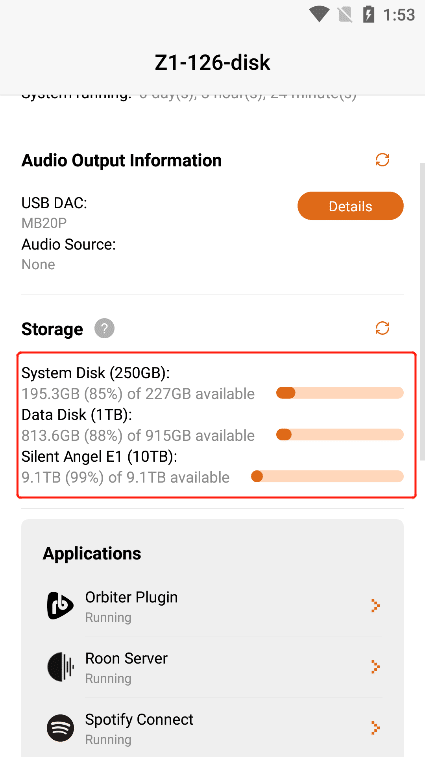
3.5. Storage
Under "Storage" on the main interface, you can find the storage contents of the "System Disk", "Data Disk" and "U Disk(E1)" of the current Z1 device.
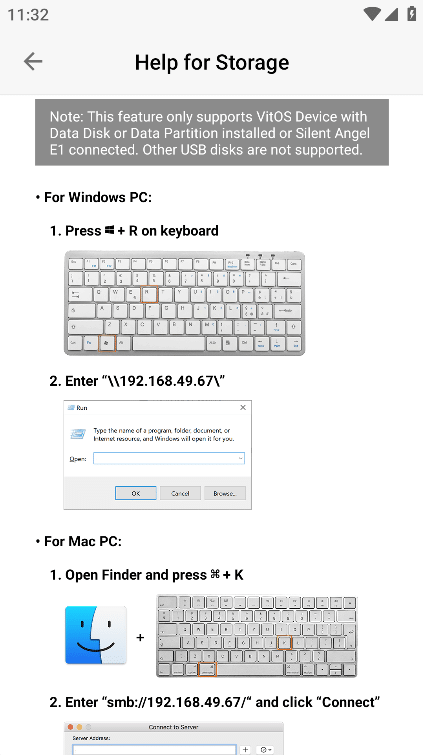
3.5.1. Help for Storage
Click on the "?" button on the right side of the "Storage" title,to enter the "Help for Storage" interface, where you can view the steps to connect to the device using the computer.
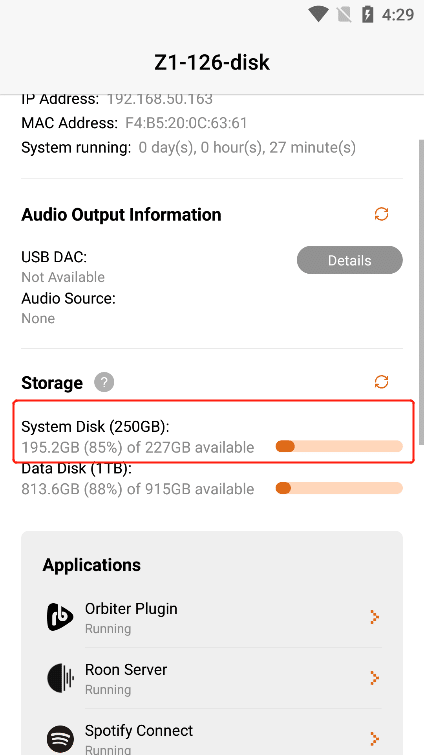
3.5.2. System Disk
You can view the "Total Storage Capacity" and "Remaining Usable Capacity" of the System Disk of the current Z1 device.
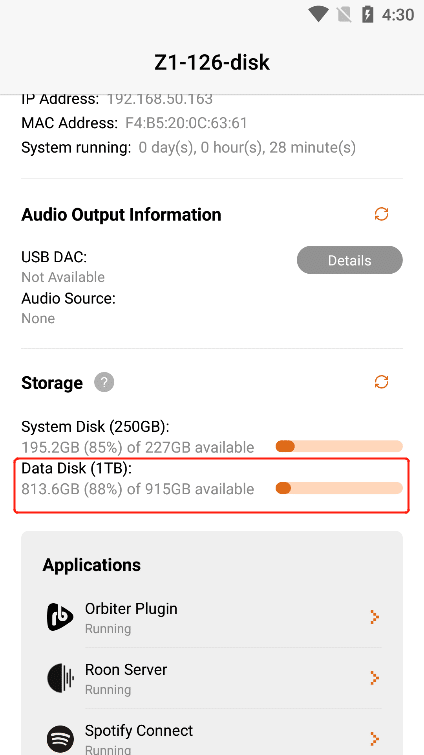
3.5.3. Data Disk (Limited To Devices With Data Disks)
You can view the "Total Storage Capacity" and "Remaining Usable Capacity" of the Data Disk of the current Z1 device.
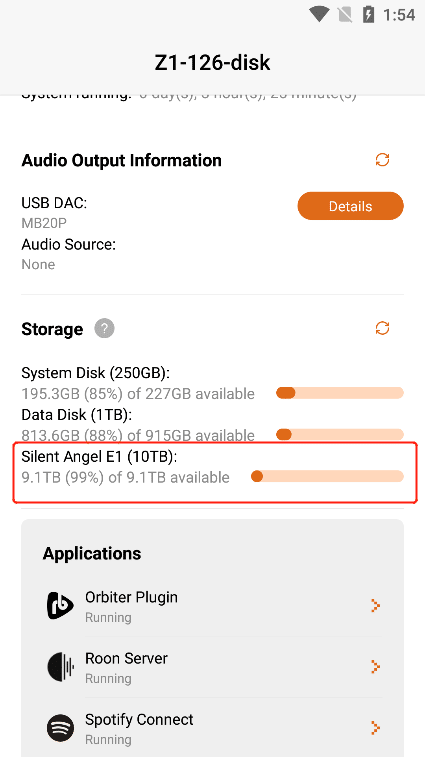
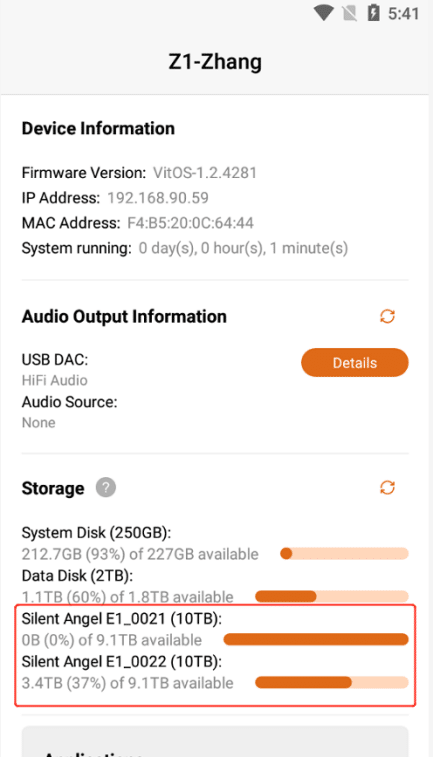
3.5.4. U Disk (E1)
If your device is connected to a single " E1 " storage device or multiple " E1 " storage devices, a single " E1 " displays "Total Storage Capacity" and "Remaining Usable Capacity" , and multiple " E1" display " Total Storage Capacity " , " Remaining Usable Capacity " and " E1 Name " plus the last four digits of the serial number.
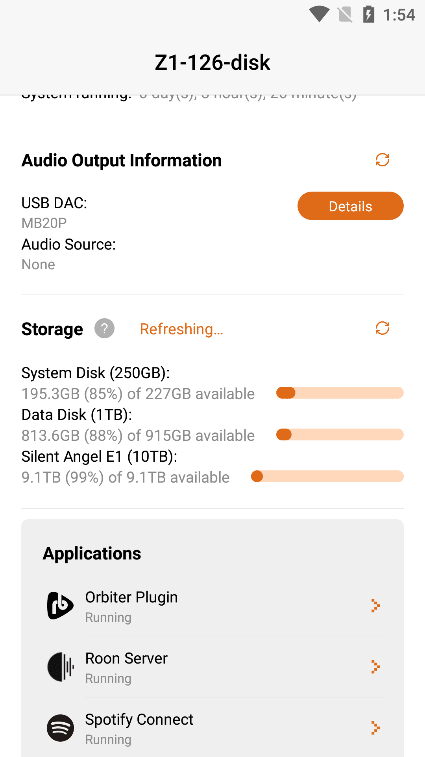
3.5.5. Refresh Storage
If the latest storage information is not updated in the "System Disk" 、"Data Disk" 、"U Disk(E1)", you can Click the "Refresh" button to update the data.
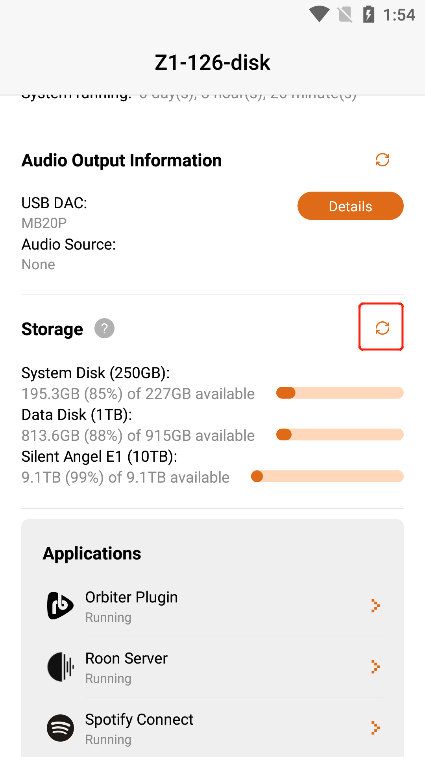
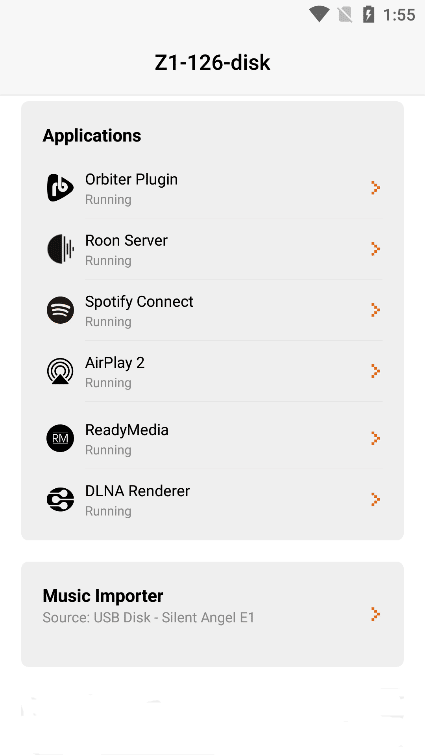
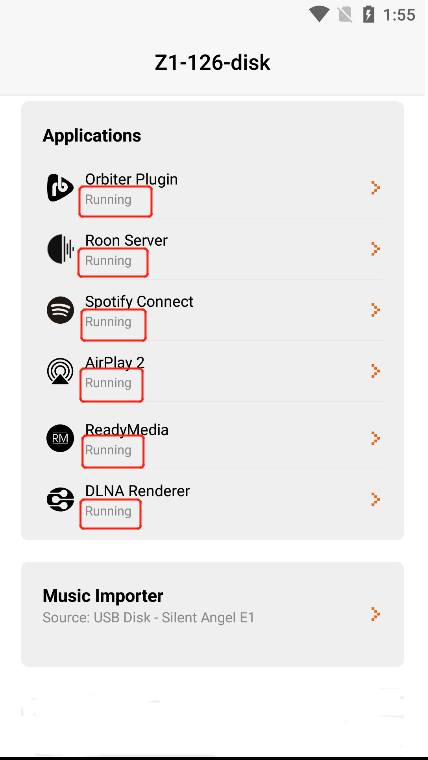
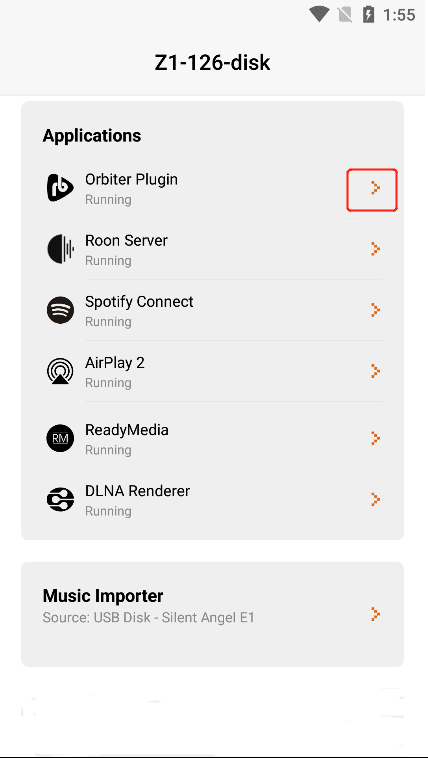
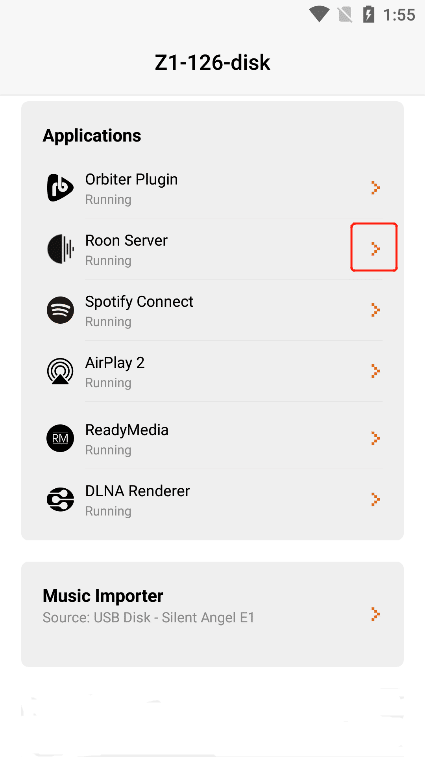
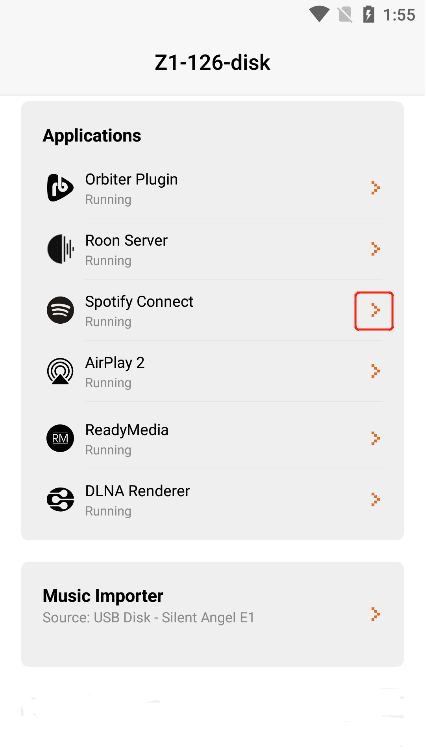
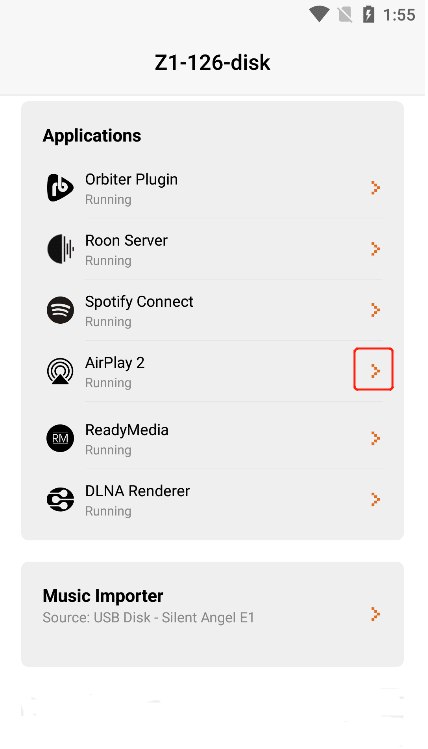
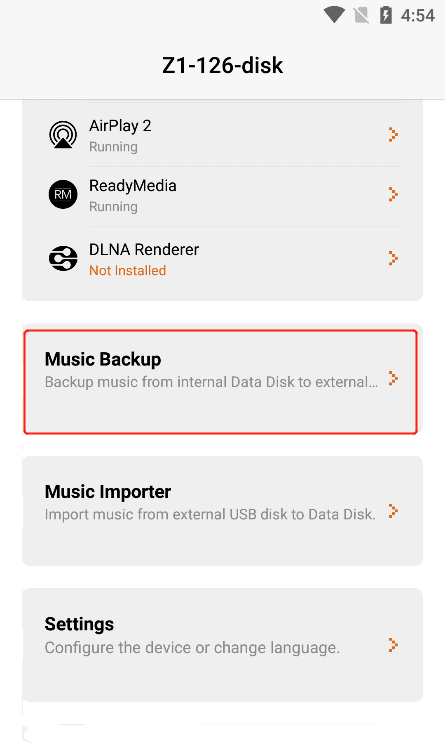
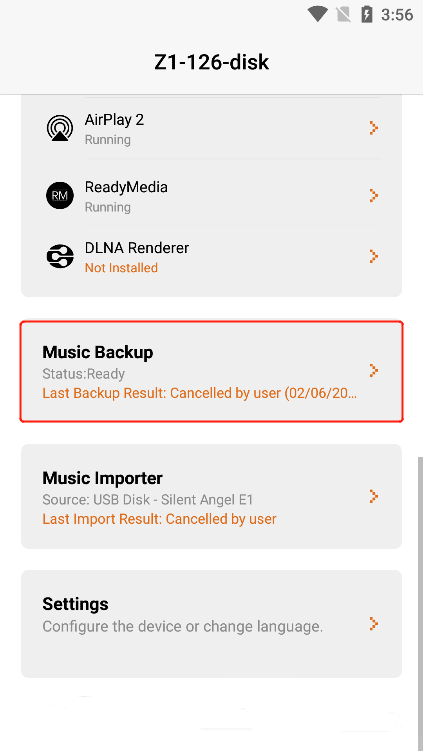
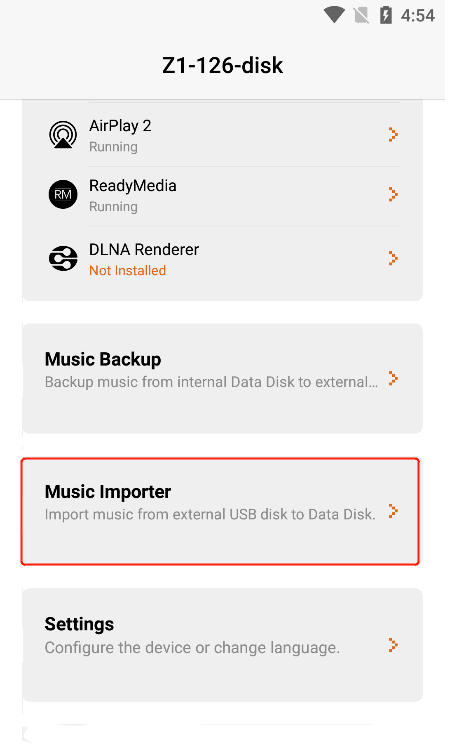
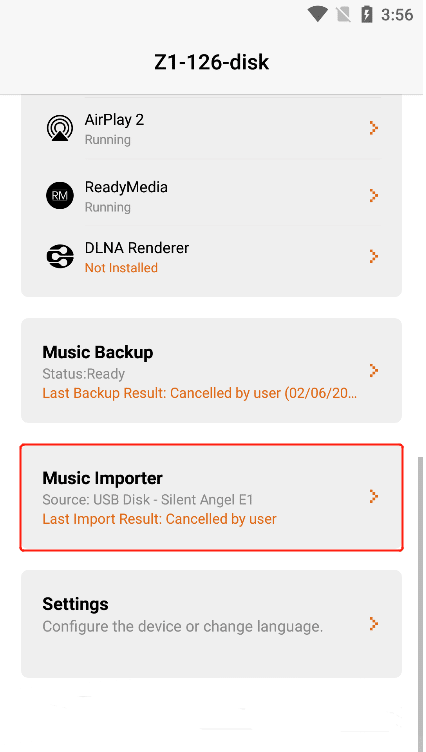
3.6. Application
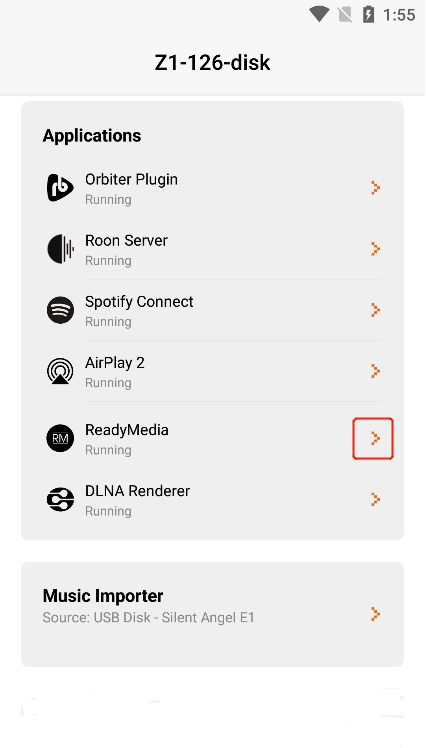
In the application list, you can view each " Application Running Status " ("Running ", " Stopped ", " Not Installed"), and Click the " > " button corresponding to the application to enter the application operation.
3.6.1. Orbiter Plugin
Click the ">" button corresponding to "Orbiter Plugin" to enter the application operation interface.
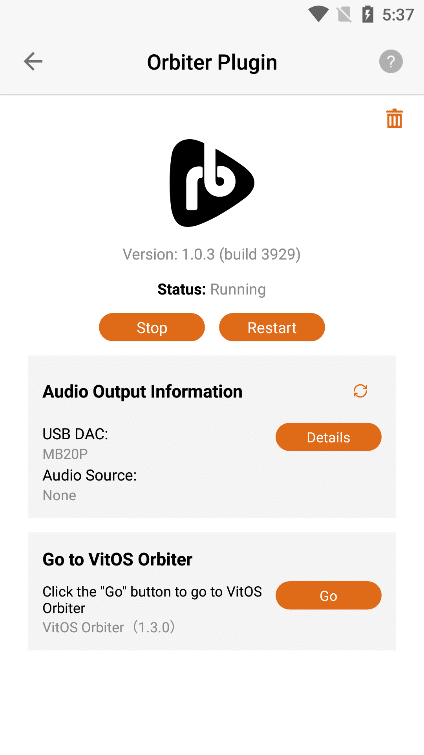
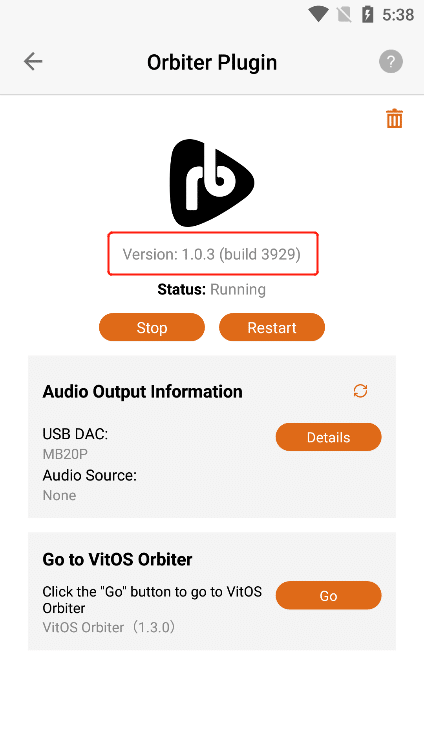
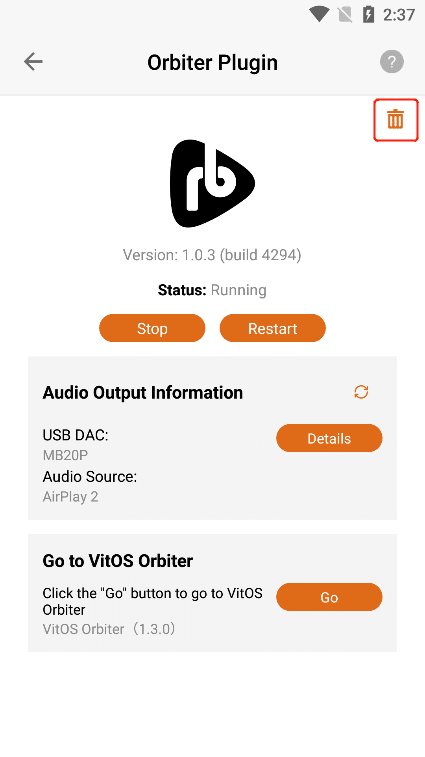
3.6.1.1. Orbiter Plugin Version
After entering the "Orbiter Plugin" application interface, you can view the "Version" information of the application.
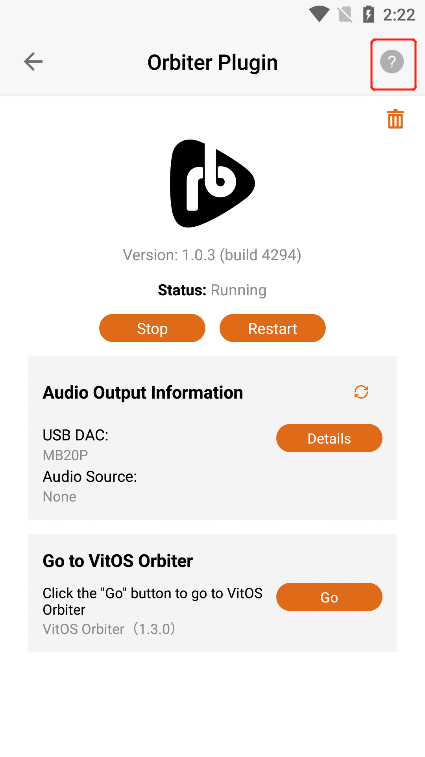
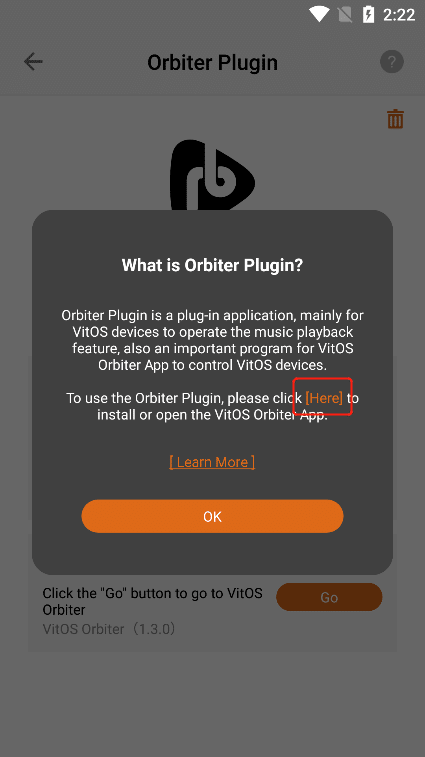
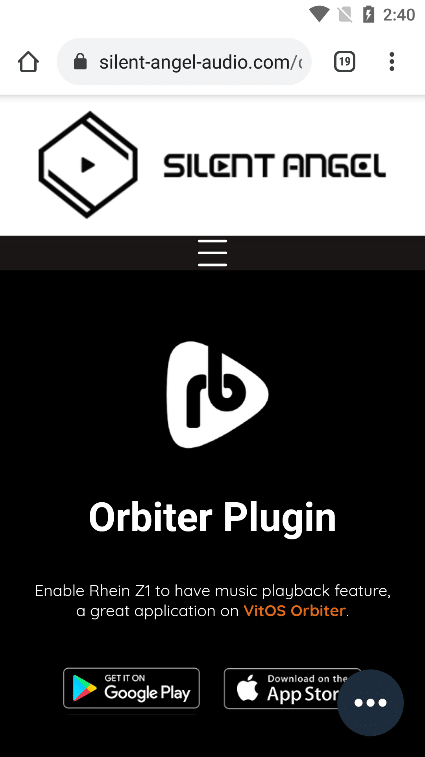
3.6.1.2. What is Orbiter Plugin?
Click the "?" button in the upper right corner to view the "Orbiter Plugin" application information.

3.6.1.2.1. Open or Download VitOS Orbiter
Click "Here" , if you have downloaded it, you can directly open the "VitOS Orbiter" App . If you haven't downloaded "VitOS Orbiter", you can jump to the App market or APP Store to download and install the " VitOS Orbiter" App.
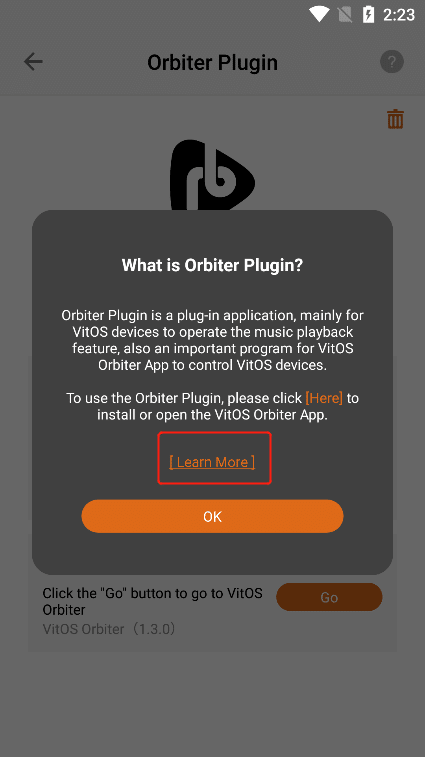
3.6.1.2.2. Learn More
can view the "Orbiter Plugin" application information below, if you Click "Learn More" , you can jump to the official website to view the details.

3.6.1.3. Orbiter Plugin Status
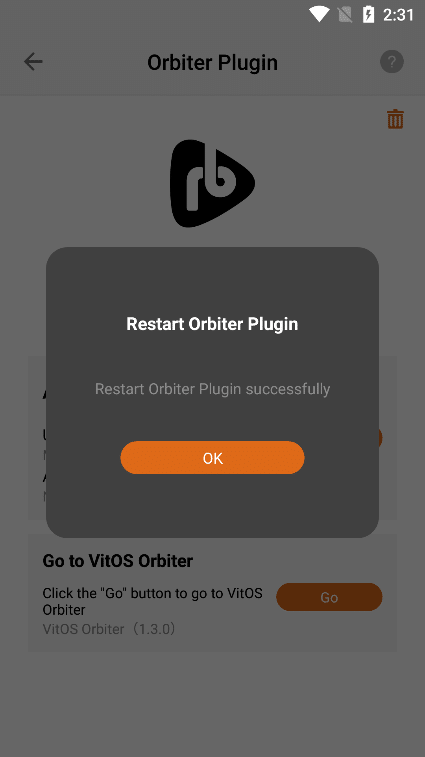
When the status bar shows "Running" , Click the "Stop" button to stop the Orbiter Plugin application,The Status bar displays "Stopped".
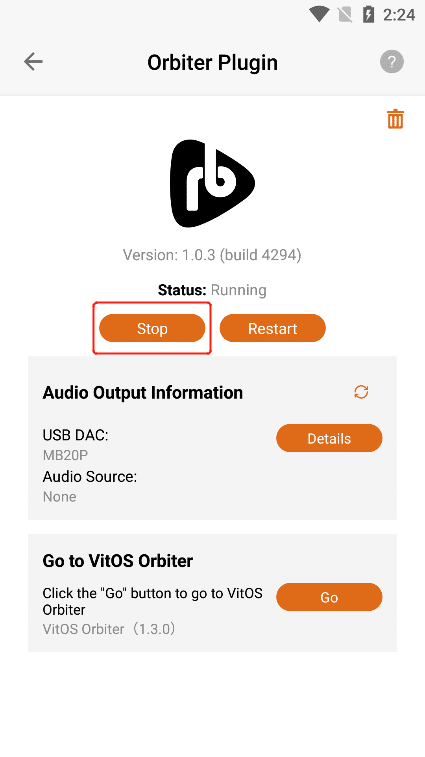
When the status bar shows "Running" , Click the "Restart" button to restart the Orbiter Plugin application.

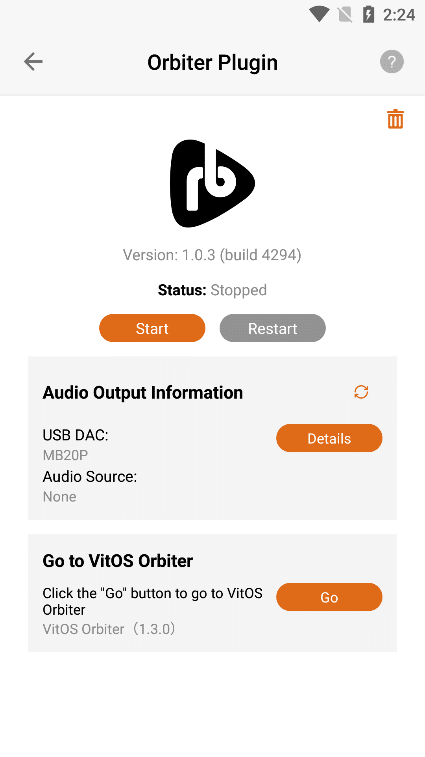
When the status bar displays "Stopped" , Click the "Start" button to start the Orbiter Plugin application,The Status bar displays "Running".


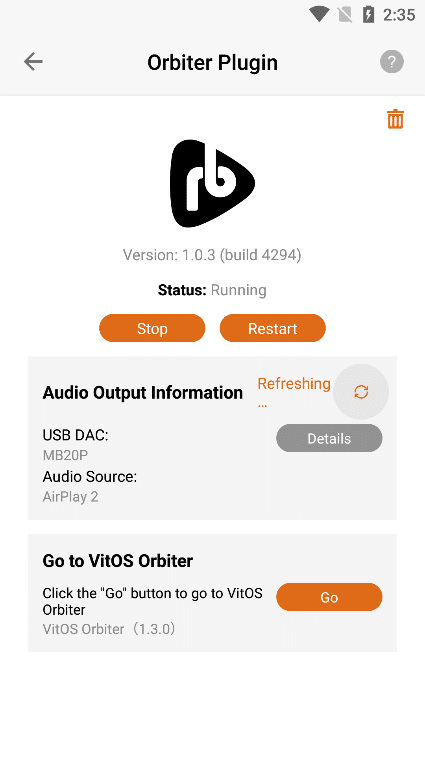
3.6.1.4. Audio Output Information
3.6.1.4.1. USB DAC Details
Confirm that the current Z1 device is connected to the "USB DAC" , and Click the "Details" button to the right of the "USB DAC" to view the details of the USB DAC connected to the current Z1 device.
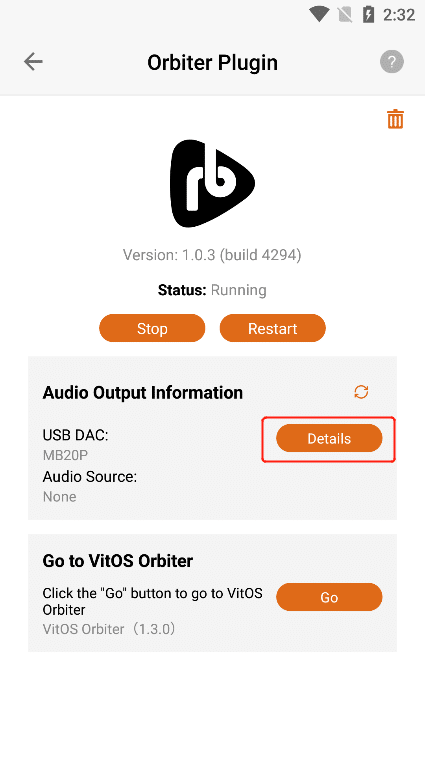
3.6.1.4.2. Audio Source
You can connect the Z1 device to play music through applications such as "Orbiter Plugin" , " Airplay2 " , "DLNA Renderer", " Spotify Connect" , " Roon Server" , etc. "Audio Source" shows the application name of the music you are currently playing , if the Z1 device is not connected to play music, it will display "None" , and if the Z1 device is connected to pause or not play music, it will display "None" .
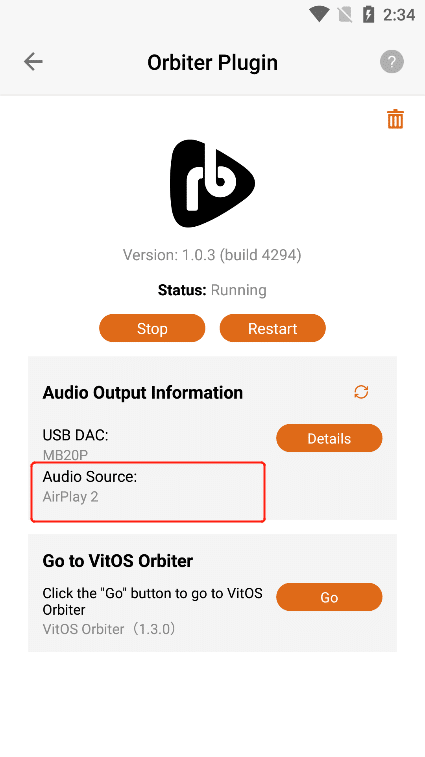

3.6.1.4.3. Refresh Audio Output Information
If the latest information is not updated in "USB DAC" or "Audio Source" , you can Click the "Refresh" button to update the data.
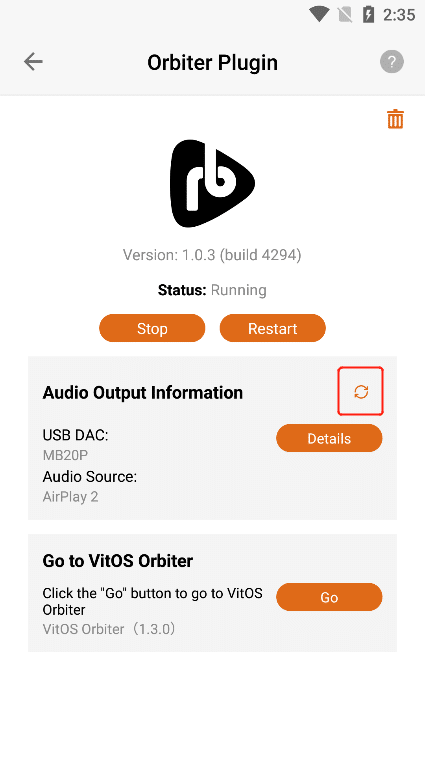
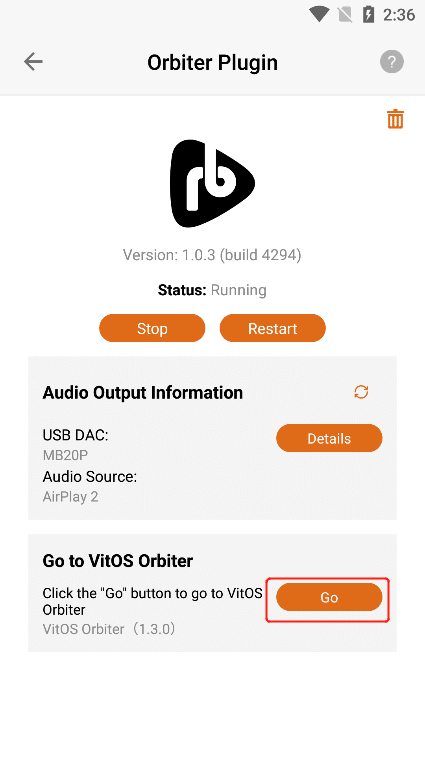
3.6.1.5. Go App
Click the "Go" button to directly open the "VitOS Orbiter" App if you have downloaded it . If you haven't downloaded "VitOS Orbiter", you can jump to the app market or APP Store to download and install the " VitOS Orbiter" app.
3.6.1.6. Uninstall Orbiter Plugin
Click the "Uninstall" button in the upper right corner, and then Click the "Confirm" button on the confirmation uninstall interface .
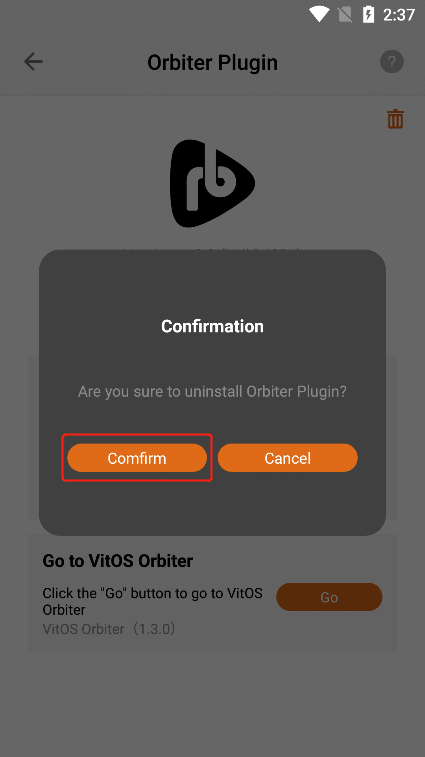
Clicking the "Confirm" button, the "Orbiter Plugin" application can be uninstalled, and the application status is "Not yet installed" .
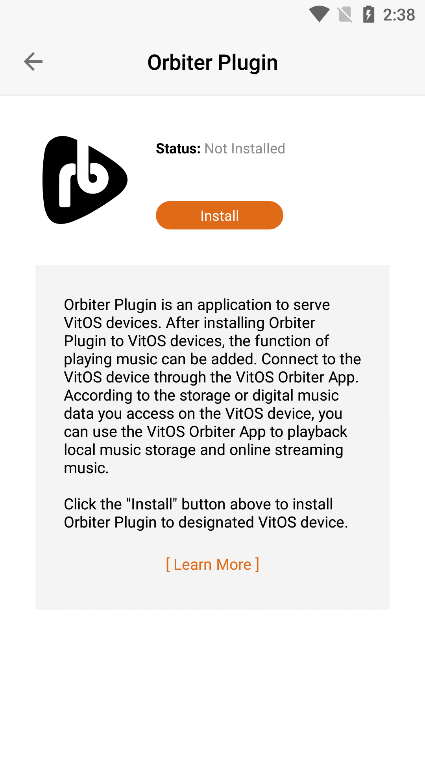
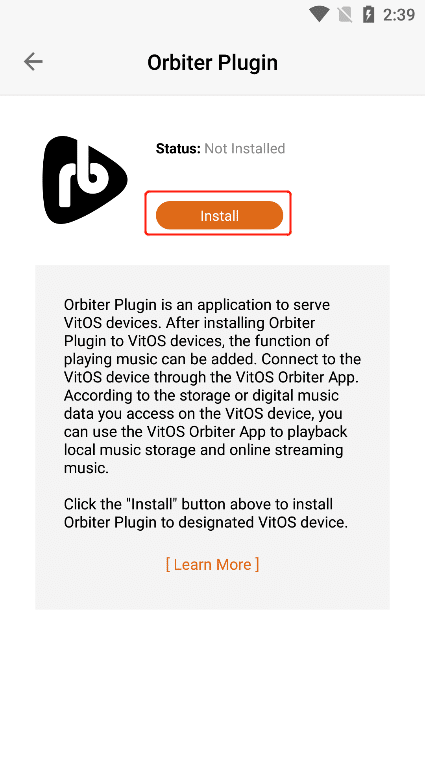
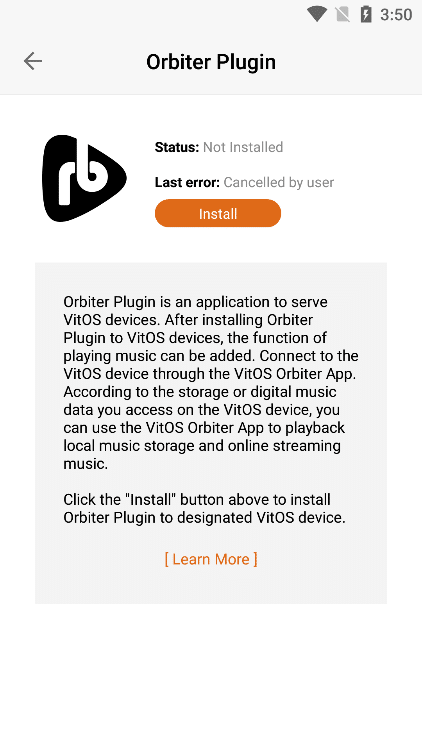
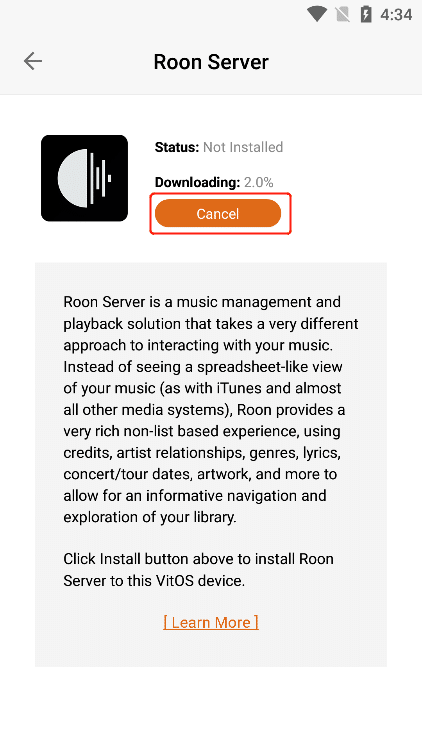
3.6.1.7. Install Orbiter Plugin
When the Orbiter Plugin application status is "Not lnstalled" , Click the "Install" button to start the download and installation.
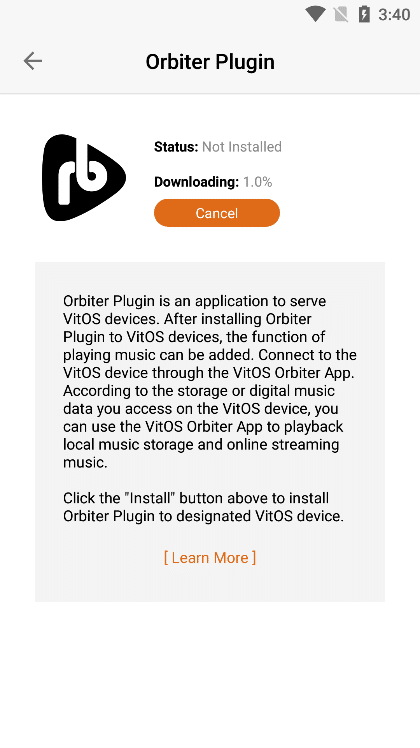
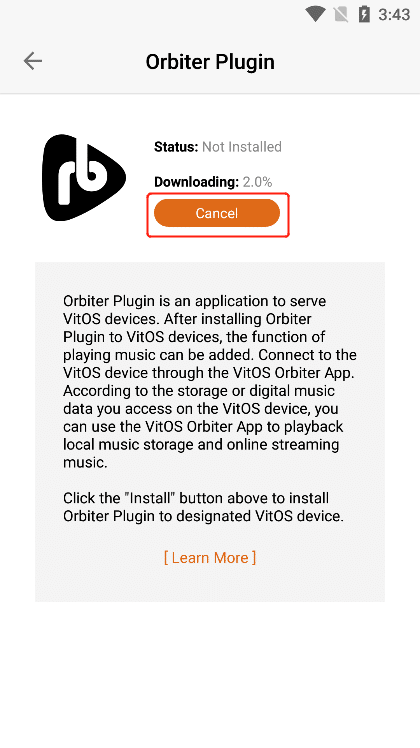
3.6.1.7.1. Cancel The Installation
When "Downloading" is displayed , Click the "Cancel" button to cancel the installation. The last error was "Cancelled by user" .
3.6.1.7.2. Learn More
can view the "Orbiter Plugin" application information below, if you Click "Learn More" , you can jump to the official website to view the details.

3.6.2. Roon Server
Click the ">" button corresponding to "Roon Server" to enter the application operation interface.

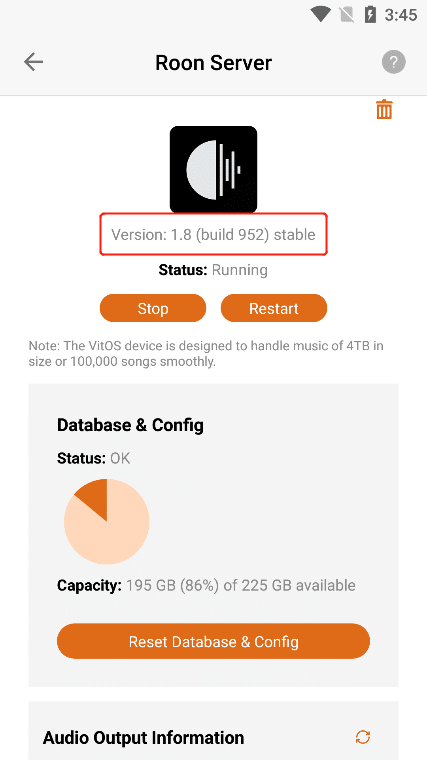
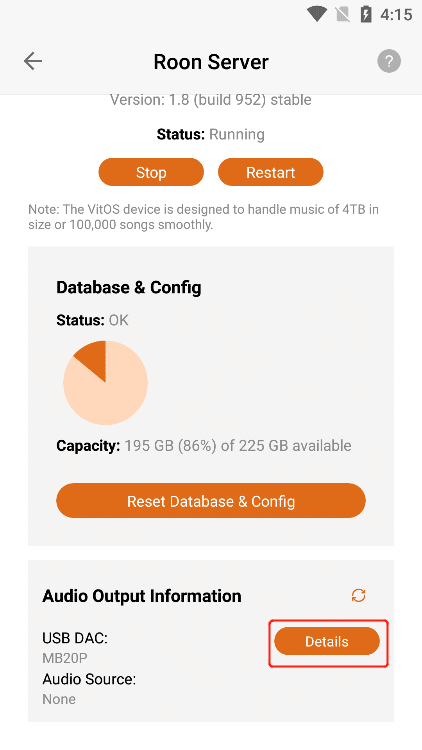
3.6.2.1. Roon Server Version
After entering the " Roon Server " interface, you can view the " Version " information of the application.
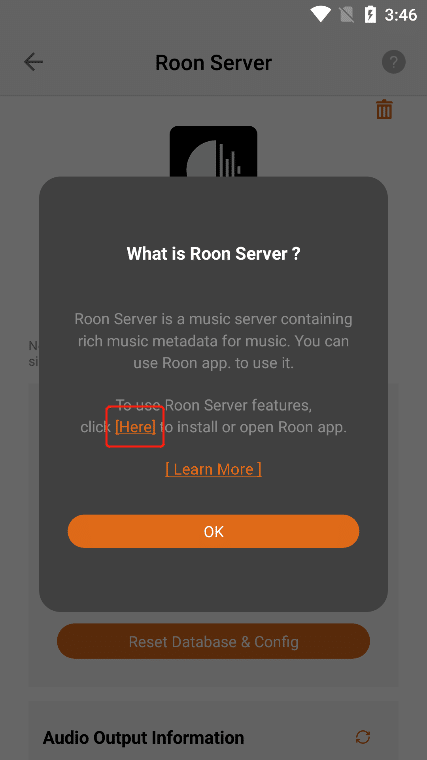
3.6.2.2. What Is Roon Server?
Click the "?" button in the upper right corner to view the "Roon Server" application information.


3.6.2.2.1. Open or Download Roon App
Click "Here" , if you have downloaded it, you can directly open the "Roon" App . If you haven't downloaded "Roon", you can jump to the app market or APP Store to download and install the "Roon" App.
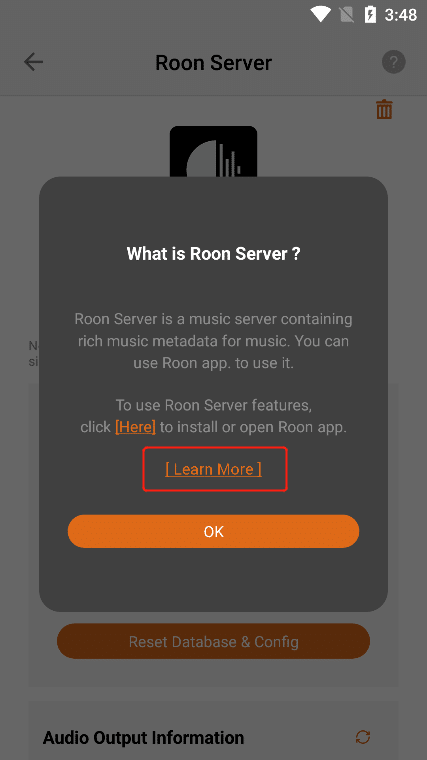
3.6.2.2.2. Learn More
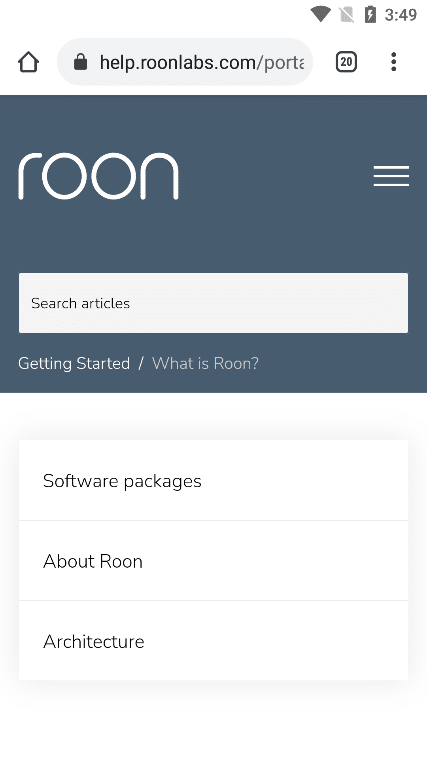
can view the "Roon Server" information below. If you Click "Learn More" , you can jump to the official website to view the details.

3.6.2.3. Roon Server Status
When the status bar shows "Running" , Click the "Stop" button to stop the Roon server,The Status bar displays "Stopped".


When the status bar shows "Running" , Click the "Restart" button to restart the Roon server.

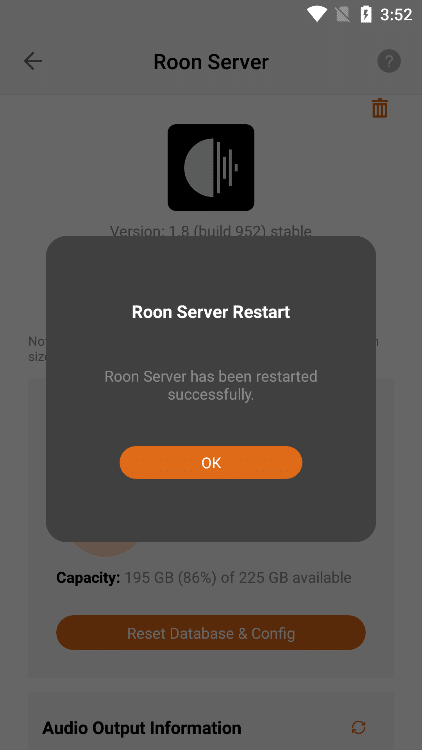
When the status bar displays "Stopped" , Click the "Start" button to start the Roon server,The Status bar displays "Running".
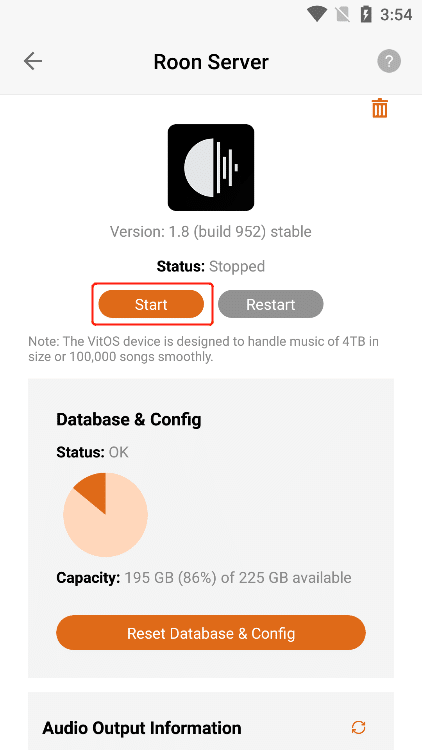

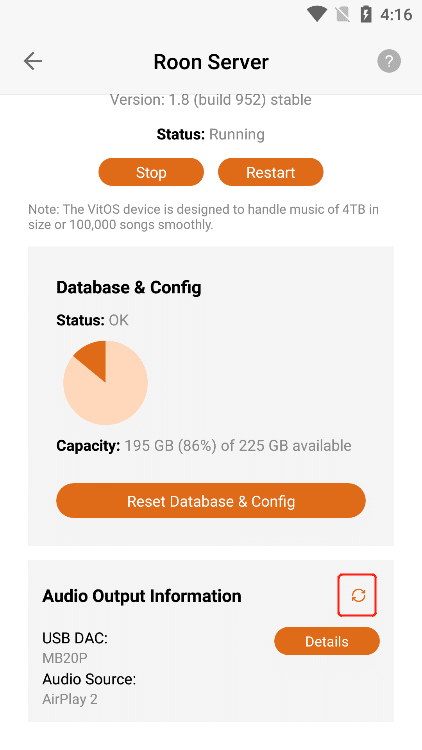
3.6.2.4. Database & Config
In "Database & Config" , view the "Status" 、"Total Data Capacity" and "Remaining Available capacity" of the database in "Roon Server".

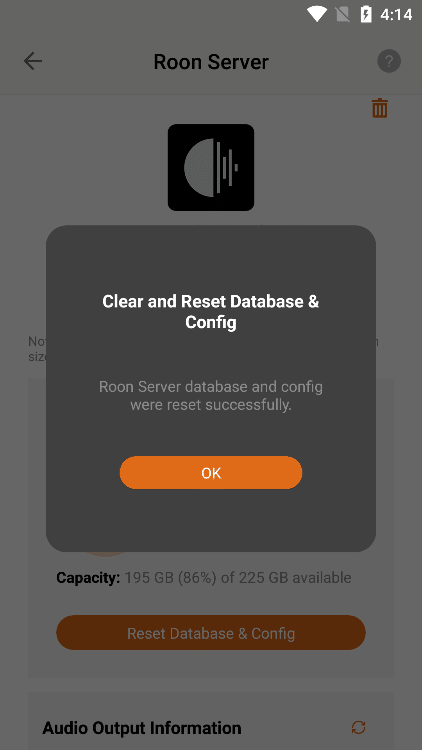
3.6.2.4.1. Reset Database & Config
Click the "Reset Database & Config" button, and then Click the "OK" button.
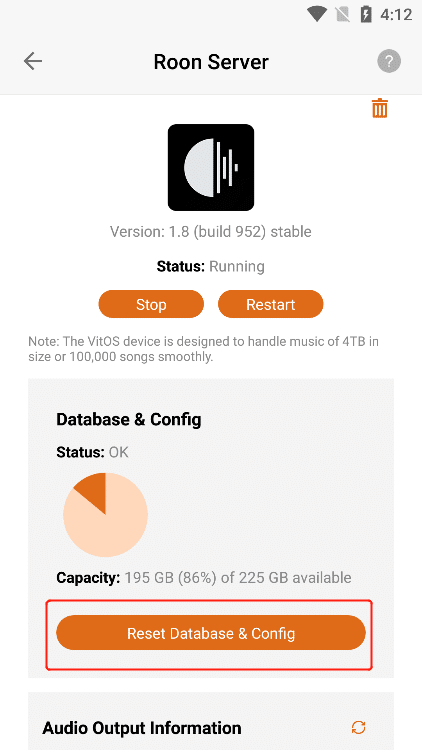
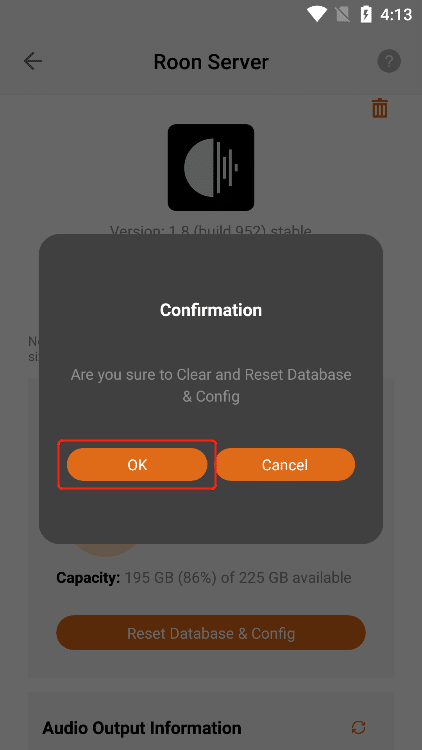
The relevant configuration data in the "Roon Server" in the current Z1 device can be cleared and reset.
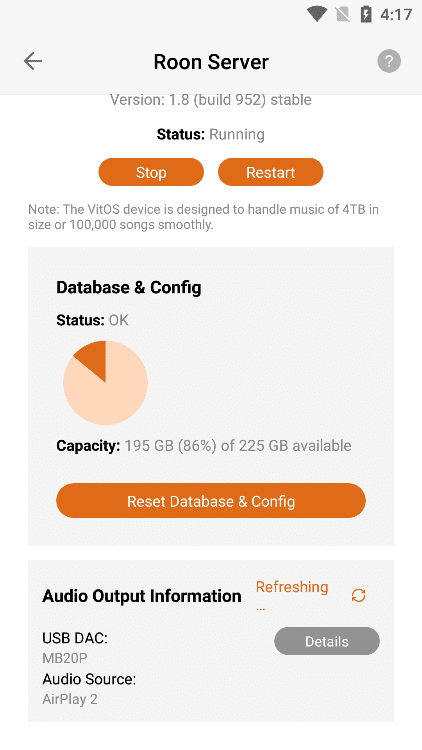
3.6.2.5. Audio Output Information
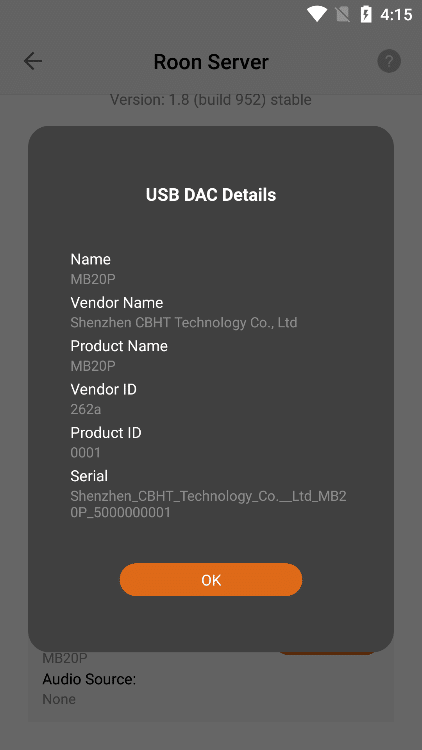
3.6.2.5.1. USB DAC Details
Confirm that the current Z1 device is connected to the "USB DAC" , and Click the "Details" button to the right of the "USB DAC" to view the details of the USB DAC connected to the current Z1 device.
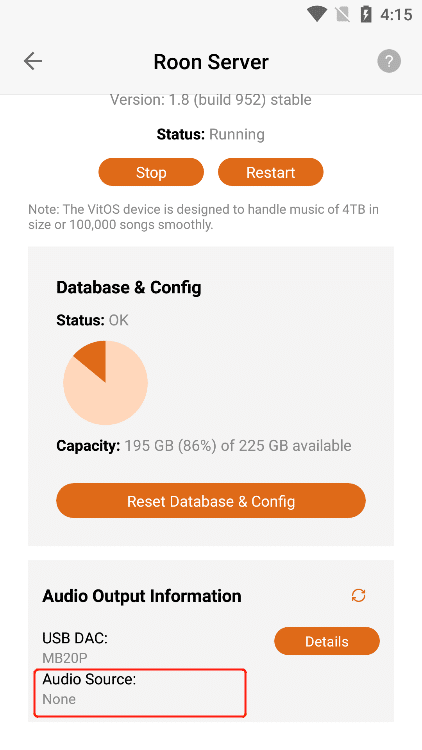
3.6.2.5.2. Audio Source
You can connect the Z1 device to play music through applications such as "Orbiter Plugin" , " Airplay2 " , "DLNA Renderer", " Spotify Connect" , " Roon Server" , etc. "Audio Source" shows the application name of the music you are currently playing , if the Z1 device is not connected to play music, it will display "None" , and if the Z1 device is connected to pause or not play music, it will display "None" .

3.6.2.5.3. Refresh Audio Output Information
If the latest information is not updated in "USB DAC" or "Audio Source" , you can Click the "Refresh" button to update the data.
3.6.2.6. Uninstall Roon Server
Click the "Uninstall" button in the upper right corner , and then Click the "Uninstall" button on the confirmation uninstall interface .
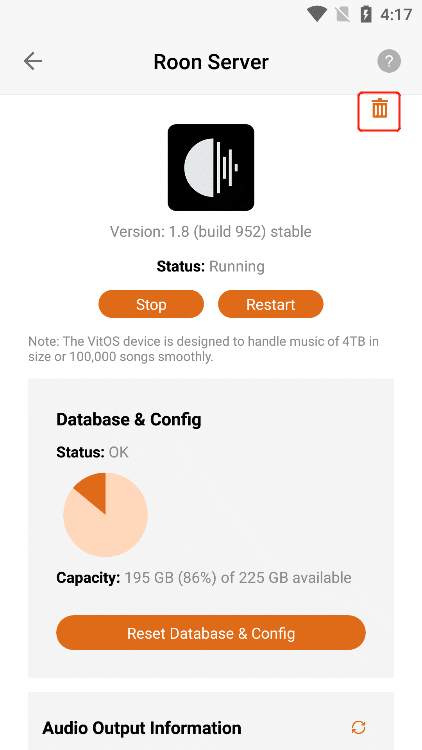
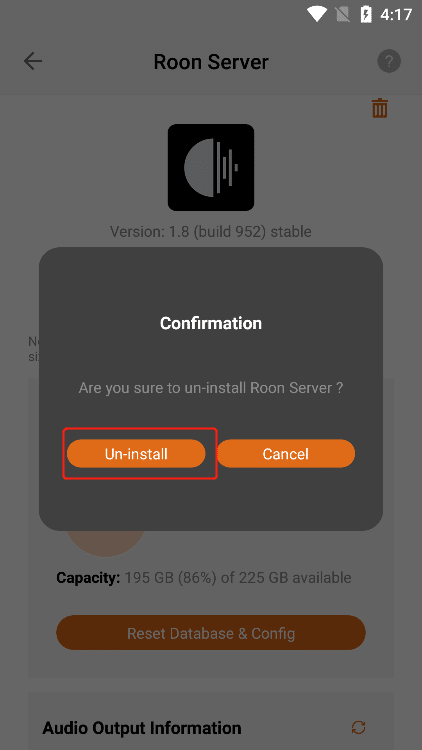
Clicking the "Uninstall" button, the "Roon Server" application can be uninstalled, and the application status is "Not lnstalled" .

3.6.2.7. Install Roon Server
When the Roon server status is "Not lnstalled" , Click the "Install" button to start the download and installation.


3.6.2.7.1. Cancel The Installation
When "Downloading" is displayed , Click the "Cancel" button to cancel the installation. The last error was "Cancelled by user" .

3.6.2.7.2. Learn More
can view the "Roon Server" information below. If you Click "Learn More" , you can jump to the official website to view the details.

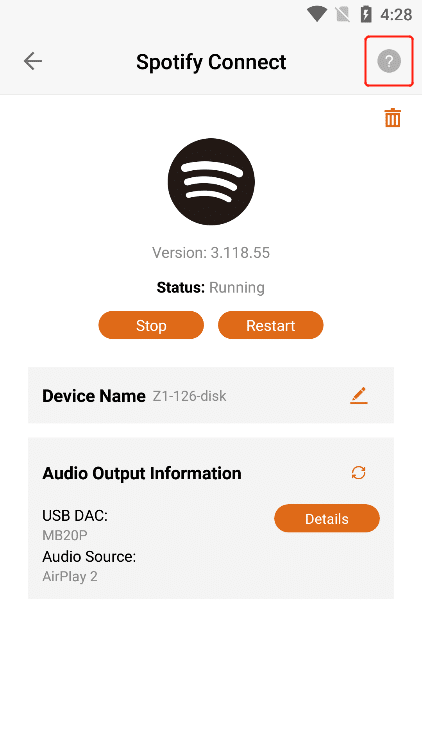
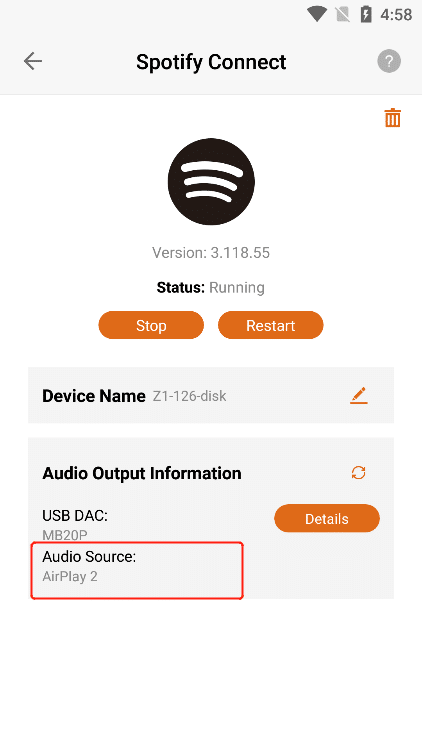
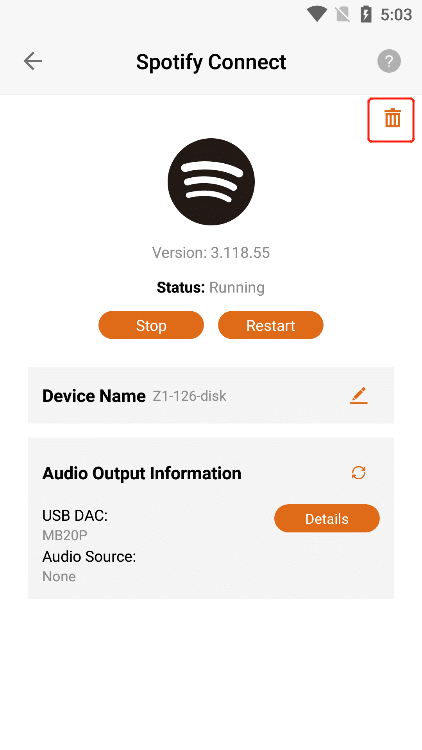
3.6.3. Spotify Connect
Click the ">" button corresponding to "Spotify Connect" to enter the operation interface of the application.
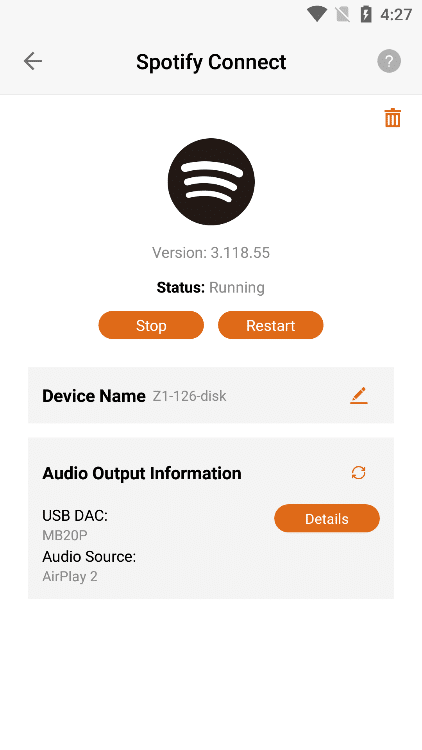
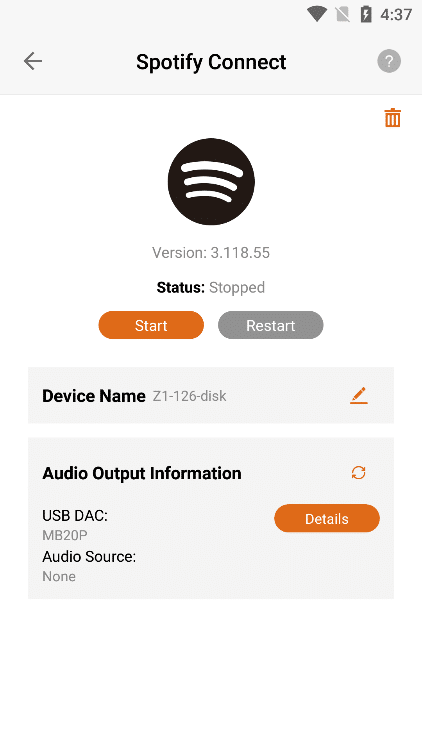
3.6.3.1. Spotify Connect Version
After entering the " Spotify Connect " application interface, you can view the " Version " information of the application.

3.6.3.2. What Is Spotify Connect?
Click the "?" button in the upper right corner to view the "Spotify Connect" application information.
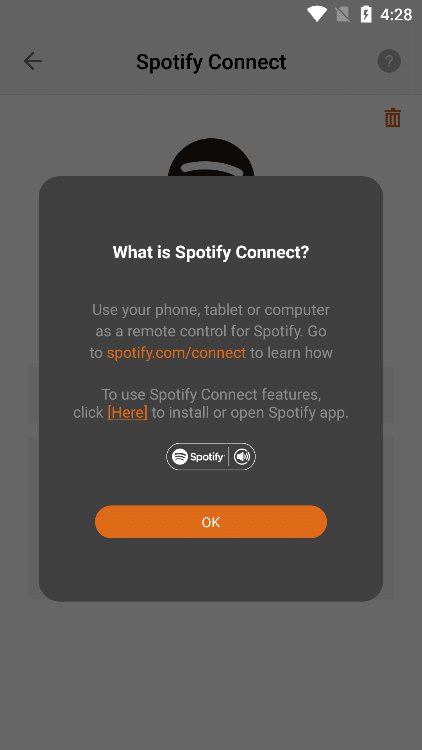
3.6.3.2.1. Open or download Spotify Connect
Click "Here" , if you have downloaded it, you can directly open the " Spotify Connect " App . If you haven't downloaded " Spotify Connect ", you can jump to the app market or APP Store to download and install the " Spotify Connect " app.
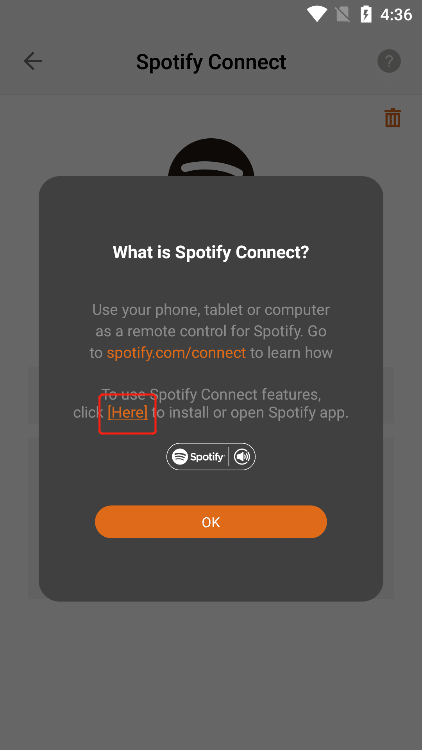
3.6.3.2.2. Learn More
can view the "Spotify Connect" application information below, if you Click "Spotify.com/connect" , you can jump to the official website to view the details.


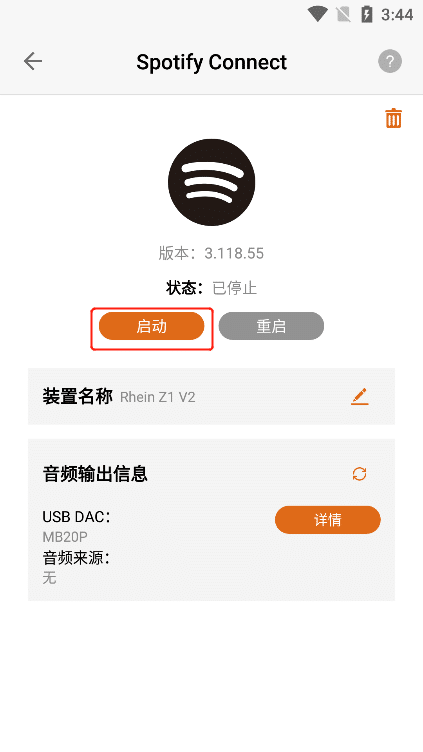
3.6.3.3. Spotify Connect Status
When the status bar shows "Running" , Click the "Stop" button to stop the Spotify Connect app,The Status bar displays "Stopped".

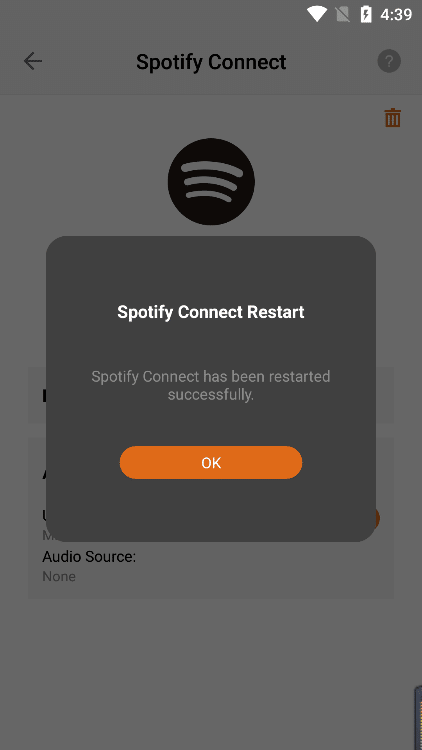
When the status bar shows "Running" , Click the "Restart" button to restart the Spotify Connect app.
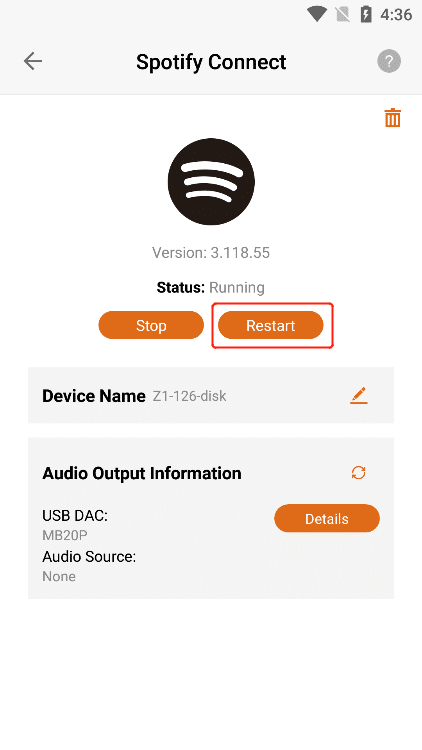
When the status bar shows "Stopped" , Click the "Start" button to start the Spotify Connect app,The Status bar displays "Running".

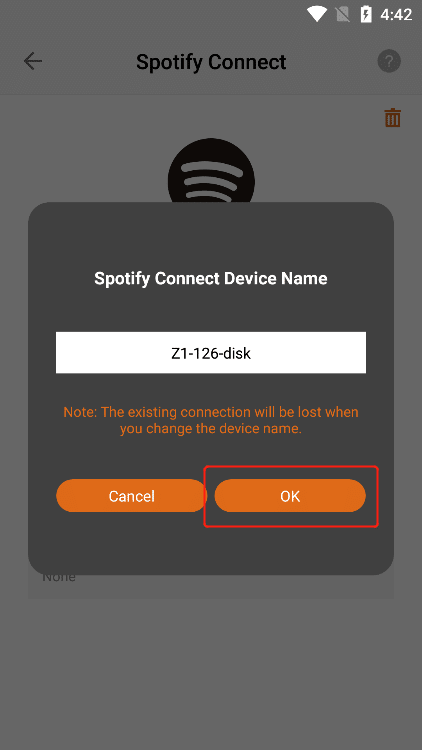
3.6.3.4. Device Name Modify
Display the name when you use the "Spotify" App to connect the Z1 device, Click the "Modify" button to modify the "New Connected Device Name" . (Note: This name only applies when you connect your device using the Spotity App)
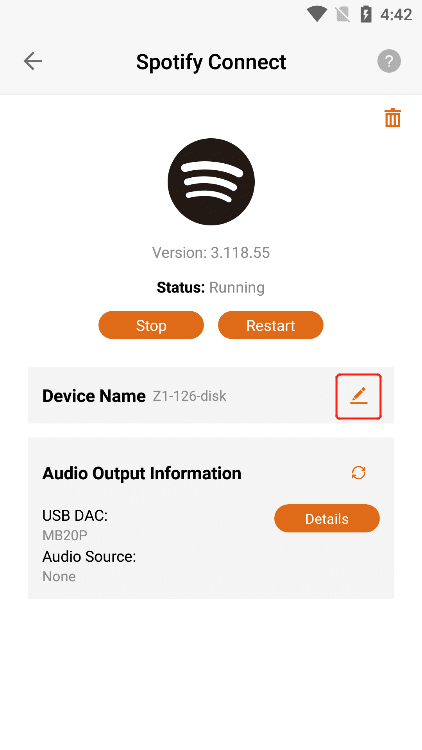
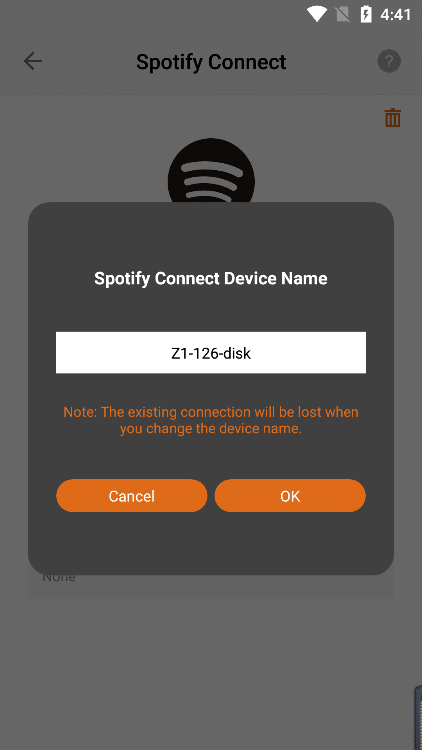
After entering the new device name, Click the "OK" button to successfully modify the name.
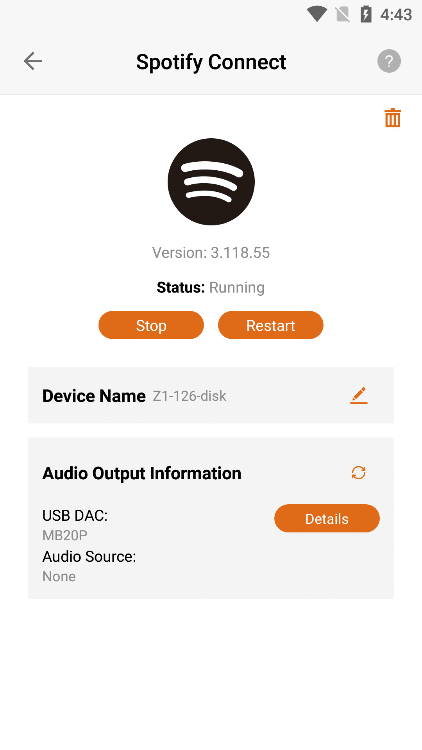
3.6.3.5. Audio Output Information
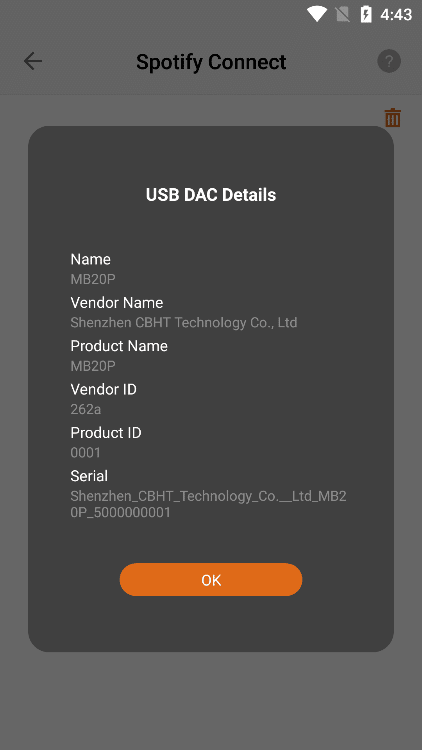
3.6.3.5.1. USB DAC Details
Confirm that the current Z1 device is connected to the "USB DAC" , and Click the "Details" button to the right of the "USB DAC" to view the details of the USB DAC connected to the current Z1 device.
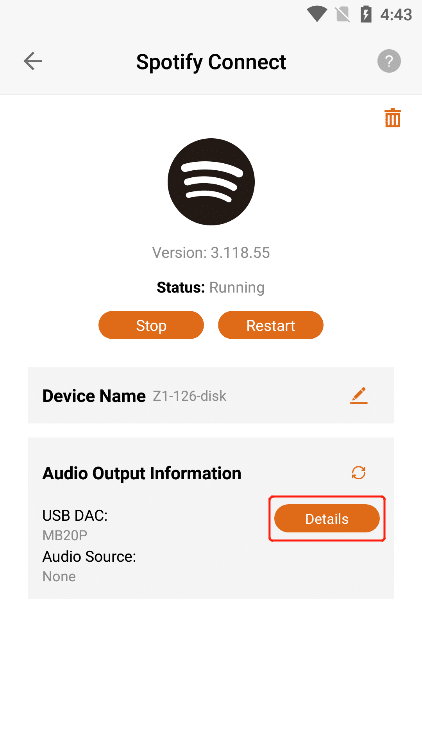
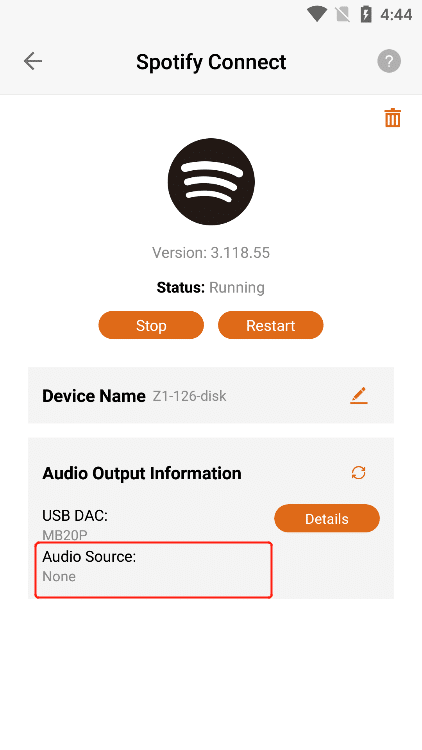
3.6.3.5.2. Audio Source
You can connect the Z1 device to play music through applications such as "Orbiter Plugin" , " Airplay2 " , "DLNA Renderer", " Spotify Connect" , " Roon Server" , etc. "Audio Source" shows the application name of the music you are currently playing , if the Z1 device is not connected to play music, it will display "None" , and if the Z1 device is connected to pause or not play music, it will display "None" .
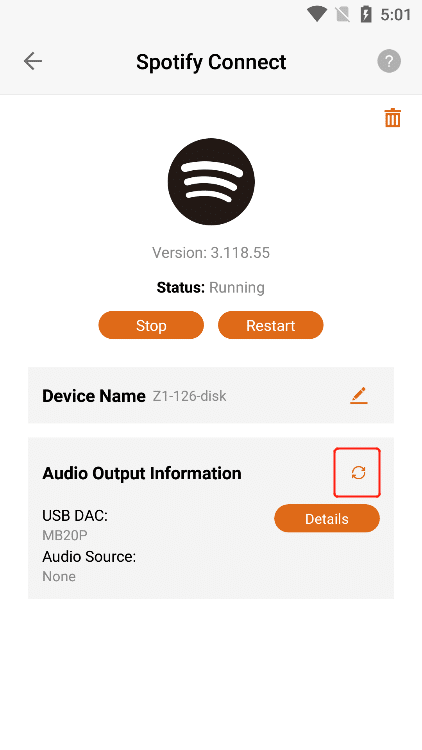
3.6.3.5.3. Refresh Audio Output Information
If the latest information is not updated in "USB DAC" or "Audio Source" , you can Click the "Refresh" button to update the data.

3.6.3.6. Uninstall Spotify Connect
Click the "Uninstall" button in the upper right corner , and then Click the "Uninstall" button on the confirmation uninstall interface .
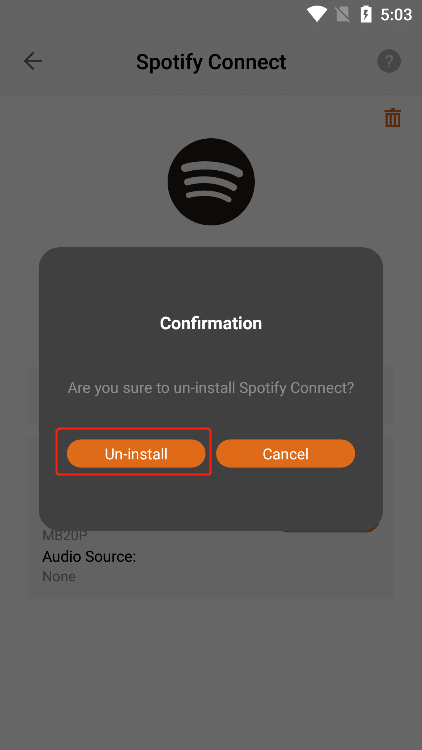
Clicking the "Uninstall" button, the "Spotify Connect" application can be uninstalled, and the application status is "Not Installed" .
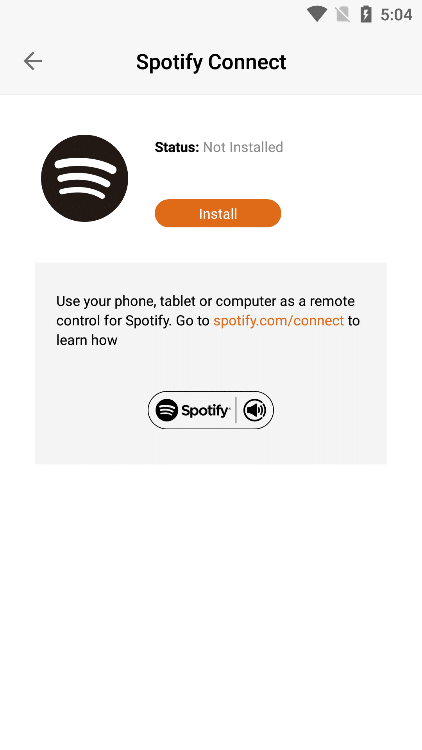
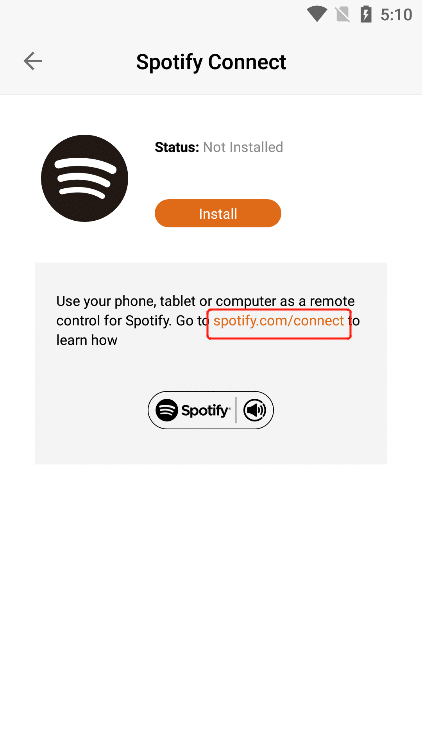
3.6.3.7. Install Spotify Connect
When the status of Spotify Connect is "Not lnstalled" , Click the "Install" button to start the download and installation.

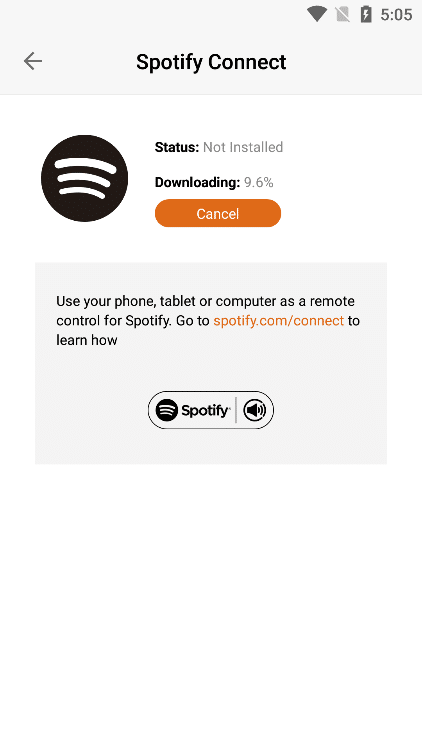
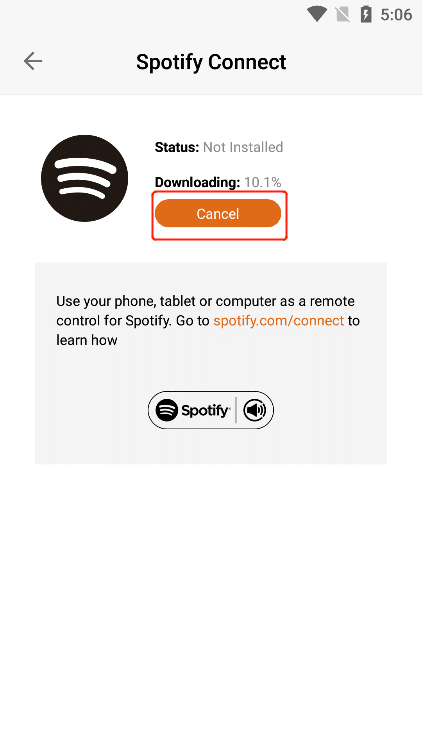
3.6.3.7.1. Cancel The Installation
When "Downloading" is displayed , Click the "Cancel" button to cancel the installation. The last error was "Cancelled by user" .

3.6.3.7.2. Learn More
can view the "Spotify Connect" information below, if you Click "Spotify.com/connect" , you can jump to the official website to view the details.
3.6.4. AirPlay2
Click the ">" button corresponding to "AirPlay2" to enter the application operation interface.

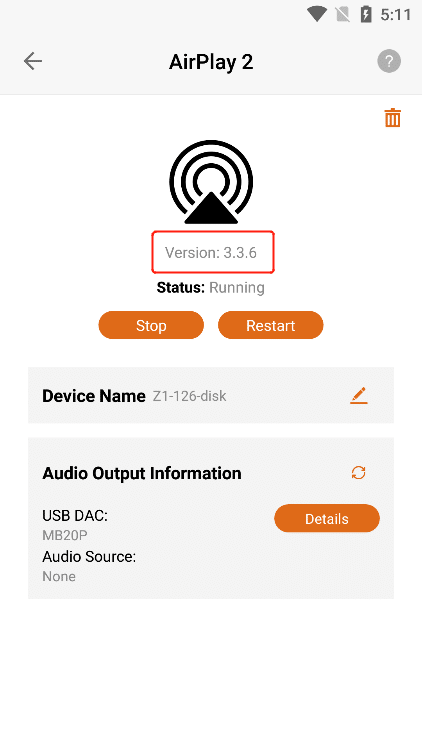
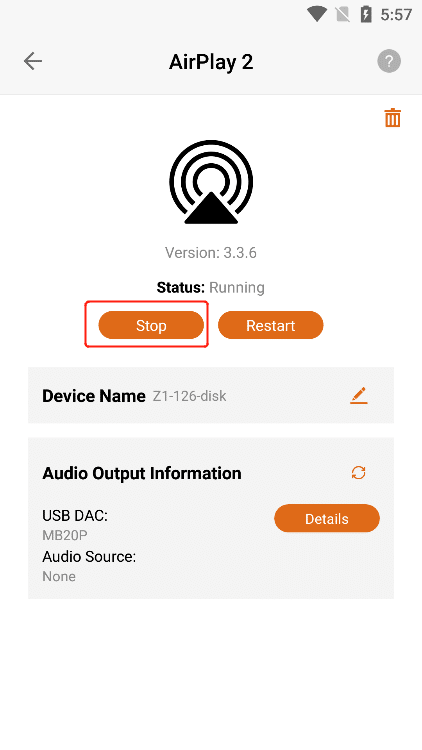
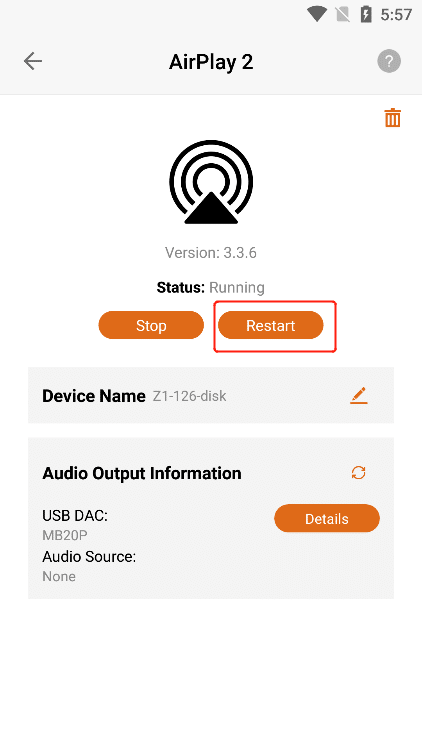
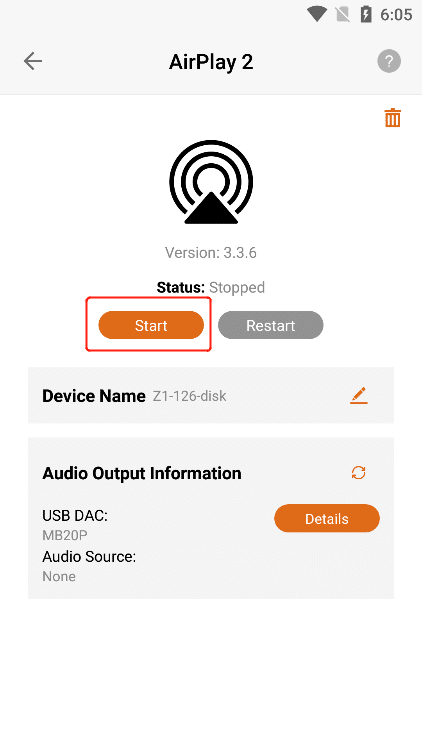
3.6.4.1. AirPlay2 Version
After entering the " AirPlay2 " application interface, you can view the " Version " information of the application.
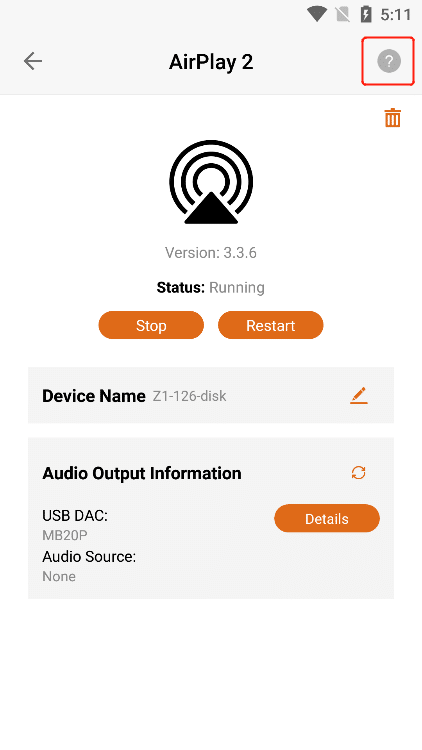
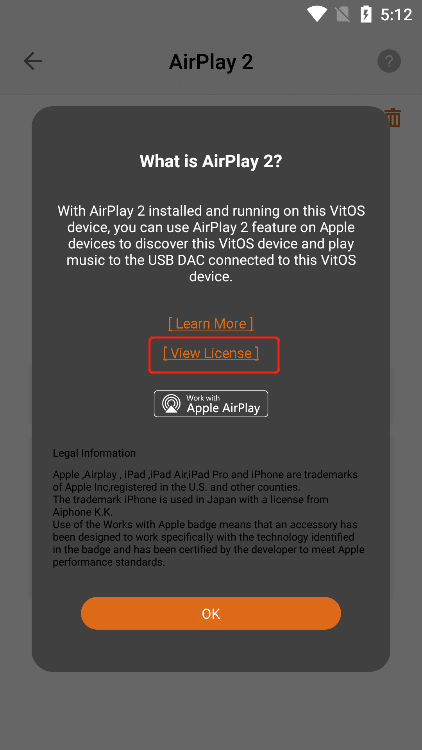
3.6.4.2. What is AirPlay2?
Click the "?" button in the upper right corner to view the "AirPlay2" application information.
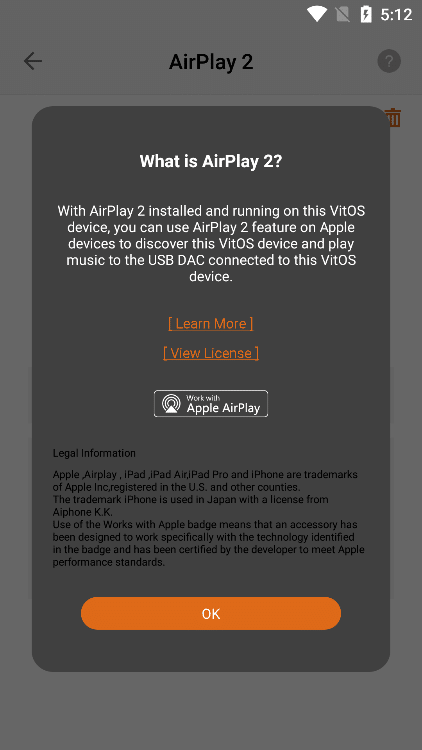
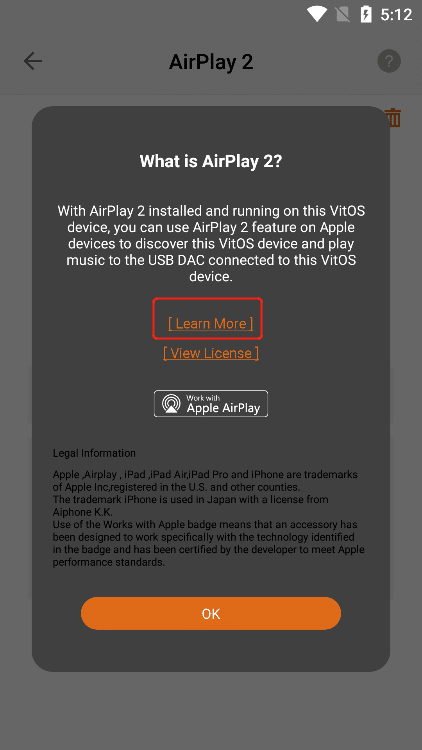
3.6.4.2.1. Learn More
can view the "AirPlay2" application information below. If you Click "Learn More" , you can jump to the official website to view the details.

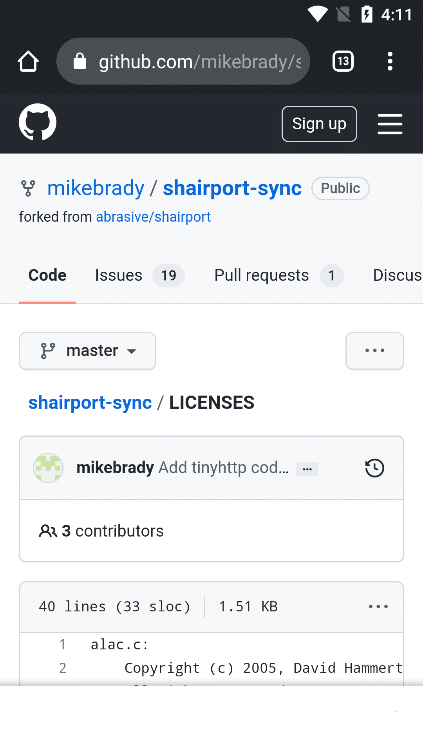
3.6.4.2.2. View License
Click "View License" to jump to the AirPlay2 authorization interface.
3.6.4.3. AirPlay2 Status
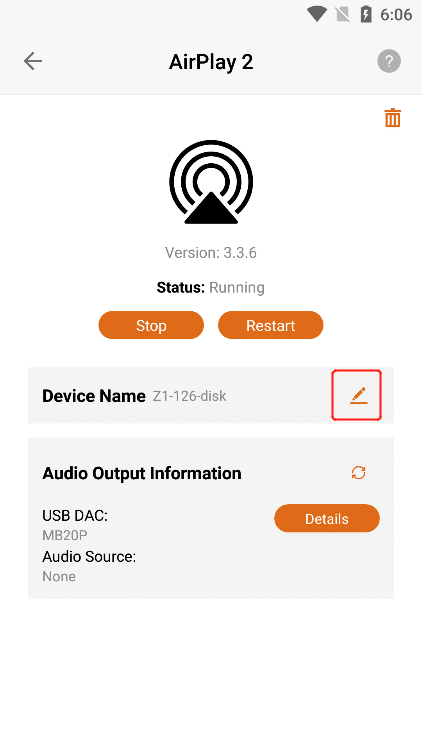
When the status bar shows "Running" , Click the "Stop" button to stop the AirPlay2 application,The Status bar displays "Stopped".

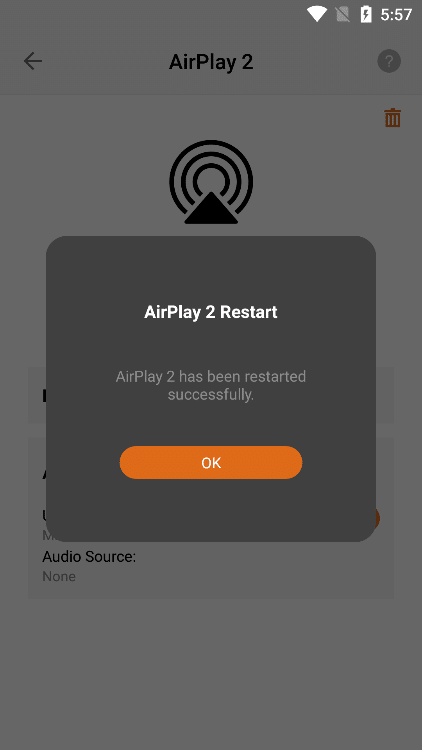
When the status bar shows "Running" , Click the "Restart" button to restart the AirPlay2 application.
When the status bar displays "Stopped" , Click the "Start" button to start the AirPlay2 application,The Status bar displays "Running".

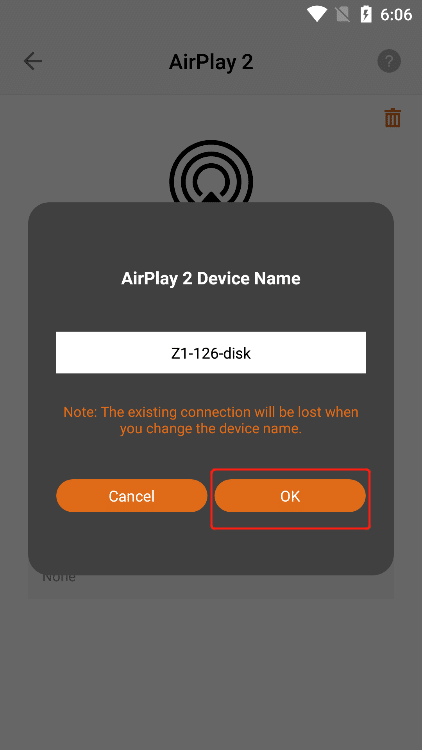
3.6.4.4. Device Name Modify
Display the name when you use "AirPlay2" to connect the Z1 device, Click the "Modify" button to modify the "New Connected Device Name" . (Note: This name only applies when you are using AirPlay2 to connect the device)
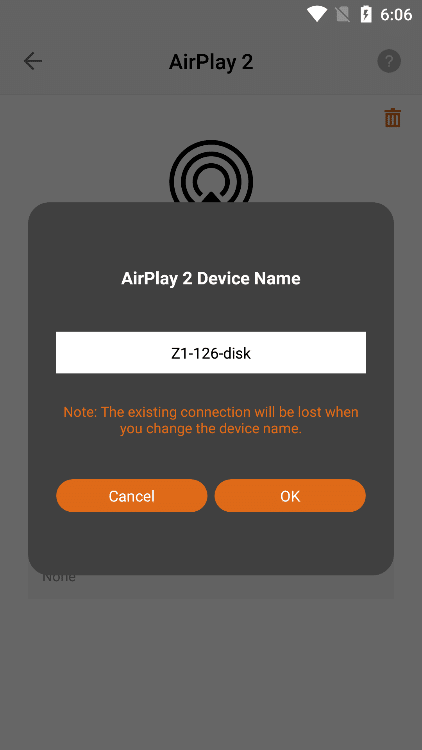
After entering the new device name, Click the "OK" button to successfully modify the name.
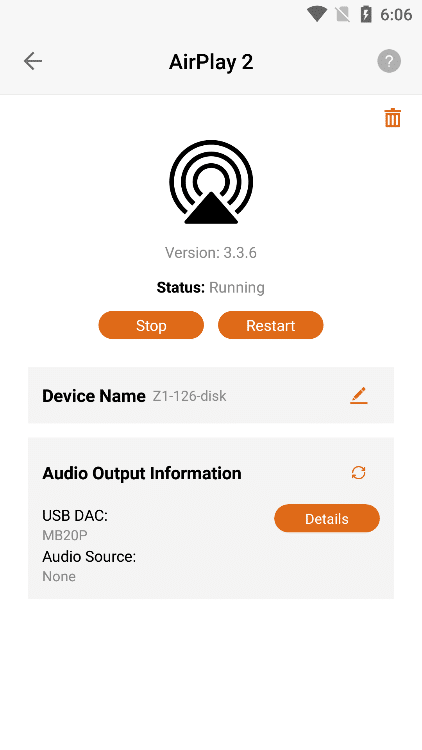
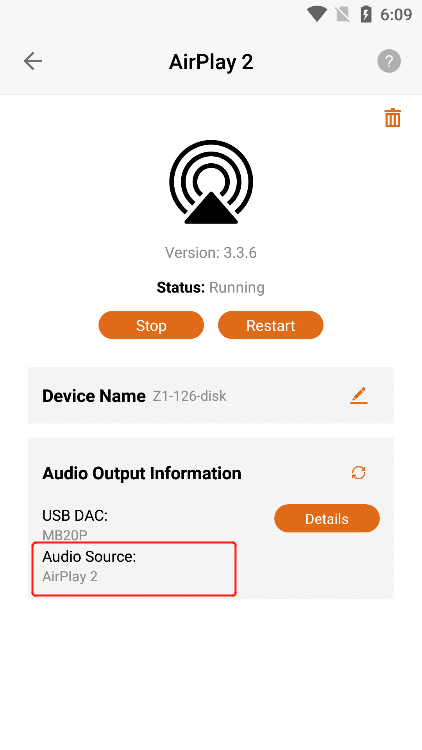
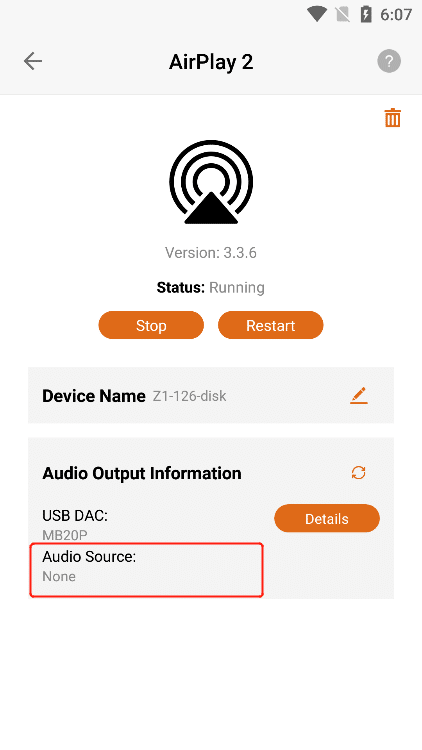
3.6.4.5. Audio Output Information
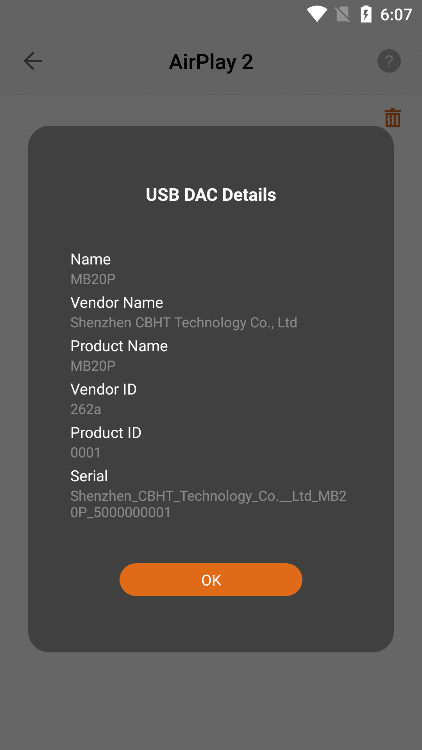
3.6.4.5.1. USB DAC Details
Confirm that the current Z1 device is connected to the "USB DAC" , and Click the "Details" button to the right of the "USB DAC" to view the details of the USB DAC connected to the current Z1 device.
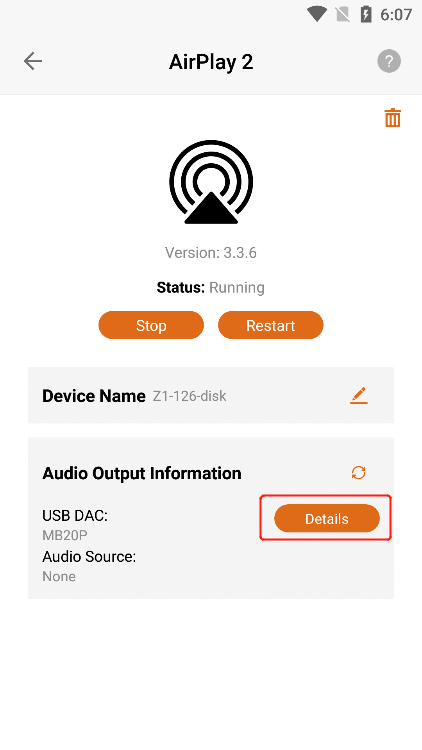
3.6.4.5.2. Audio Source
You can connect the Z1 device to play music through applications such as "Orbiter Plugin" , " Airplay2 " , "DLNA Renderer", " Spotify Connect" , " Roon Server" , etc. "Audio Source" shows the application name of the music you are currently playing , if the Z1 device is not connected to play music, it will display "None" , and if the Z1 device is connected to pause or not play music, it will display "None" .
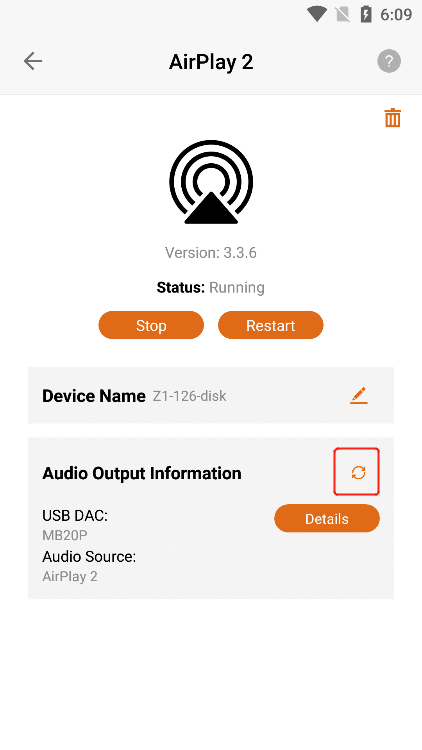
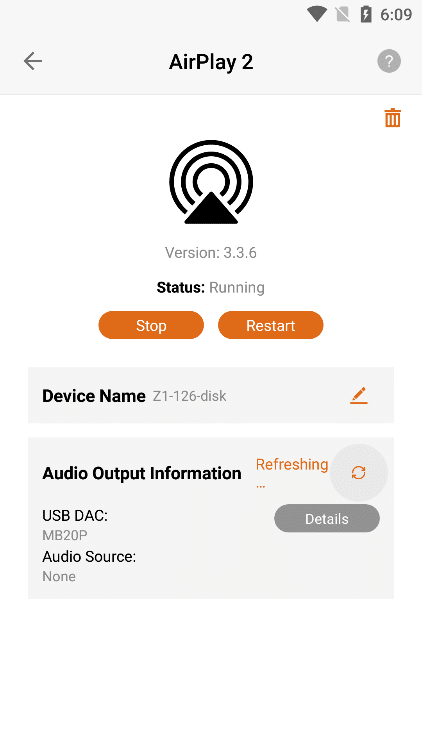
3.6.4.5.3. Refresh Audio Output Information
If the latest information is not updated in "USB DAC" or "Audio Source" , you can Click the "Refresh" button to update the data.
3.6.4.6. Uninstall AirPlay2
Click the "Uninstall" button in the upper right corner , and then Click the "Uninstall" button on the confirmation uninstall interface .

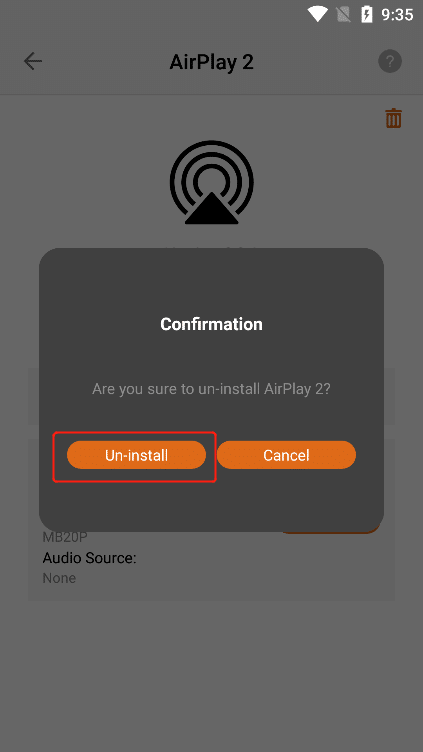
Clicking the "Uninstall" button, the "AirPlay2" application can be uninstalled, and the application status is "Not lnstalled" .
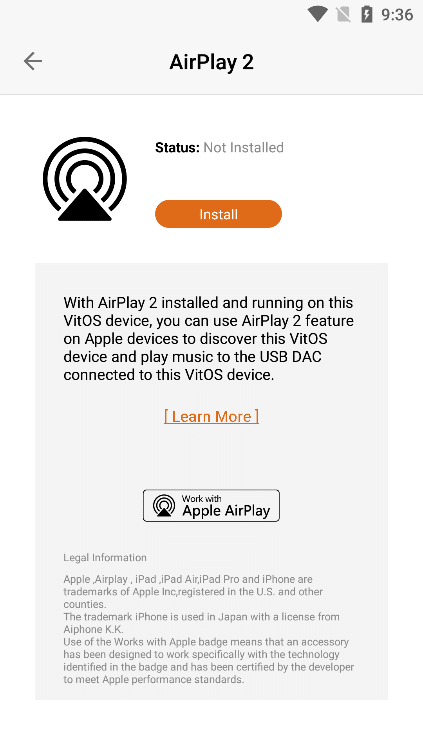
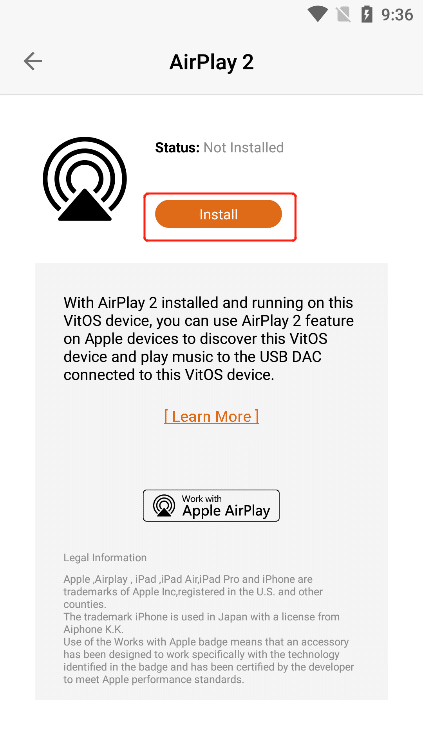
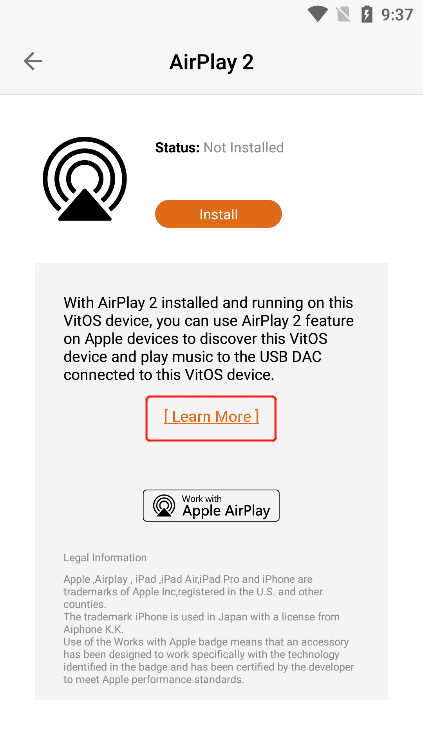
3.6.4.7. Install AirPlay2
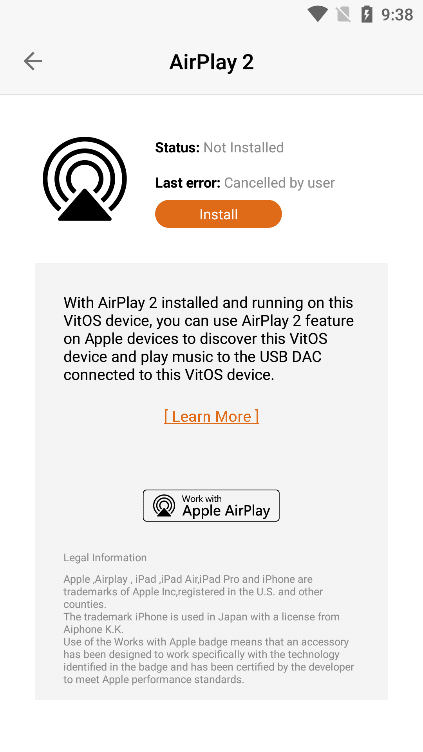
When the AirPlay2 status is "Not lnstalled" , Click the "Install" button to start the download and installation.
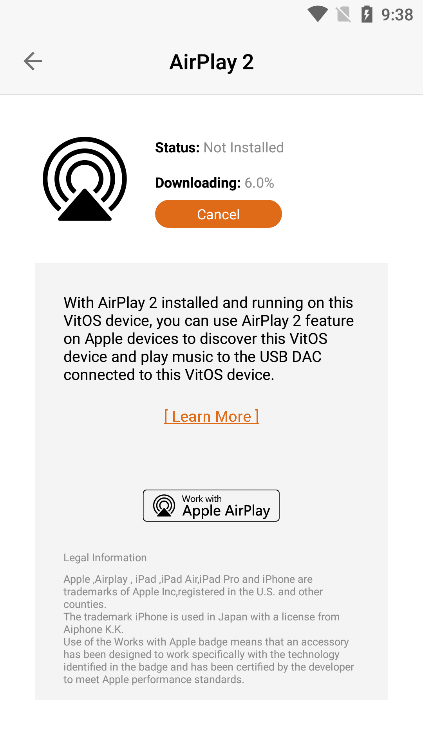
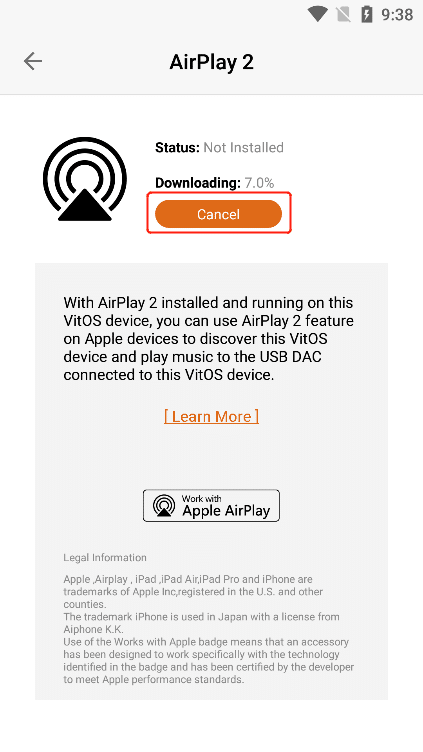
3.6.4.7.1. Cancel The Installation
When "Downloading" is displayed , Click the "Cancel" button to cancel the installation. The last error was "Cancelled by user" .
3.6.4.7.2. Learn More
can view the "AirPlay2" information below, if you Click "Learn More" , you can jump to the official website to view the details.

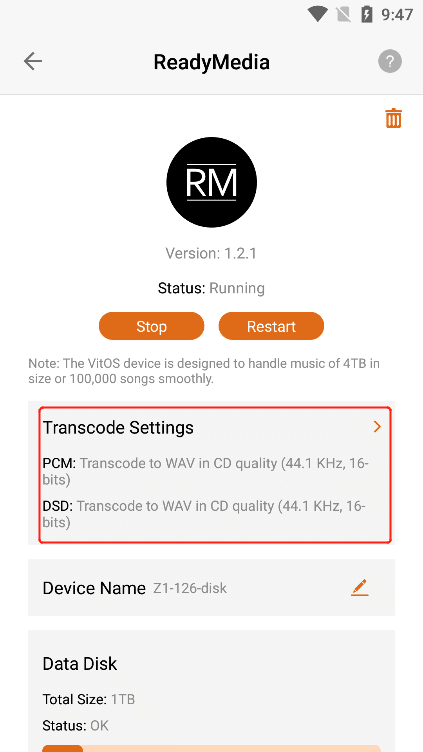
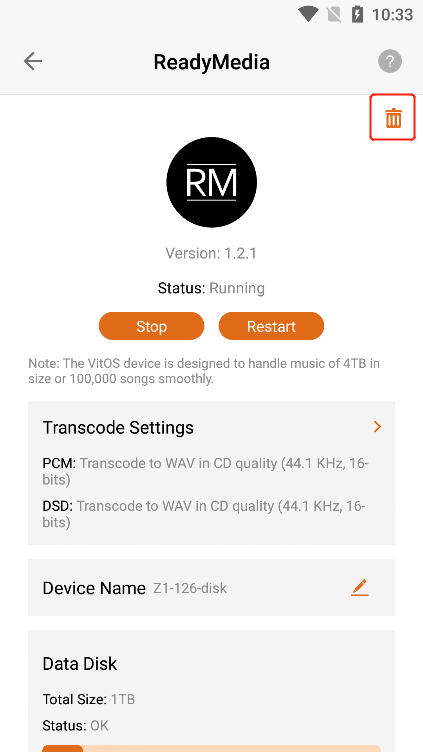
3.6.5. ReadyMedia
Click the ">" button corresponding to "ReadyMedia" to enter the application operation interface.

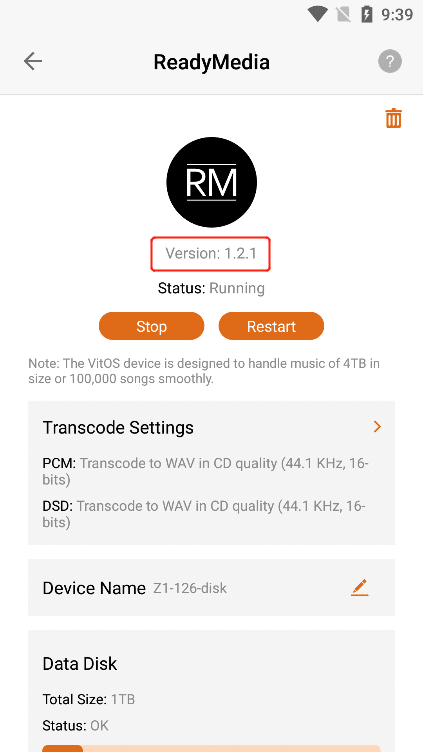
3.6.5.1. ReadyMedia Version
After entering the " ReadyMedia " application interface, you can view the " Version " information of the application.
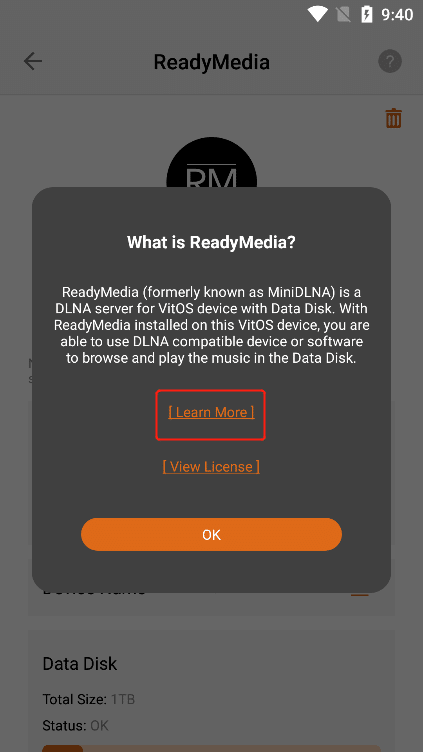
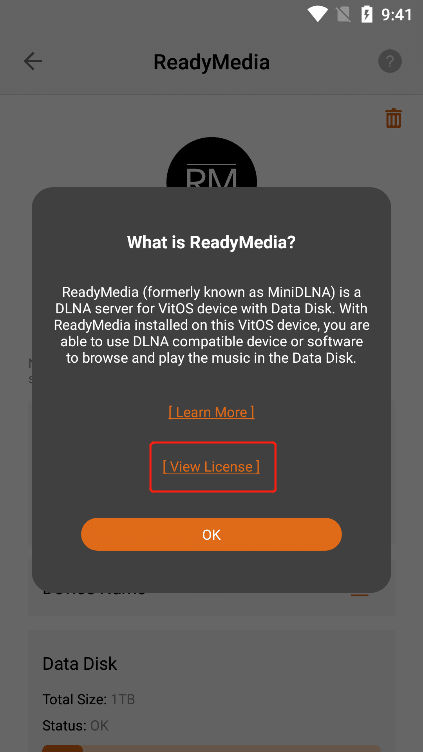
3.6.5.2. What is ReadyMedia?
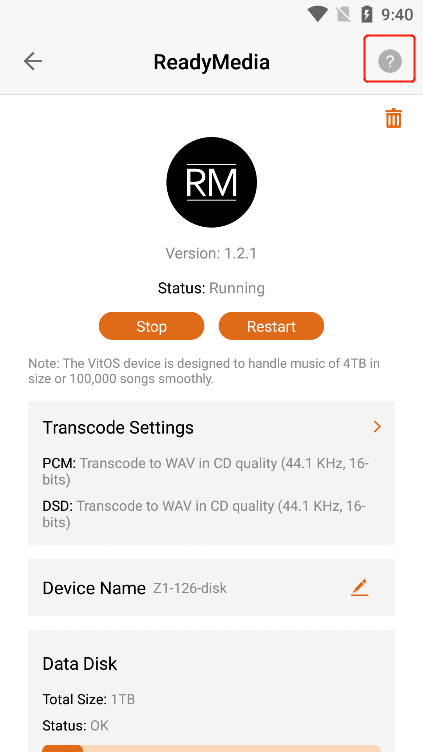
Click the "?" button in the upper right corner to view the "ReadyMedia" application information.
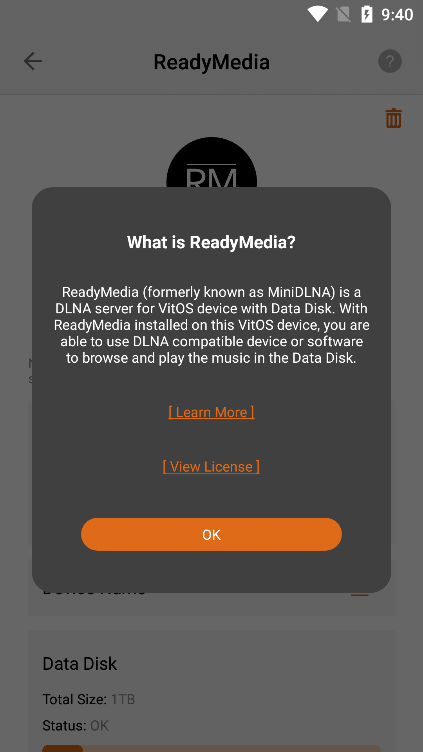
3.6.5.2.1. Learn More
can view the "ReadyMedia" application information below. If you Click "Learn More" , you can jump to the official website to view the details.
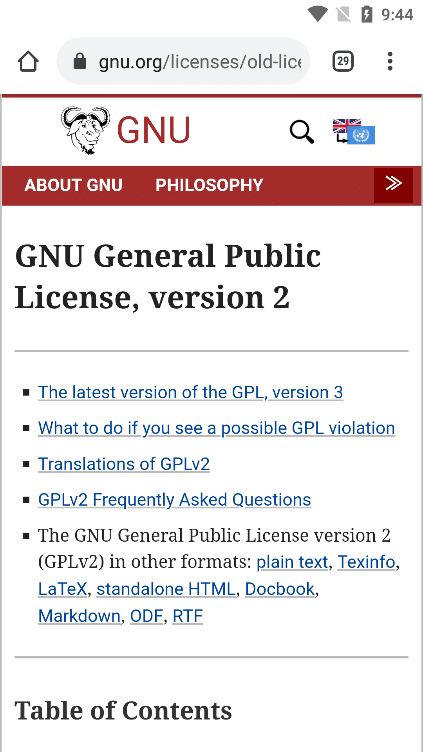
3.6.5.2.2. View License
Click "View License" to jump to the ReadyMedia authorization interface.
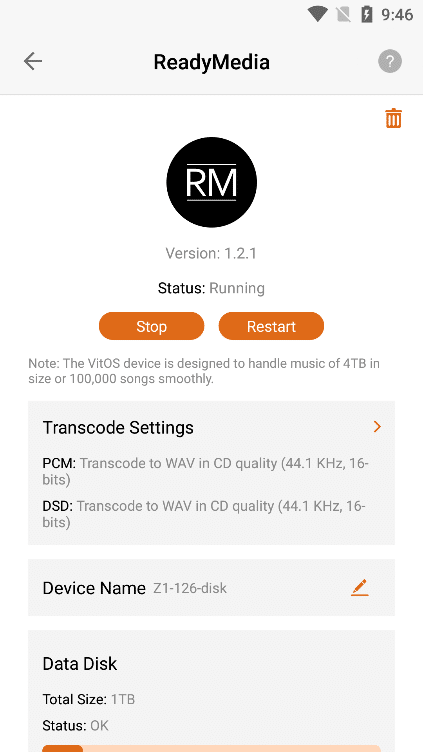
3.6.5.3. ReadyMedia Status
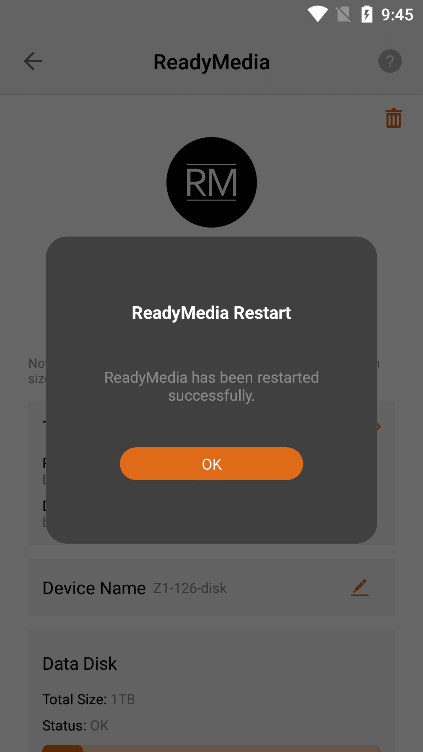
When the status bar shows "Running" , Click the "Stop" button to stop the ReadyMedia application,The Status bar displays "Stopped".
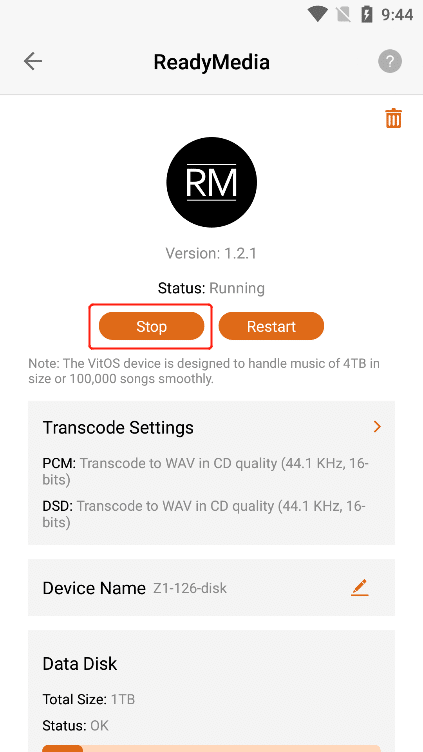
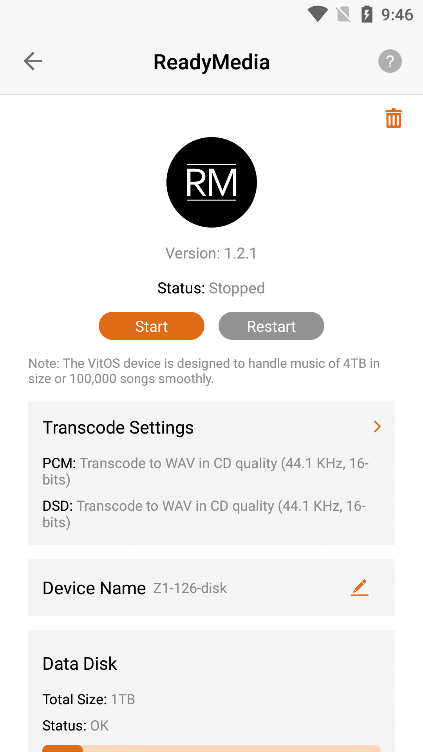
When the status bar shows "Running" , Click the "Restart" button to restart the ReadyMedia application.
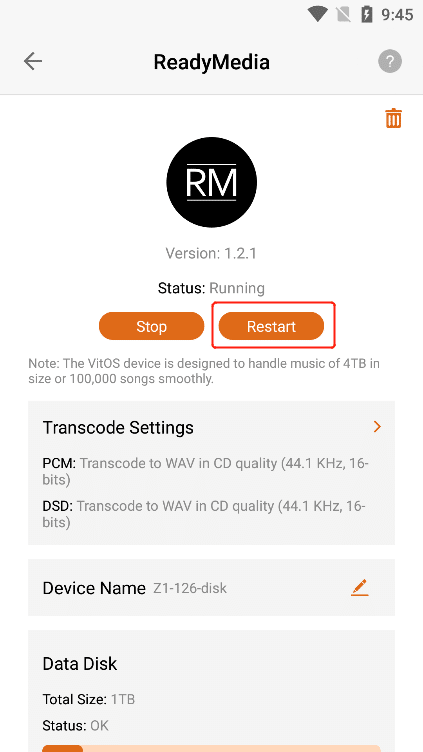
When the status bar displays "Stopped" , Click the "Start" button to start the ReadyMedia application,The Status bar displays "Running".

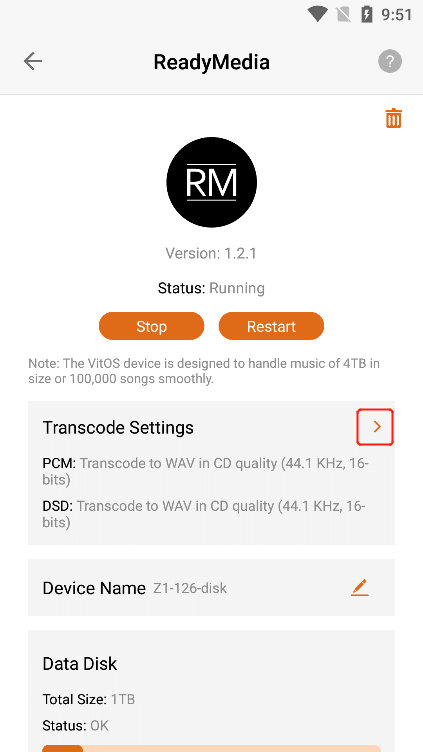
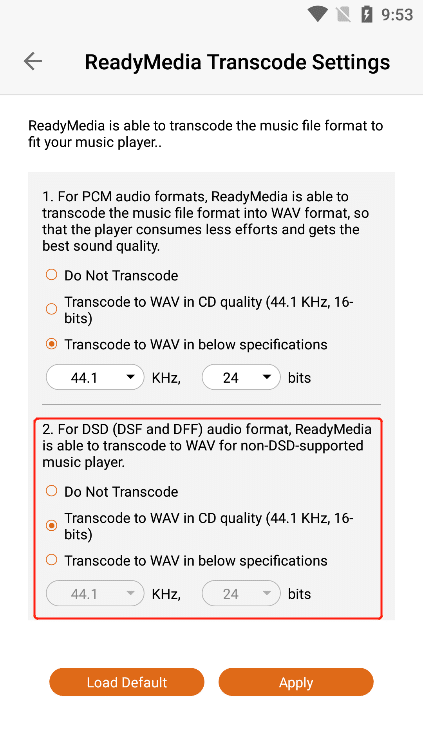
3.6.5.4. Transcode Settings
Under "Transcode Settings" , the transcoding formats of "PCM" and "DSD" audio formats in ReadyMedia are displayed .
3.6.5.4.1. Transcode Settings Operation
Click the ">" button corresponding to "Transcode Settings" to enter the operation interface of transcoding settings.

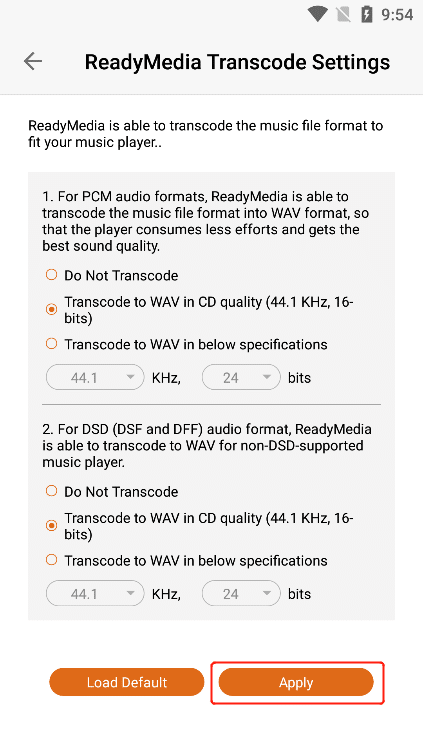
3.6.5.4.2. PCM Transcode Format
In the content marked in the figure, you can select the format you need to transcode for the "PCM" audio format, Click the circular button of the corresponding option, and then Click "Apply" to set it successfully.
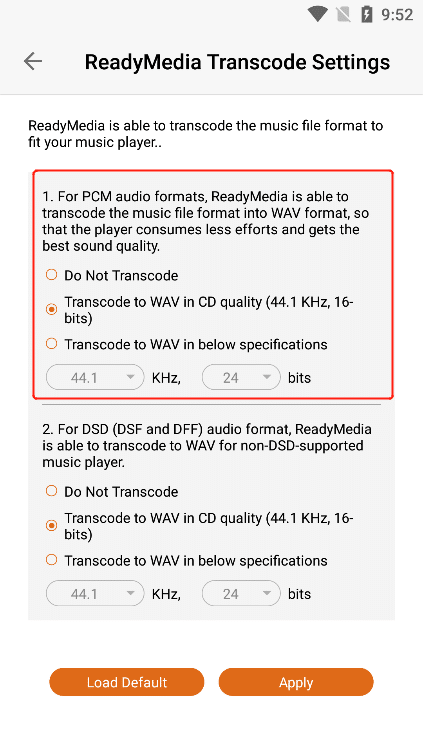
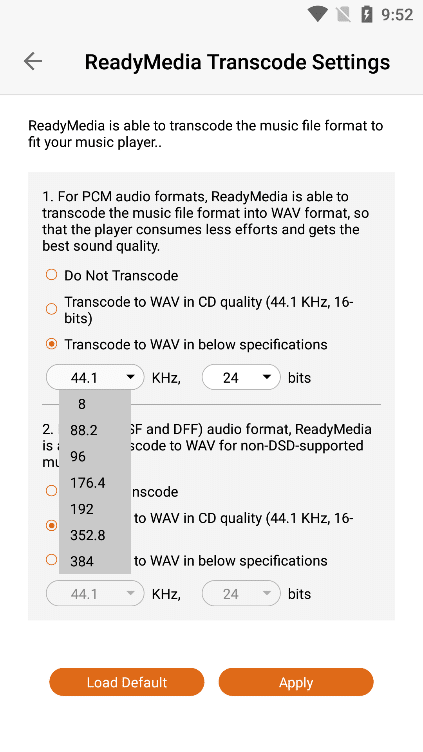
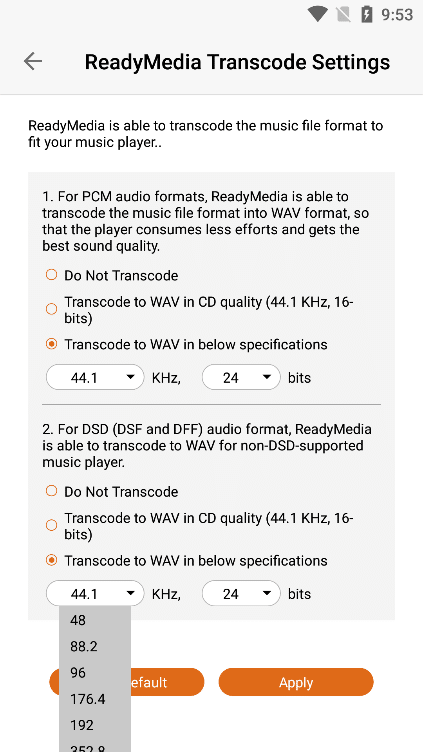
3.6.5.4.3. DSD Transcode Format
In the content marked in the figure, you can select the format you need to transcode for the "DSD" audio format, Click the circular button of the corresponding option, and then Click "Apply" to set it successfully.
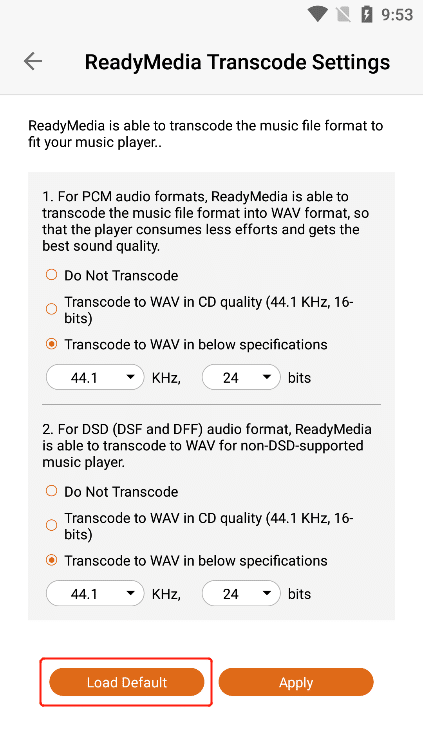
3.6.5.4.4. Load Default
Click "Load Default" to set your "PCM" and "DSD" transcoding formats as default options, and then Click "Apply" to set successfully.
3.6.5.5. Device Name Modify
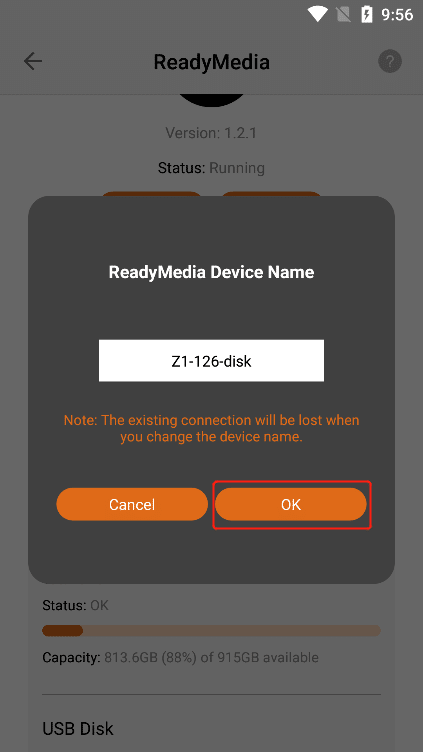
Display the name when you use "ReadyMedia" to connect the Z1 device, Click the "Modify" button to modify the "New Connected Device Name" . (Note: This name only applies when you use ReadyMedia to connect the device)
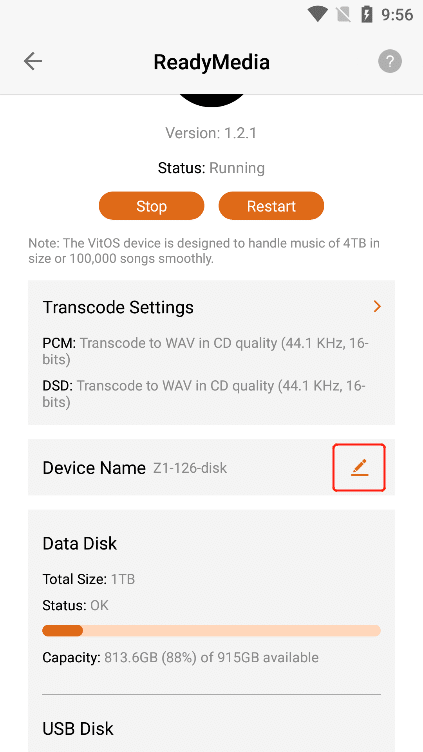

After entering the new device name, Click the "OK" button to successfully modify the name.
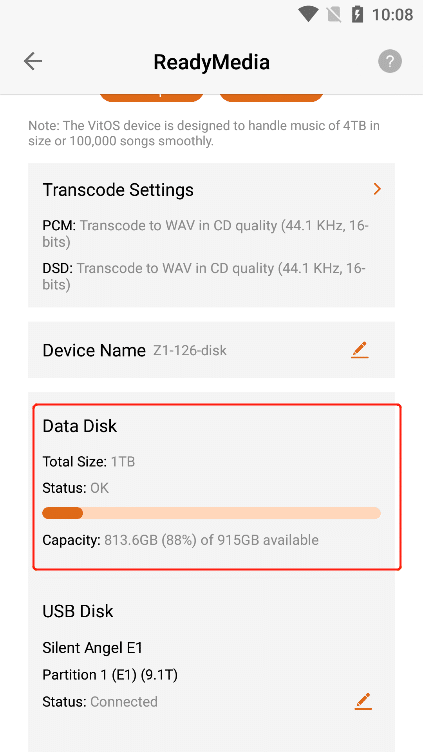
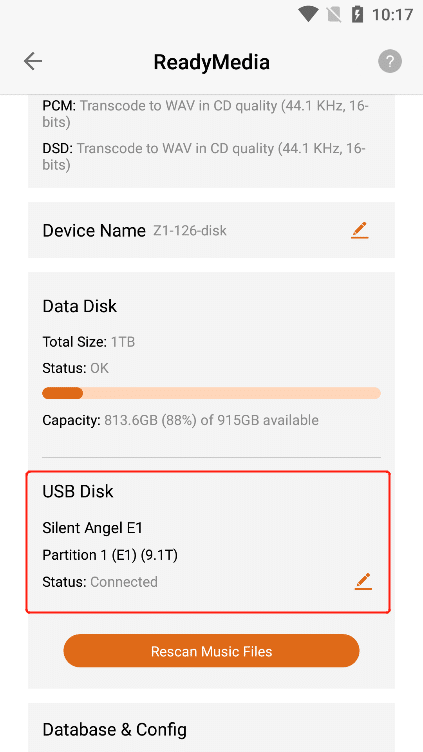
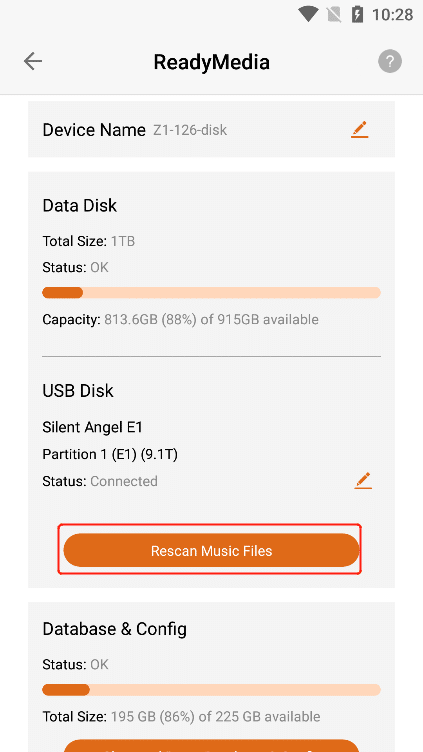
3.6.5.6. Data Disk (Limited To Devices With Data Disk)
If the current Z1 device has a data disk installed, the "Status", "Total Capacity Of The Data Disk" and "Remaining Usable Capacity" can be viewed in the "Data Disk". If the current Z1 device has no data disk installed, the "Data Disk Does Not Exist" will be displayed.
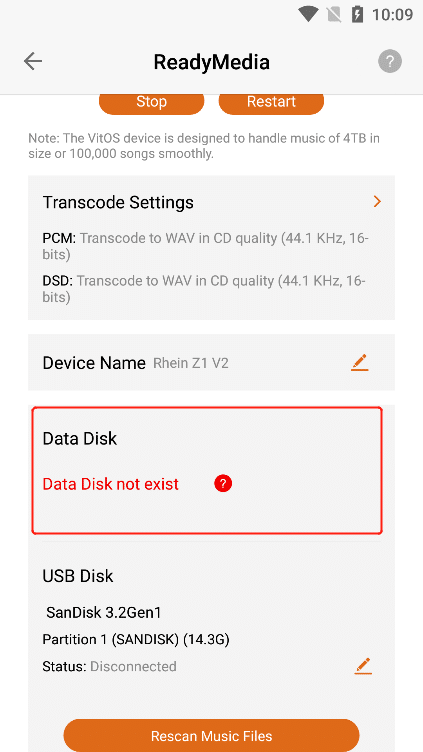
3.6.5.7. U Disk
If your device is connected to a single " U Disk " storage device or multiple " U Disk " storage devices, the " U Disk " " Name " and the partition " Status " are displayed.
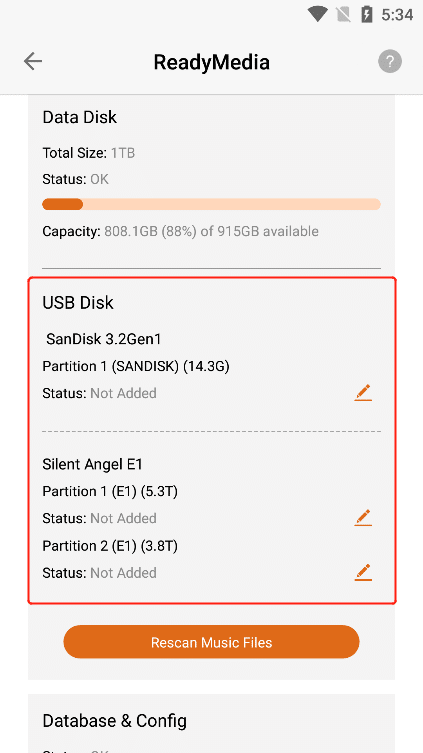
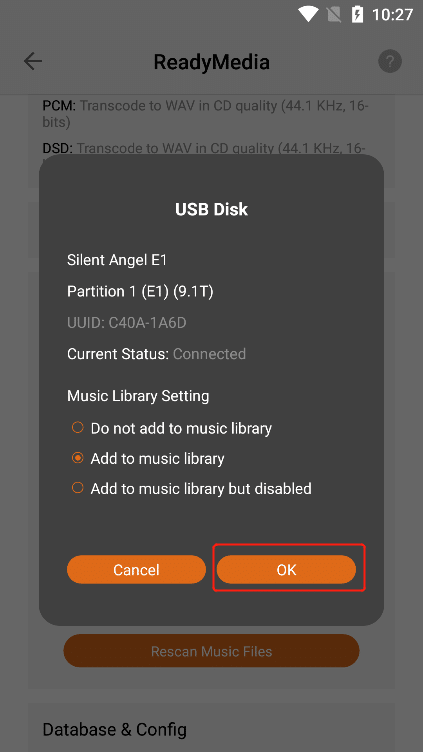
Click the " Edit " button on the right side of the partition to enter the " Music Library Setting" interface of the partition. If you choose " Do not add to music library", your " DLNA controller " cannot be used without adding the U disk. If you choose " Add to music library" , your " DLNA Controller " will display the music data in the U disk, if you select " Add to music library but disabled ", your " DLNA Controller " will be added to the U disk but stop using.
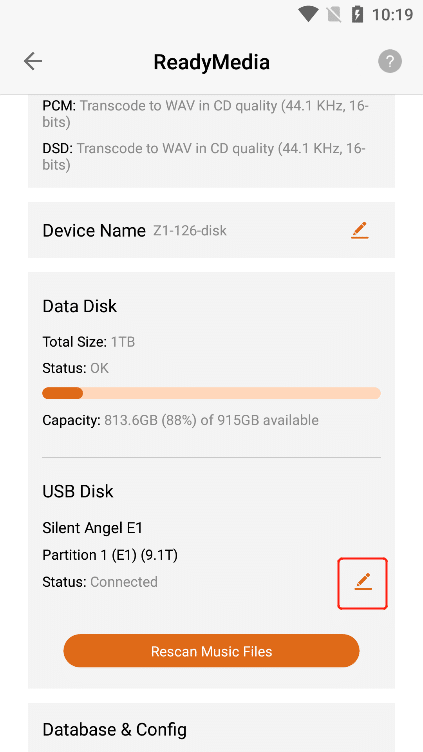
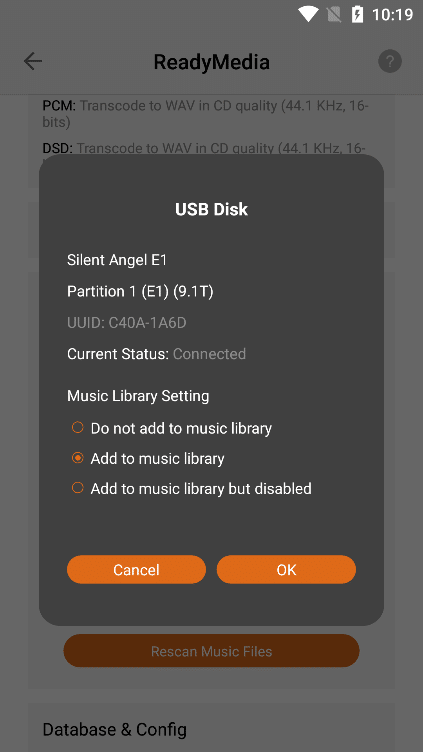
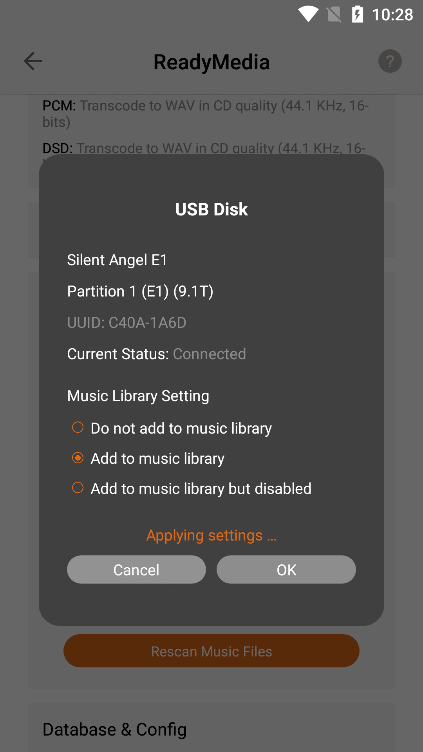
After selecting the "Music Library Setting" of the USB disk partition, Click the "OK" button to successfully apply the settings.
3.6.5.8. Rescan Music Files
Click "Rescan Music Files" to instruct ReadyMedia to rescan for music files to ensure that all your added music files are displayed in the data disk.

3.6.5.9. Database & Settings
In "Database & Config" , view the "Status" 、"Total Data Capacity" and "Remaining Available capacity" of the database in "Roon Server".
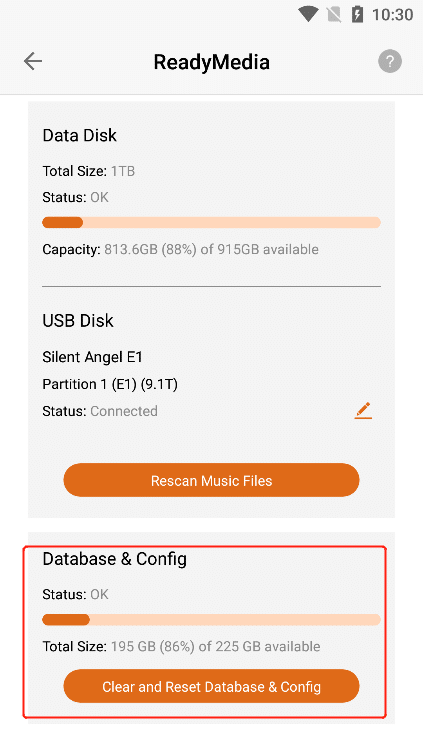
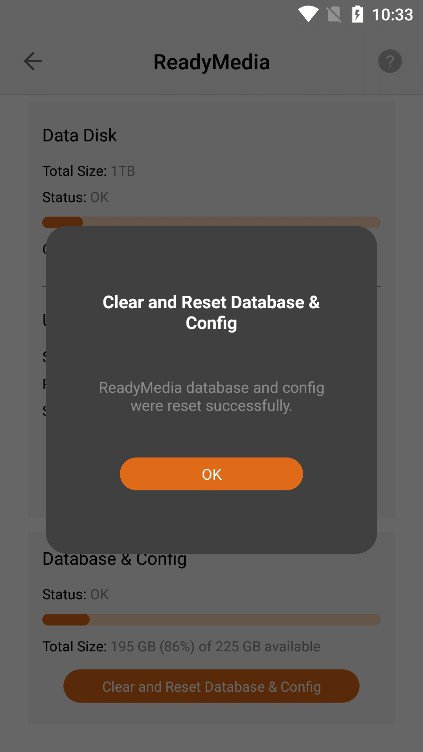
3.6.5.9.1. Reset Database & Config
Click the "Reset Database & Config" button, and then Click the "OK" button.
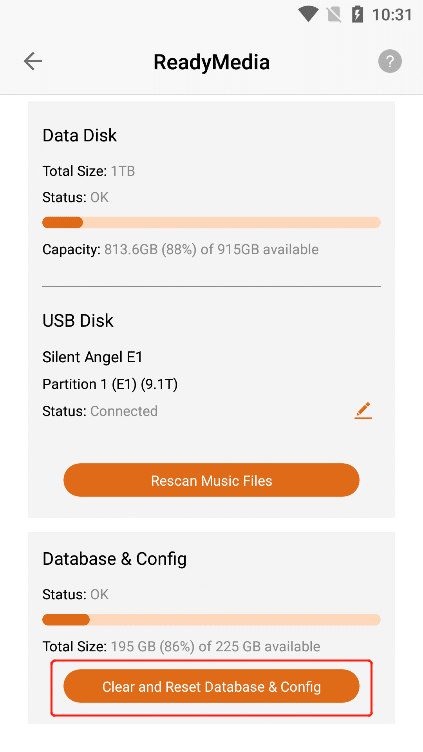
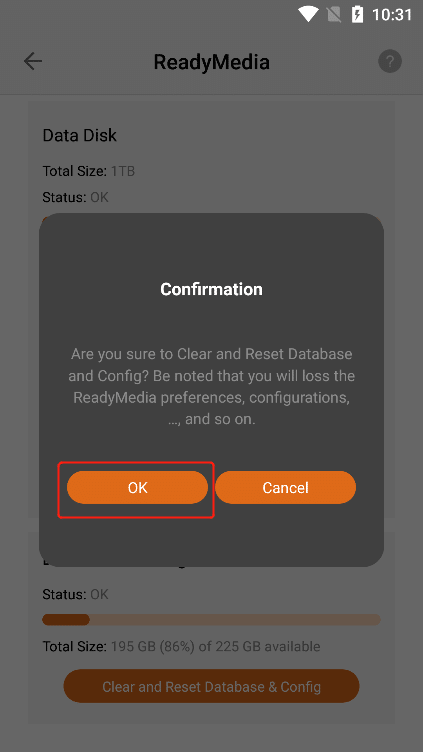
The relevant configuration data in "ReadyMedia" in the current Z1 device can be successfully cleared and reset.
3.6.5.10. Uninstall ReadyMedia
Click the "Uninstall" button in the upper right corner , and then Click the "Uninstall" button on the confirmation uninstall interface .
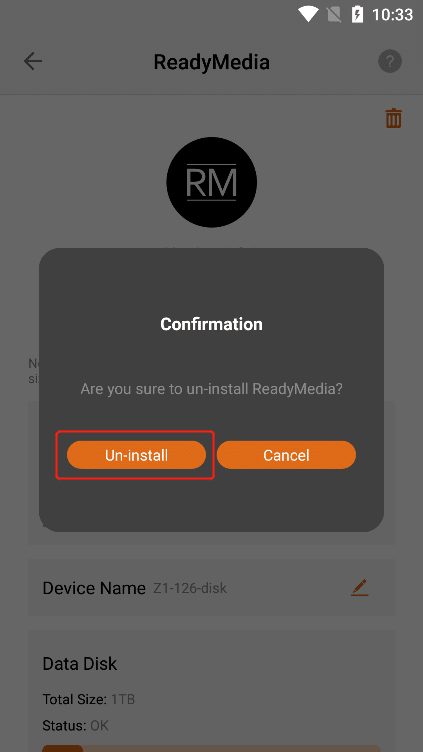
Clicking the "Uninstall" button, the "ReadyMedia" application can be uninstalled, and the application status is "Not lnstalled" .
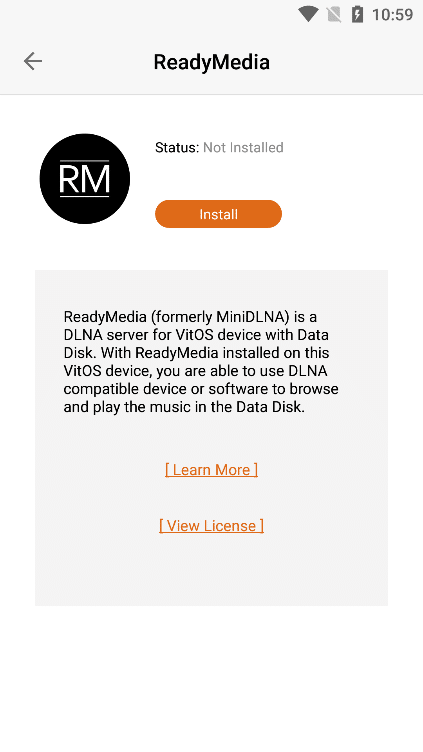
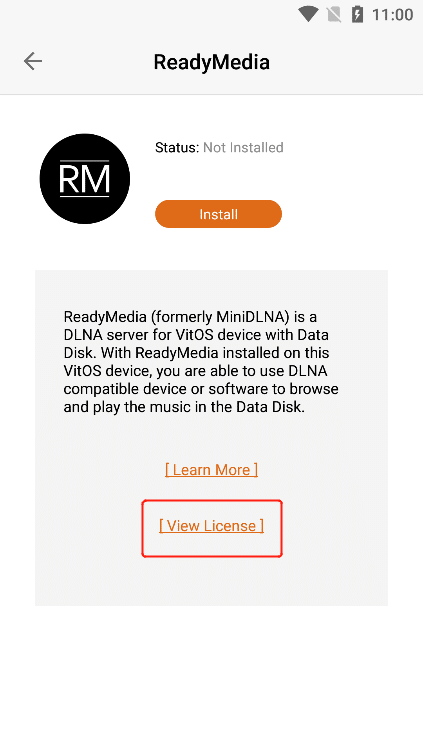
3.6.5.11. Install ReadyMedia
When the ReadyMedia status is "Not lnstalled" , Click the "Install" button to start downloading and installing.

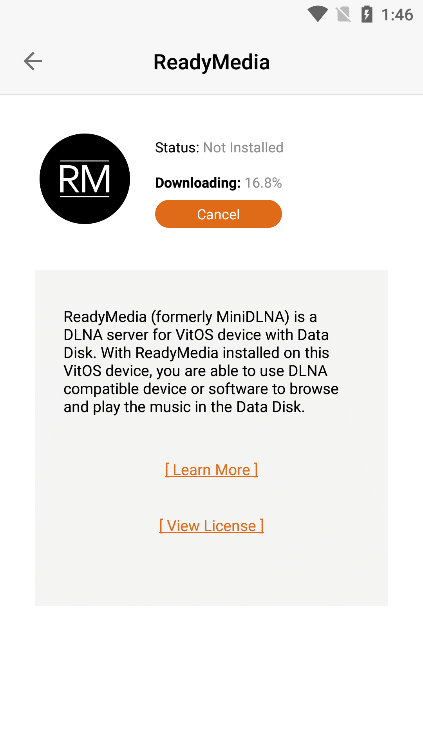
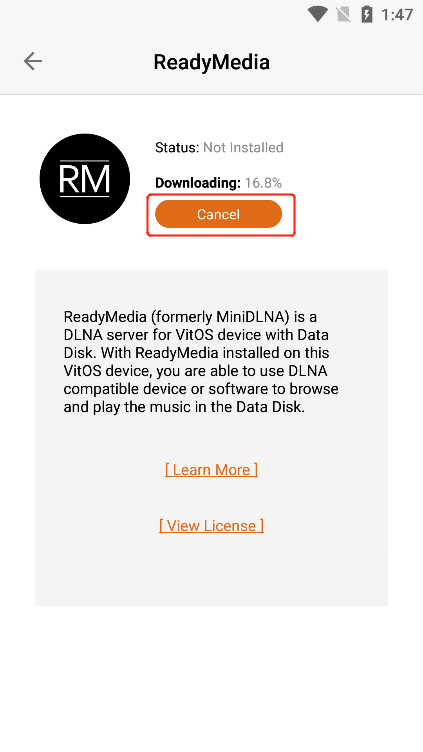
3.6.5.11.1. Cancel The Installation
When "Downloading" is displayed , Click the "Cancel" button to cancel the installation. The last error was "Cancelled by user" .

3.6.5.11.2. Learn More
can view the "ReadyMedia" information below. If you Click "Learn More" , you can jump to the official website to view the details.


3.6.5.11.3. View License
Click "View License" to jump to the ReadyMedia authorization interface.

3.6.6. DLNA Renderer
Click the ">" button corresponding to "DLNA Renderer" to enter the application operation interface.


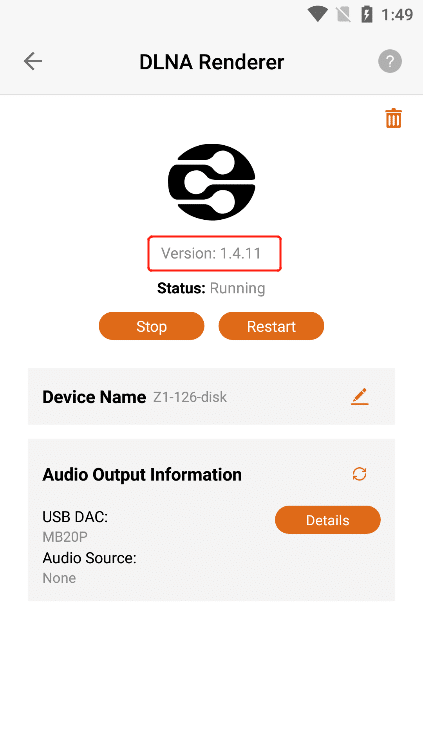
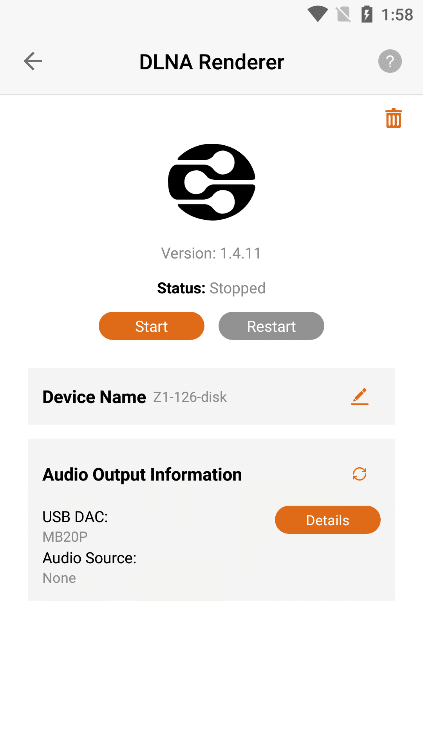
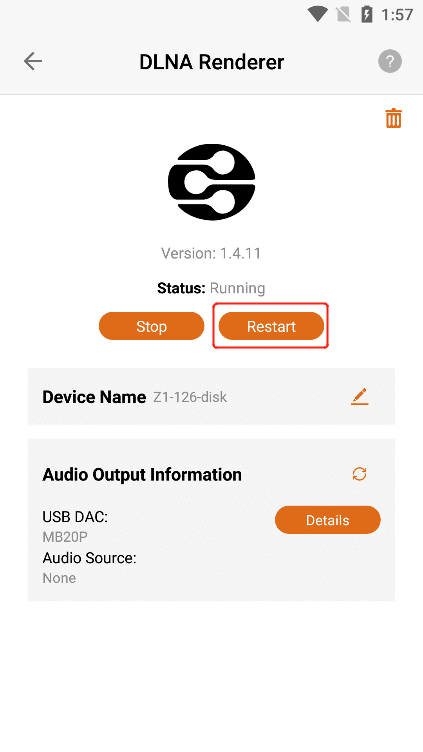
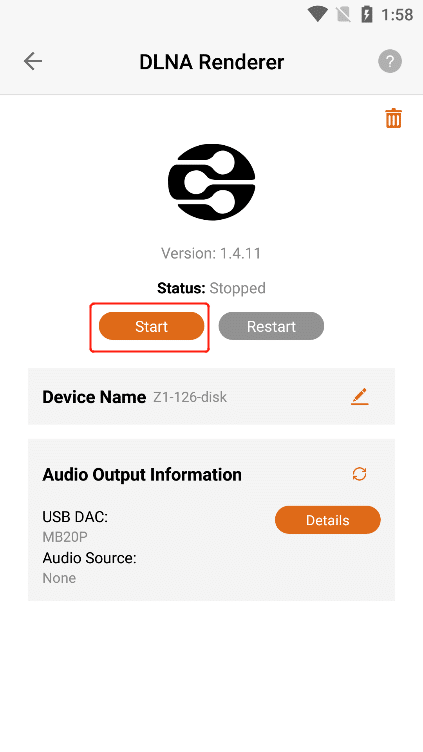
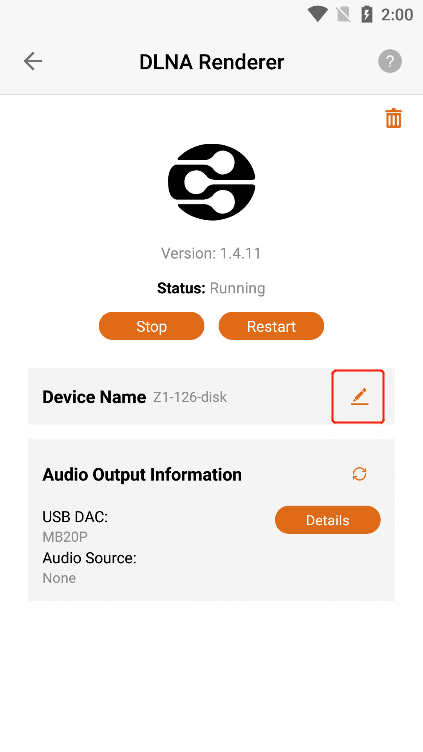
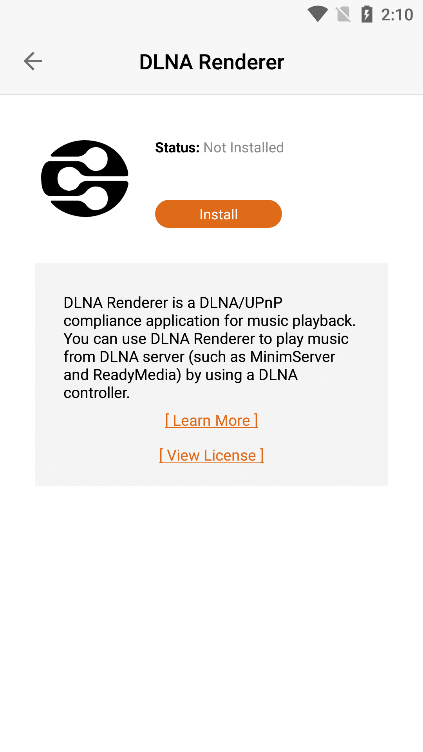
3.6.6.1. DLNA Renderer Version
After entering the " DLNA Renderer " application interface, you can view the " Version " information of the application.
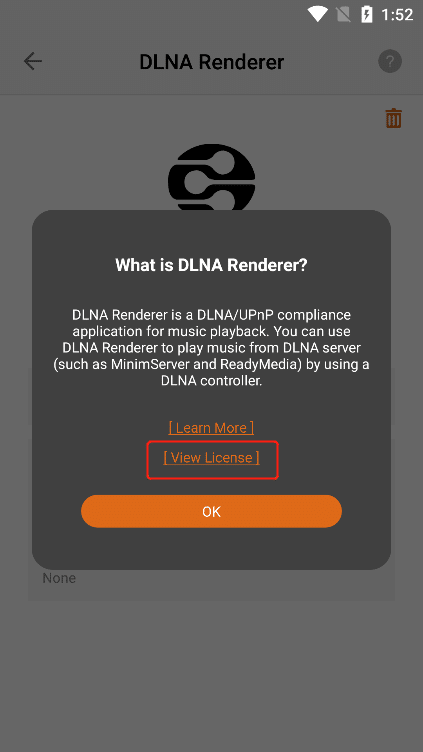
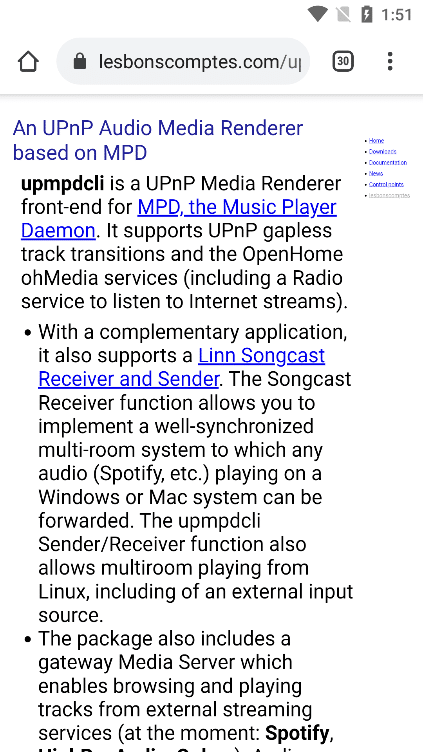
3.6.6.2. What Is DLNA Renderer?
Click the "?" button in the upper right corner to view the application information of "DLNA Renderer" .


3.6.6.2.1. Learn More
can view the application information of "DLNA Renderer" below . If you Click "Learn More" , you can jump to the official website to view the details.
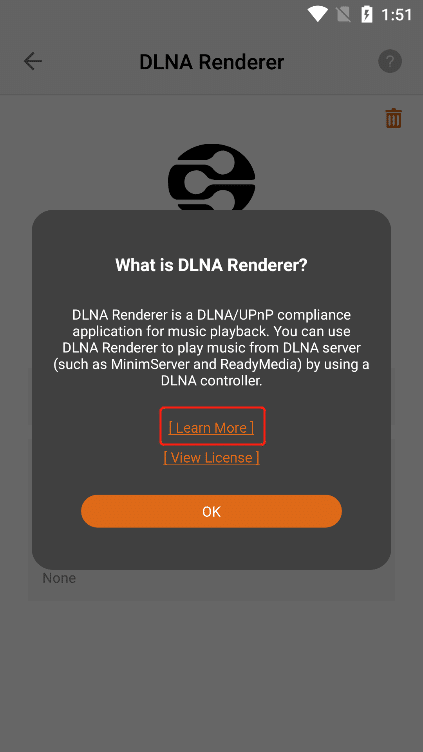

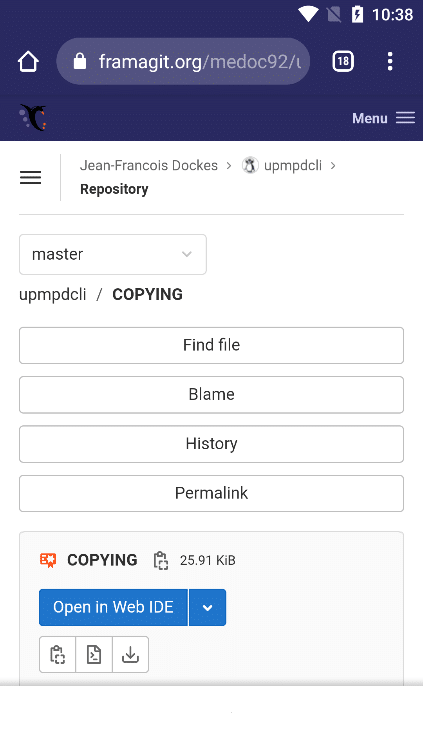
3.6.6.2.2. View License
Click "View License" to jump to the DLNA renderer authorization interface.

3.6.6.3. DLNA Renderer State
When the status bar shows "Running" , Click the "Stop" button to stop the DLNA renderer application,The Status bar displays "Stopped".
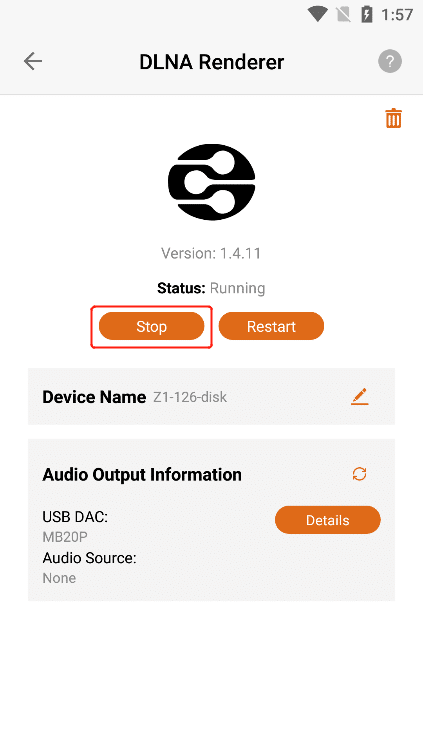
When the status bar shows "Running" , Click the "Restart" button to restart the DLNA renderer application.
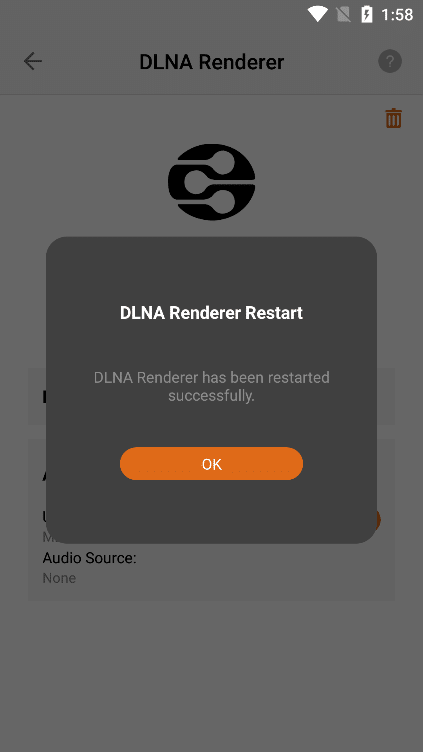
When the status bar displays "Stopped" , Click the "Start" button to start the DLNA renderer application,The Status bar displays "Running".

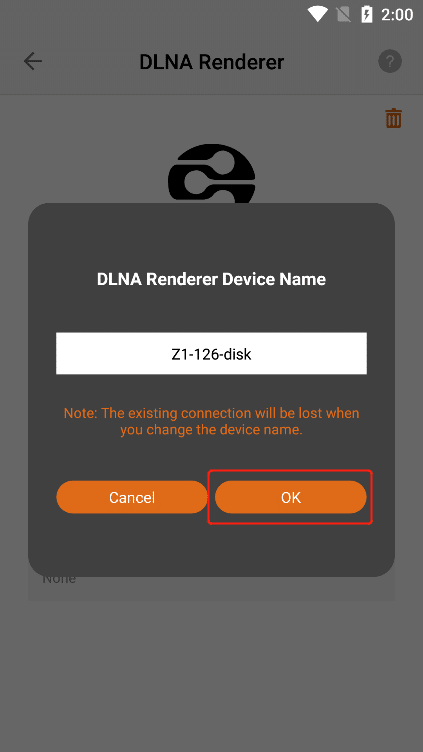
3.6.6.4. Device Name Modify
Display the name you used to connect the Z1 device with "DLNA Renderer" , Click the "Modify" button to modify the "New Connected Device Name" . (Note: This name only applies when you connect the device with the DLNA renderer)
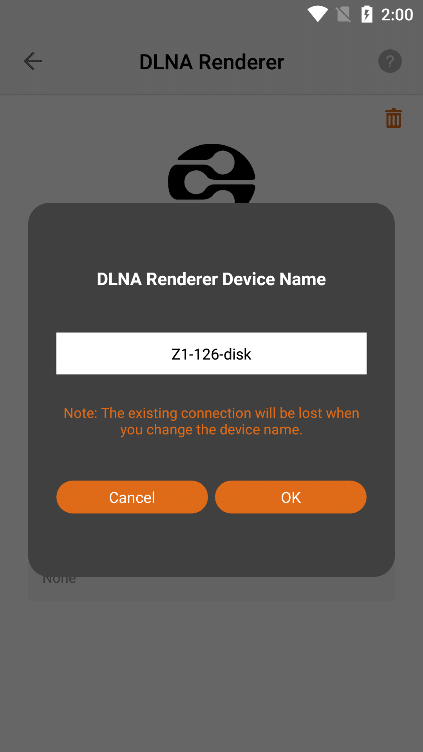
After entering the new device name, Click the "OK" button to successfully modify the name.
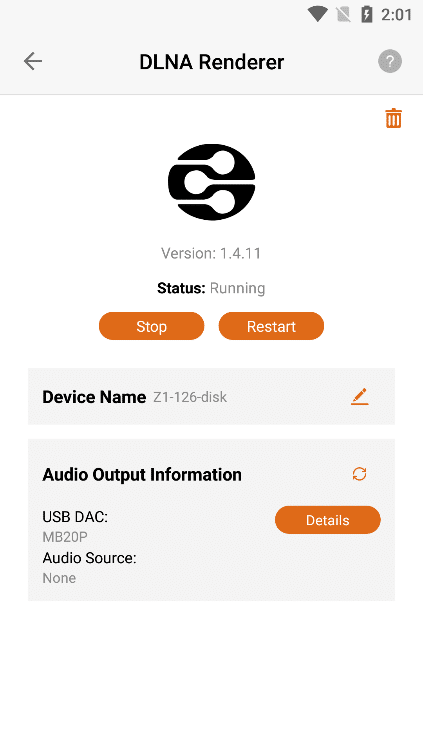
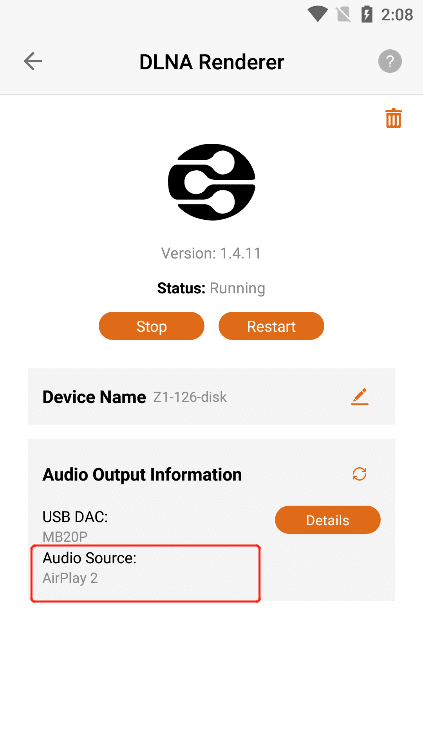
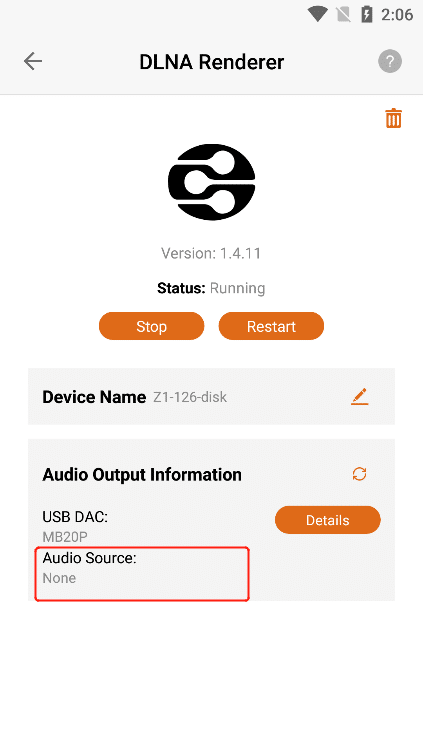
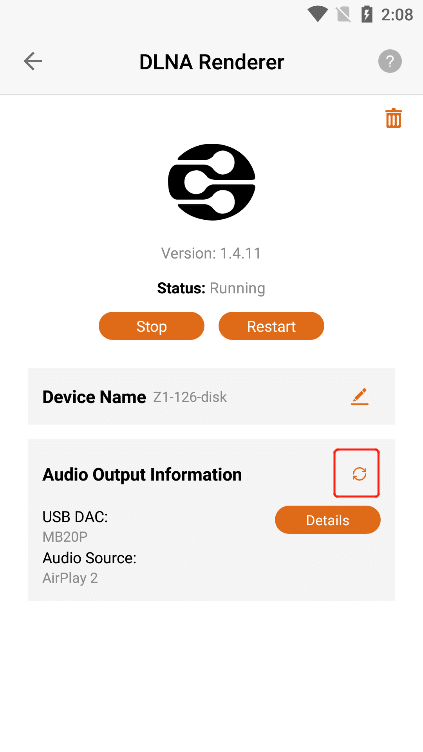
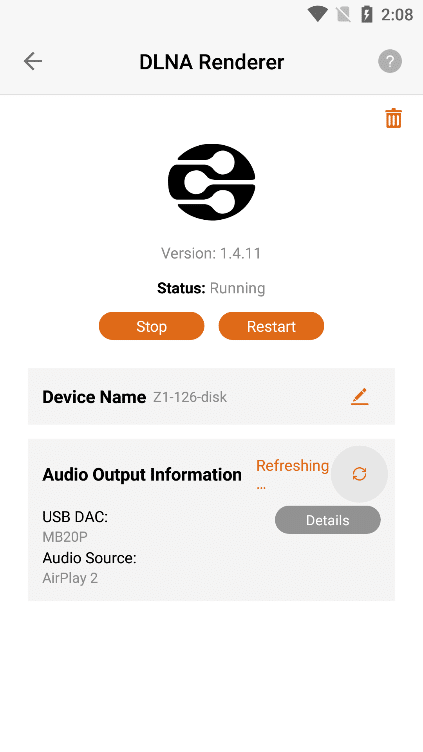
3.6.6.5. Audio Source Output Information
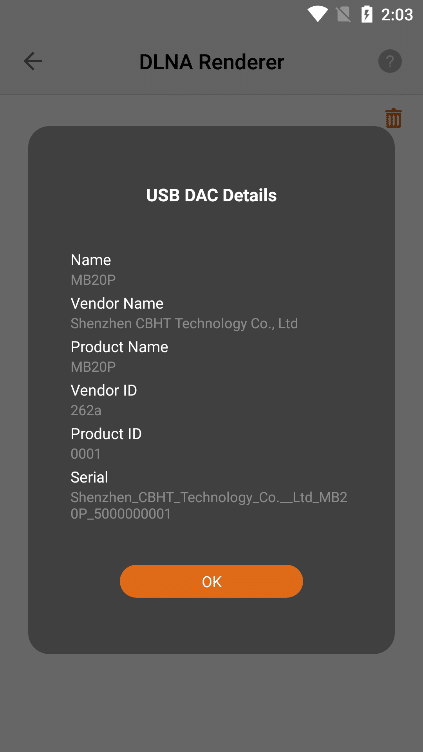
3.6.6.5.1. USB DAC Details
Confirm that the current Z1 device is connected to the "USB DAC" , and Click the "Details" button to the right of the "USB DAC" to view the details of the USB DAC connected to the current Z1 device.
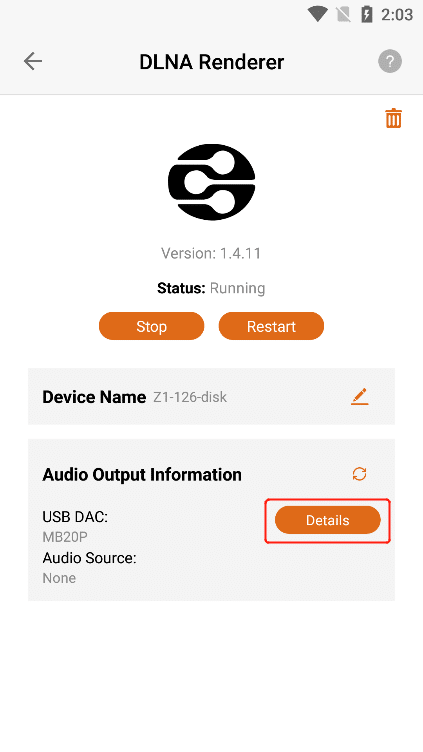
3.6.6.5.2. Audio Source
You can connect the Z1 device to play music through applications such as "Orbiter Plugin" , " Airplay2 " , "DLNA Renderer", " Spotify Connect" , " Roon Server" , etc. "Audio Source" shows the application name of the music you are currently playing , if the Z1 device is not connected to play music, it will display "None" , and if the Z1 device is connected to pause or not play music, it will display "None" .
3.6.6.5.3. Refresh Audio Output Information
If the latest information is not updated in "USB DAC" or "Audio Source" , you can Click the "Refresh" button to update the data.
3.6.6.6. Uninstall DLNA Renderer
Click the "Uninstall" button in the upper right corner , and then Click the "Uninstall" button on the confirmation uninstall interface .

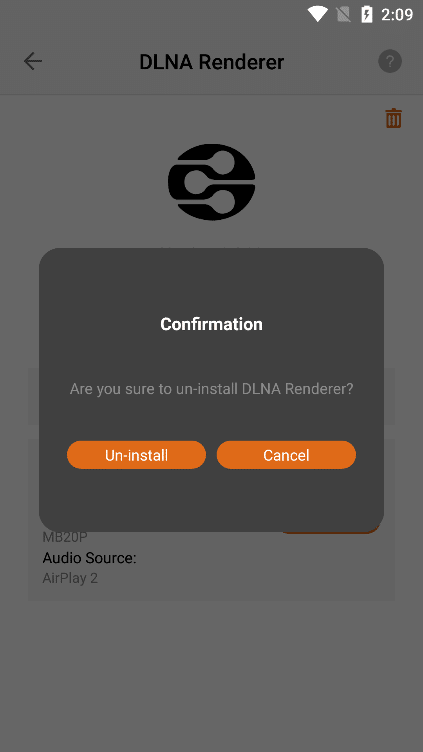
Clicking the "Uninstall" button, the "DLNA Renderer" application can be uninstalled, and the application status is "Not Installed" .

3.6.6.7. Install DLNA Renderer
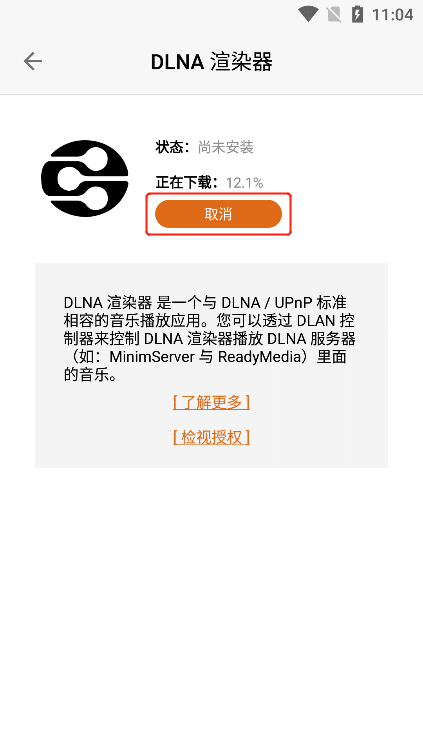
When the DLNA renderer status is "Not Installed" , Click the "Install" button to start the download and installation.
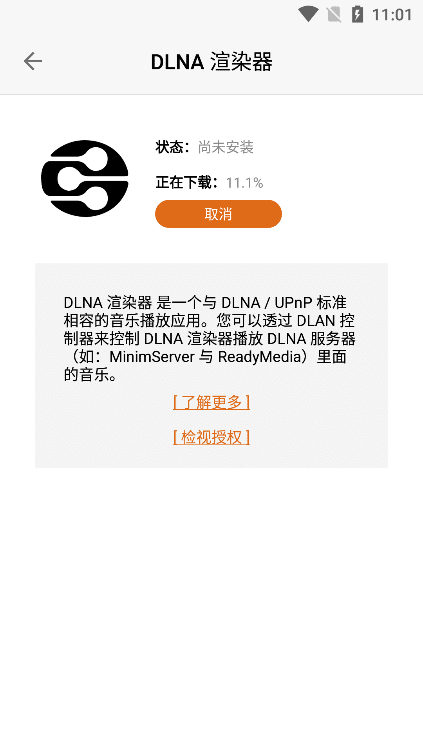
3.6.6.7.1. Cancel The Installation
When "Downloading" is displayed , Click the "Cancel" button to cancel the installation. The last error was "Cancelled the user" .
3.6.6.7.2. Learn More
Can view the "DLNA Renderer" information below. If you Click "Learn More" , you can jump to the official website to view the details.

3.6.6.7.3. View License
Click "View License" to jump to the DLNA renderer authorization interface.
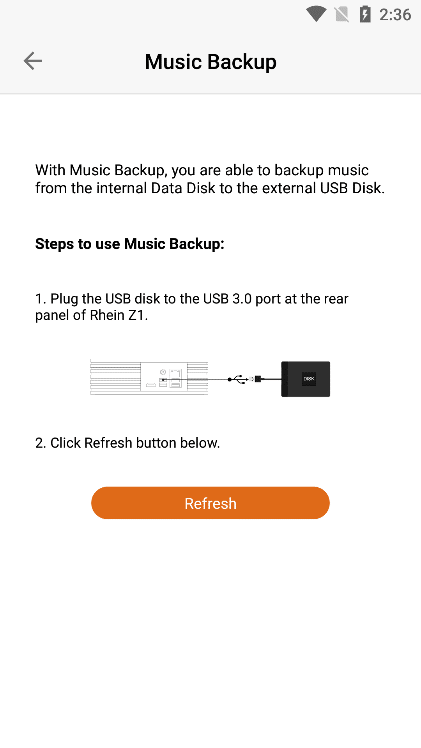
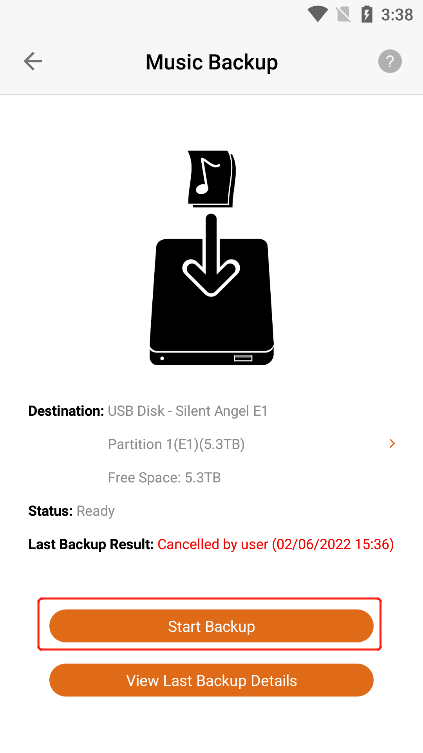
3.7. Music Backup(Only For Devices With Data Disks)
If your " Z1" device is not connected to the " U Disk ", Click "Music Backup" to enter the "Music Backup" interface, and connect the " U Disk " to the " Z1 " device according to the instructions .
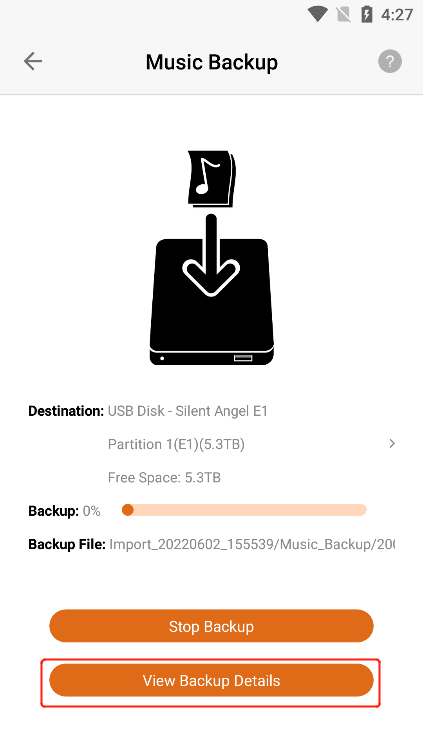
If your "Z1" device has been connected to the "USB Disk", Click "Music Backup" to enter the "Music Backup" interface, where you can view the "Name"、"Remaining Capacity"、"Status" of the connected "USB Disk", If there has been backup before, the "Last Backup Result" will be displayed.

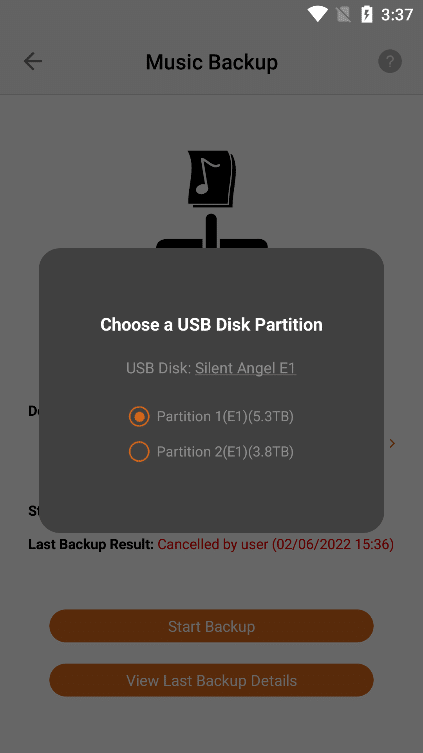
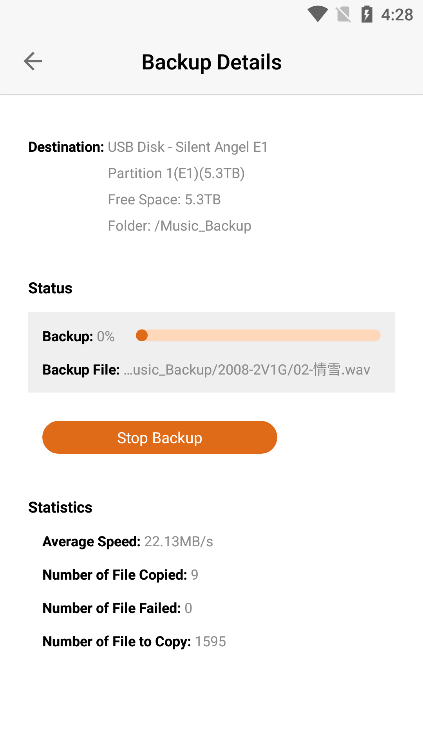
3.7.1. Start Backup
Click the " > " button on the right side of " Destination " ,If your USB stick has multiple partitions, select the " U Disk Partition " you want to back up to, and then Click "Start Backup" to back up the music in the " Z1 Device Internal Data Disk " to an external "U Disk" in the specified partition.
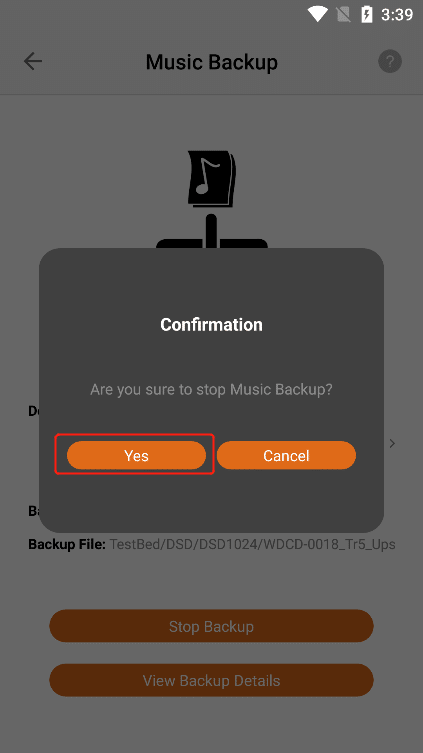
3.7.2. Stop Backup
After "Start Backup", Click the "Stop Backup" button, and then Click the "Yes" button to stop the backup.
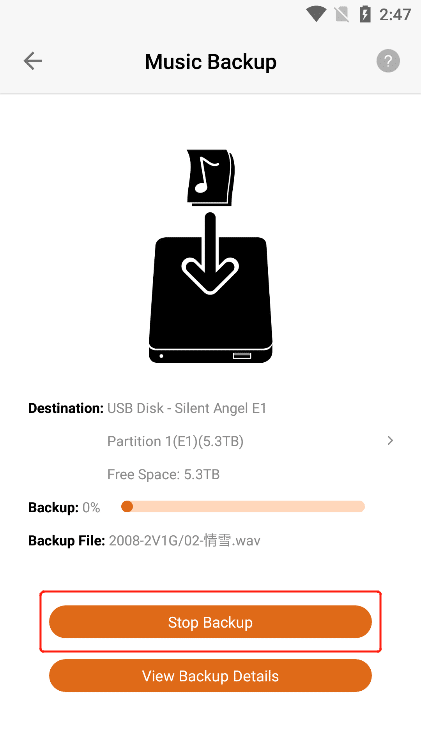
3.7.3. View Backup Details
After "Start Backup", Click the "View Backup Details" button to enter the "View Backup Details" interface.
3.7.4. View Last Backup Details
Click " View Last Backup Details " to view the " Status " and " Backup Statistics " of the last backup.
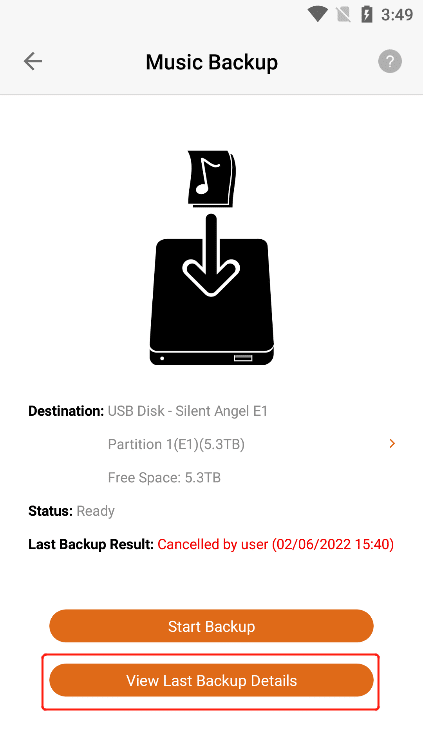
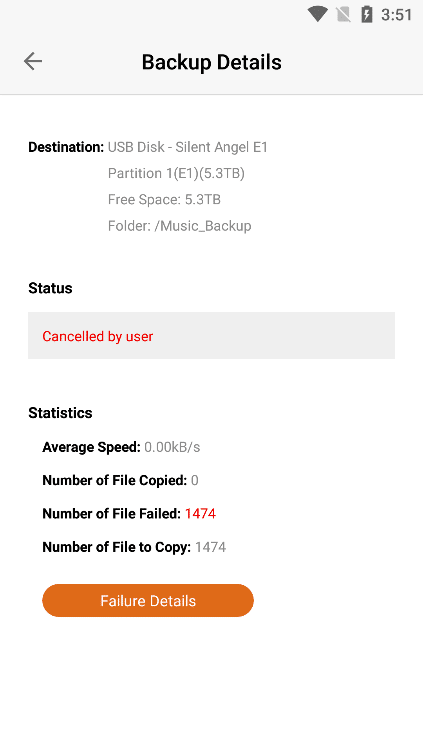
Click " Failure Details " to view the " Music Backup Failed File
List ".


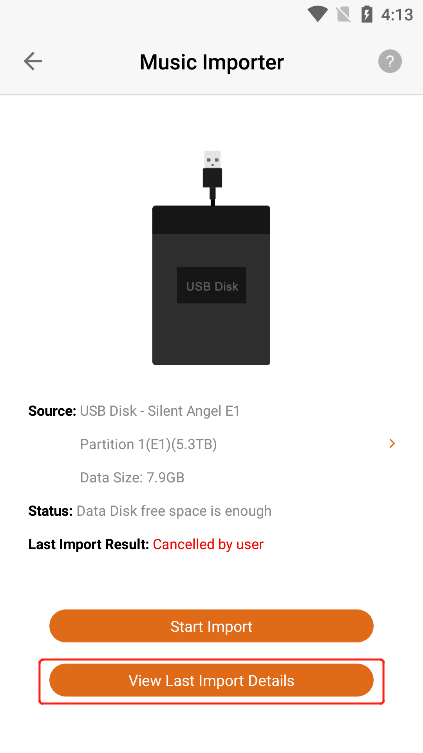
3.8. Music Import (Only For Devices With Data Disks)
If your " Z1 "device is not connected to the " U disk ", Click "Music Import" to enter the "Music Import" interface, and connect the " U Disk " to the " Z1 " device according to the instructions .

If your "Z1"device has been connected to the "USB Disk", Click the "Music Importer" to enter the "Music Importer" interface, where you can view the "Name", "Remaining Capacity" and "Status" of the connected "USB Disk". If you have imported before, the "Last Import Result" will be displayed.
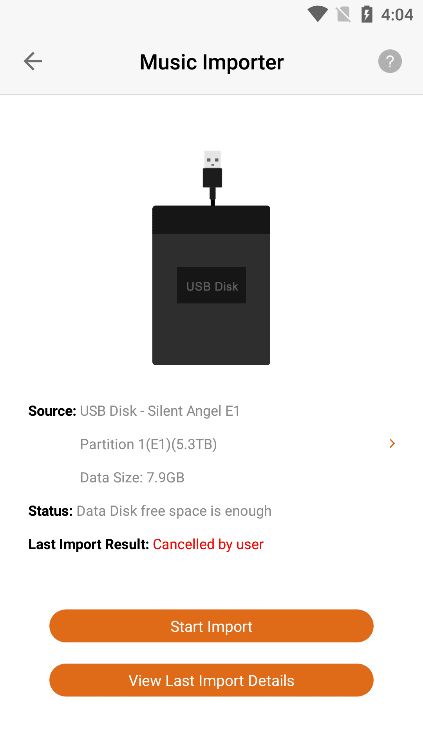
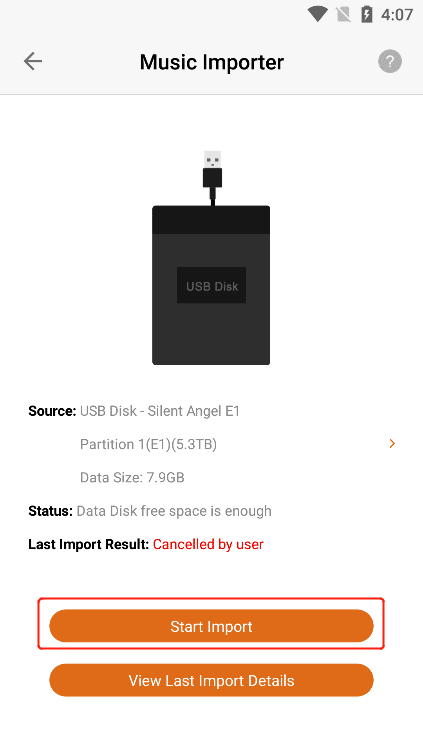
3.8.1. Start Import
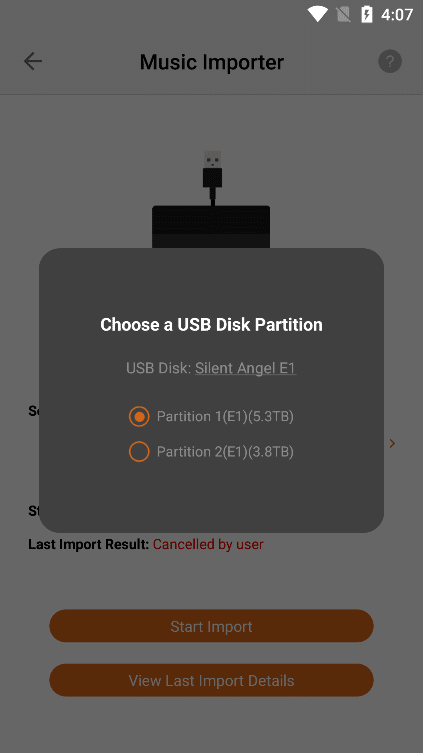
Click the " > " button on the right side of " Source " , If your USB stick has multiple partitions,select the " U Disk Partition " you want to back up to, and then Click " Start Import " to import the music from the specified partition of the external " U Disk " to the " Z1 Device Data Disk”.
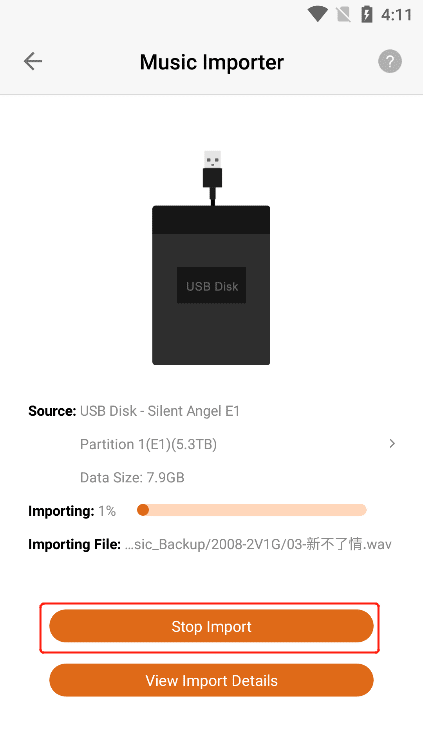
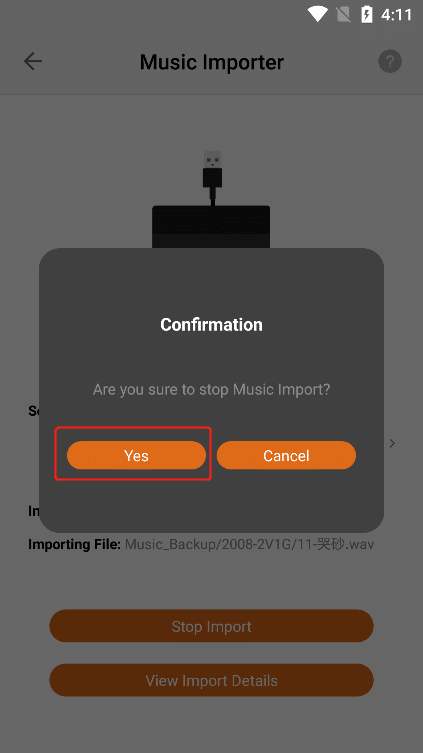
3.8.2. Stop Import
After "Start Import", Click "Stop Import" button, and then Click "Yes" button to stop import.
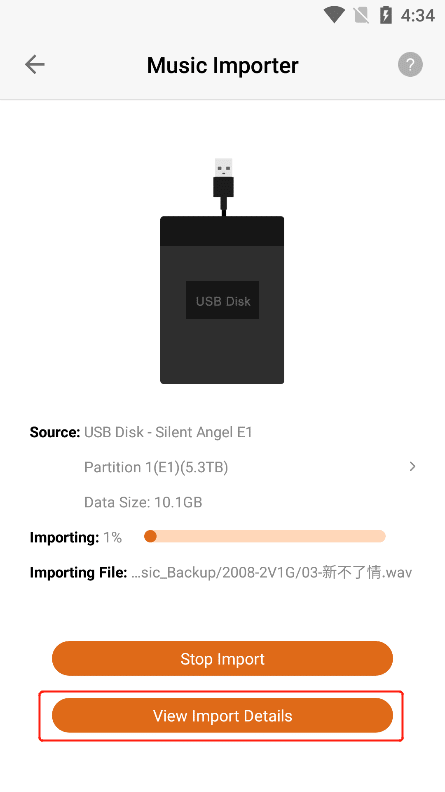
3.8.3. View Import Details
After "Start Import", Click the "View Import Details" button to enter the "View Import Details" interface.
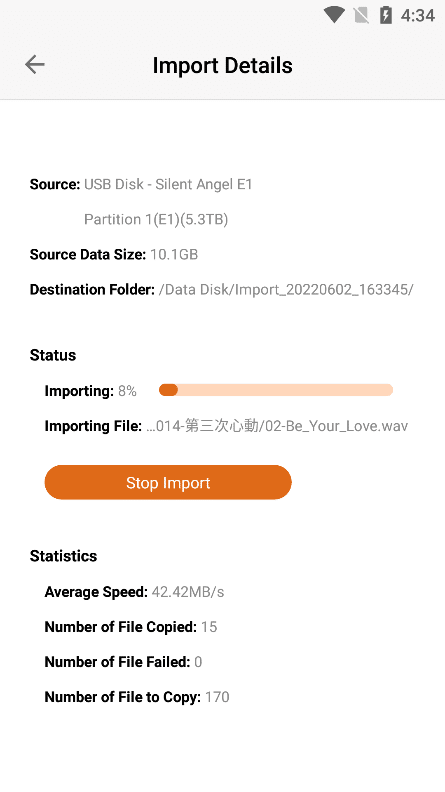
3.8.4. View Last Import Details
Click "View Last Import Details" to view the " Status " and " Import Statistics " of the last import.
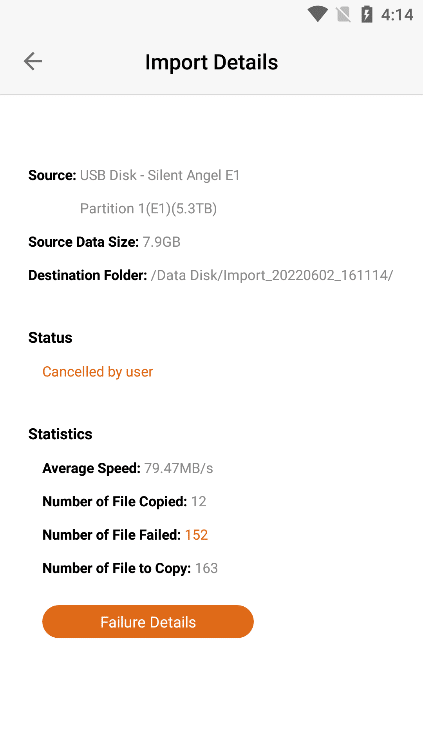
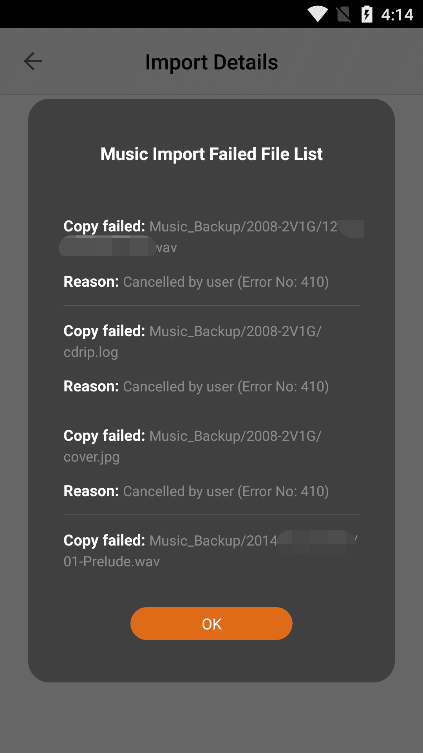
Click " Failure Details " to view the "Music Import Failed File List ".

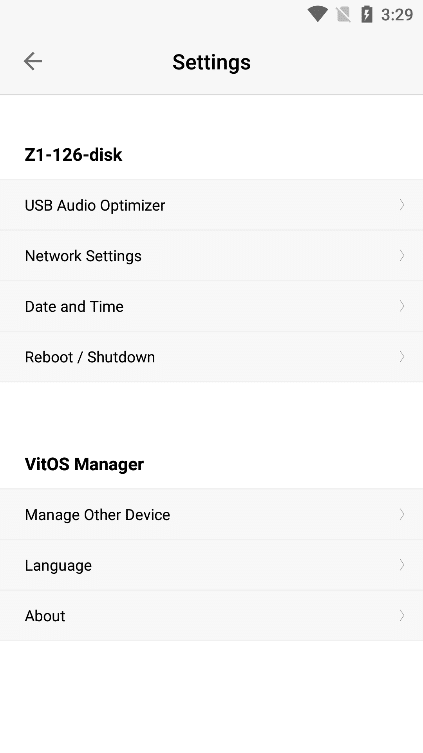
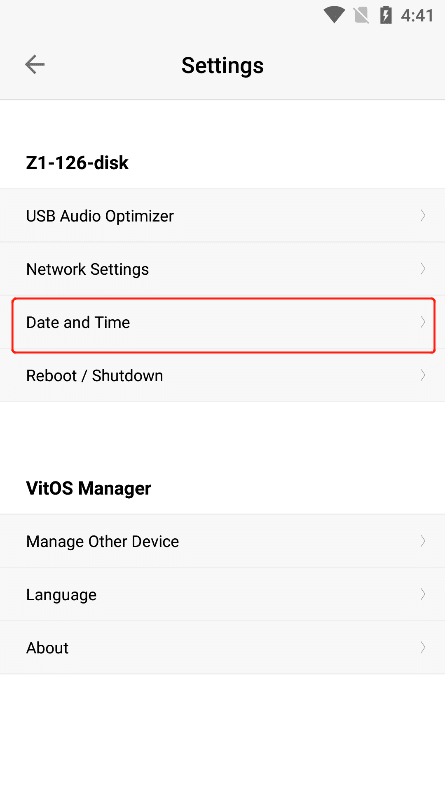
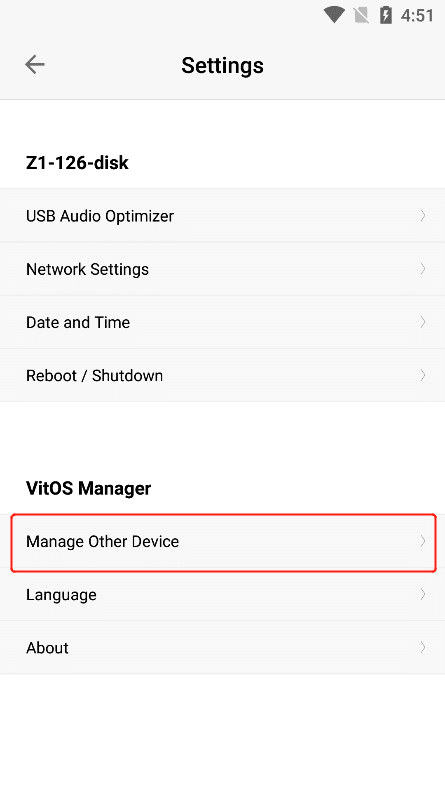
3.9. Settings
Click "Settings" to enter the "Settings" interface.
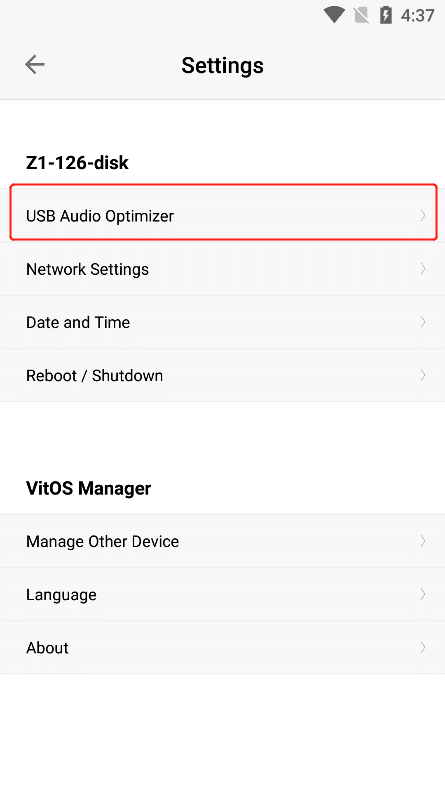
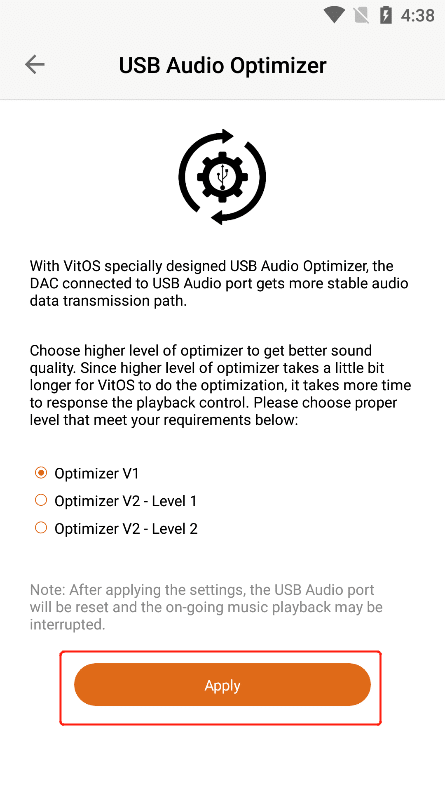
3.9.1. USB Audio Optimizer
Click "USB Audio Optimizer" to enter the "USB Audio Optimizer" selection interface, you can select the level that suits your needs, Click the circular button corresponding to the level option, and then Click "Apply" to successfully set.
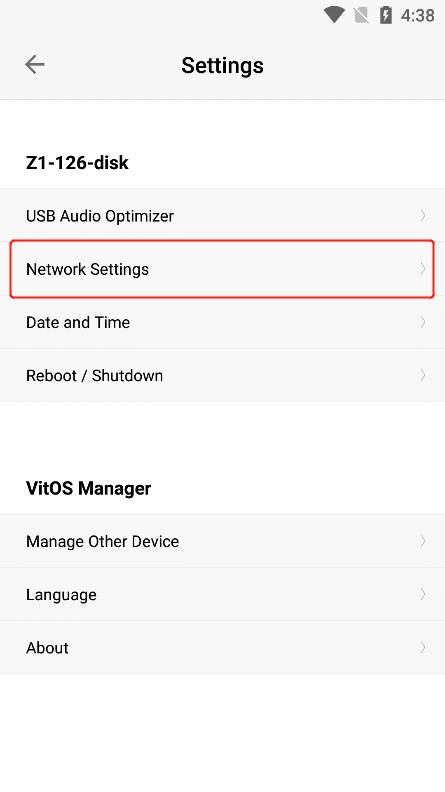
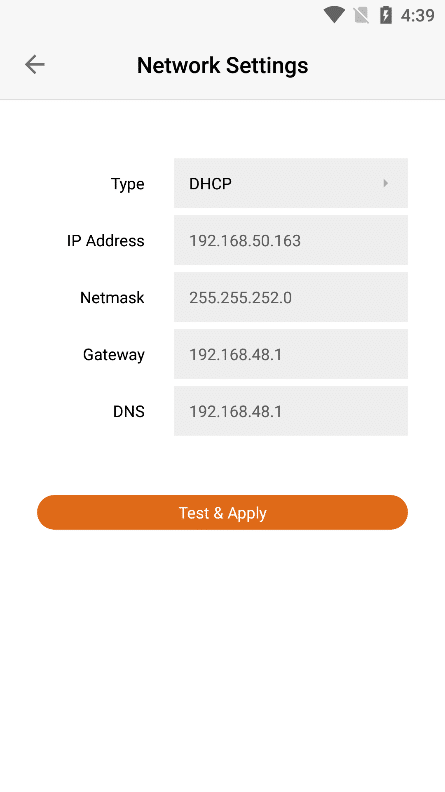
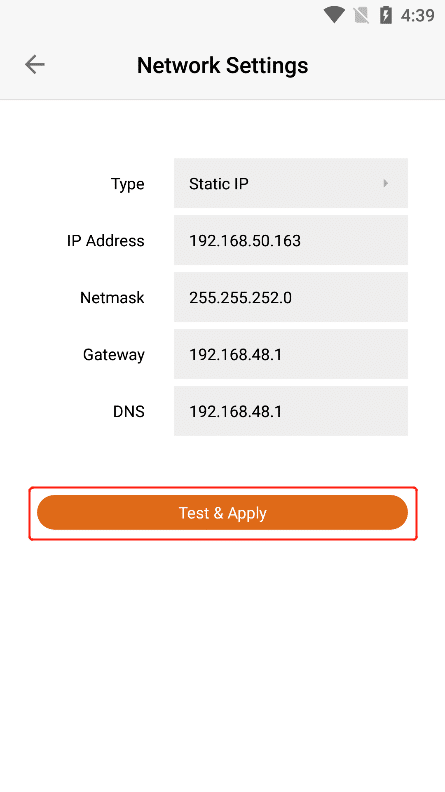
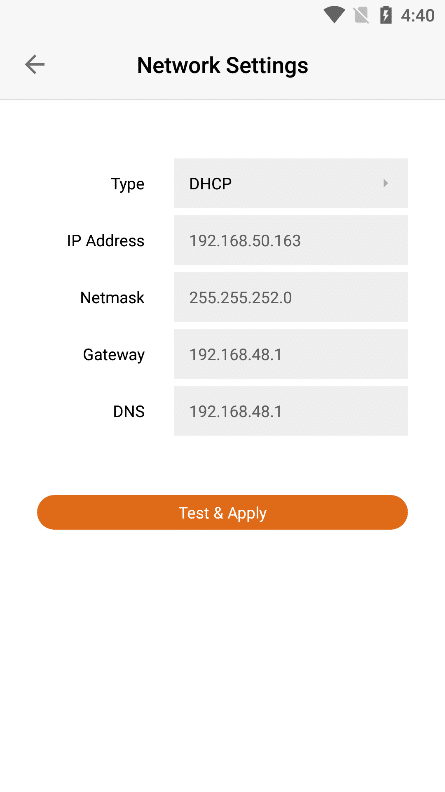
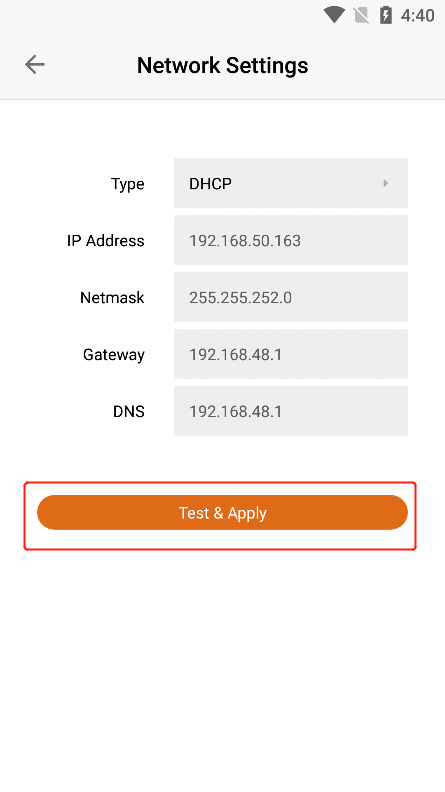
3.9.2. Network Settings
Click "Network Settings" to enter the "Network Settings" interface, where you can set the network data of the connected Z1 device.
In the "Type" option, select "Static IP" , you can manually fill in the IP address information, if the data has been changed after filling in, Click "Test & Apply" , the changed data will be successfully applied.

In the "Type" option, select "DHCP" , the IP address will be obtained automatically, no need to fill in manually, if the data has been changed, Click "Test & Apply" , and the changed data will be successfully applied.
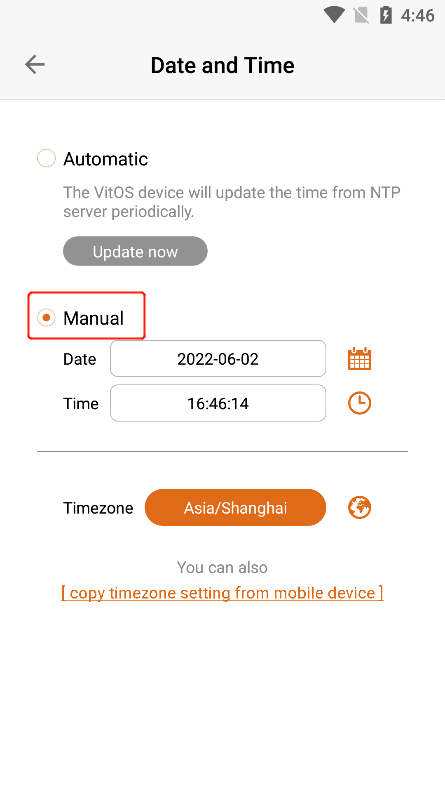
3.9.3. Date And Time
Click "Date And Time" to enter the "Date And Time Setting" interface, where you can view and set the date and time of the Z1 device.
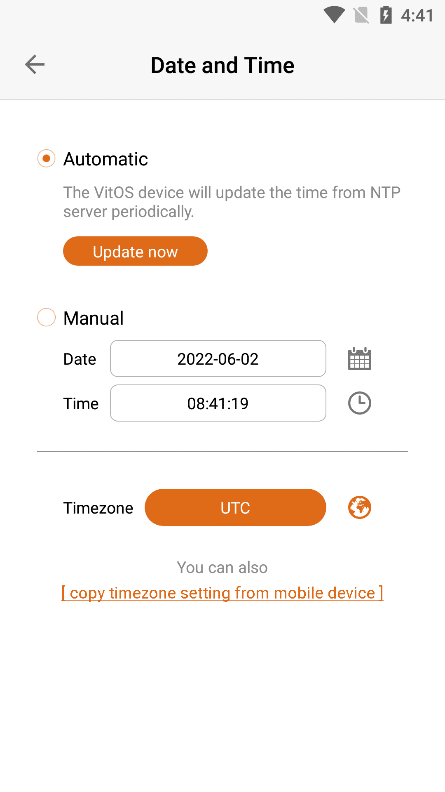
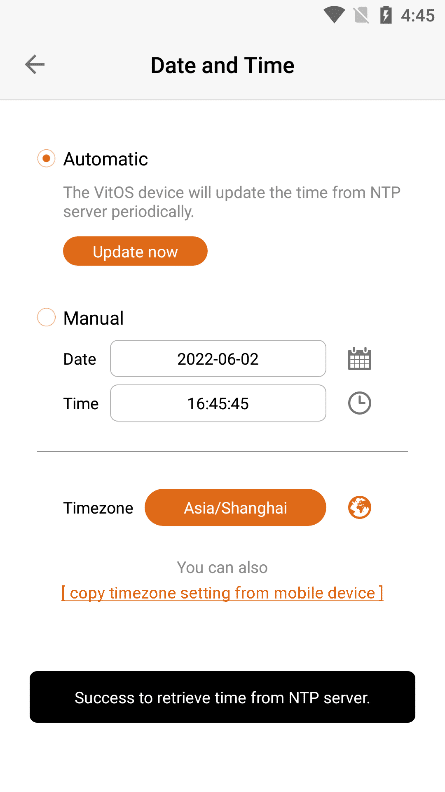
3.9.3.1. Automatic
When selecting "Automatic" to obtain time, "Retrieving time from NTP server" will pop up, and after getting the time, "Success to retrieve time from NTP server" will pop up .
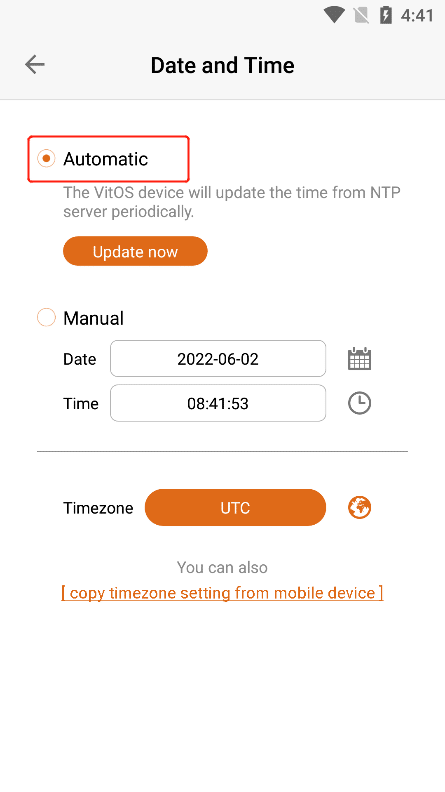

Click the "Update now" button to obtain the time from the NTP server again.

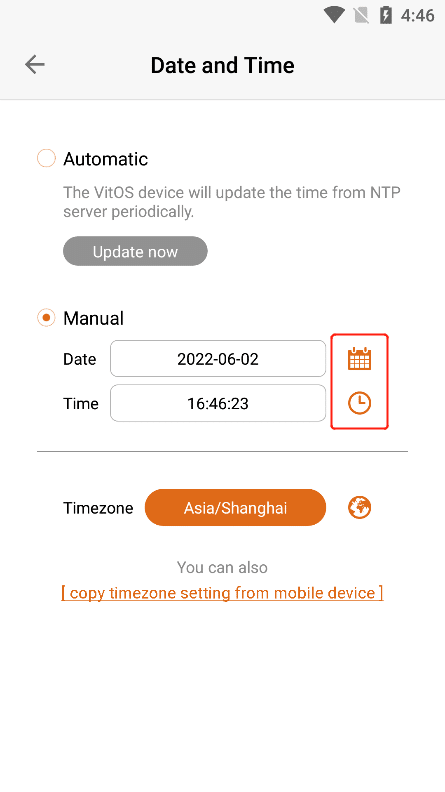
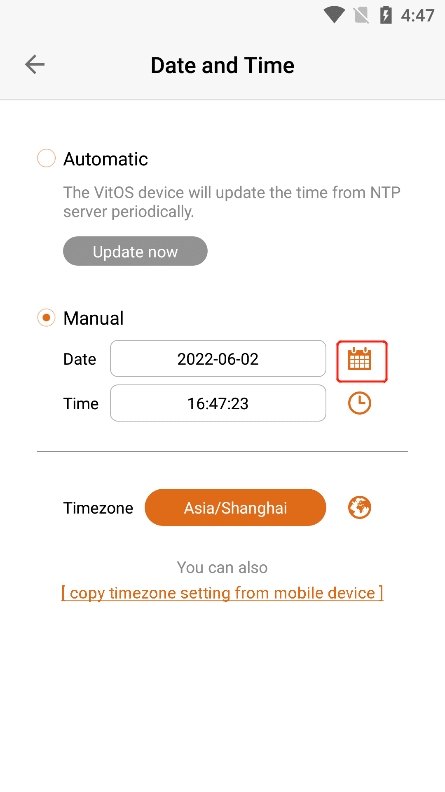
3.9.3.2. Manual
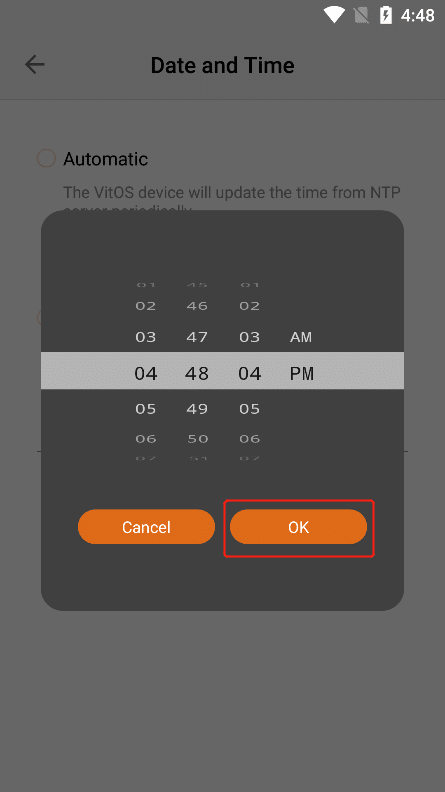
After selecting the "Manual " , you can Click the corresponding button of "Date" or "Time" to set manually.
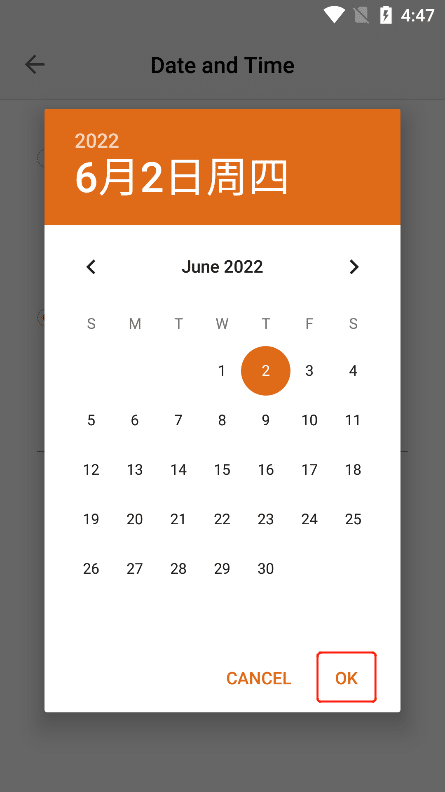
Click the button to the right of "Date" to enter the "Select Date " interface, select and then Click the "OK" button to set successfully.
Click the button to the right of "Time" to enter the "Select Date " interface, select and then Click the "OK" button to set successfully.
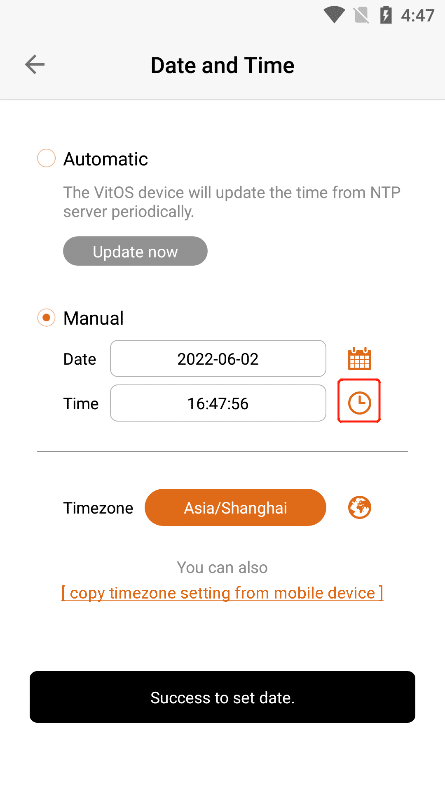
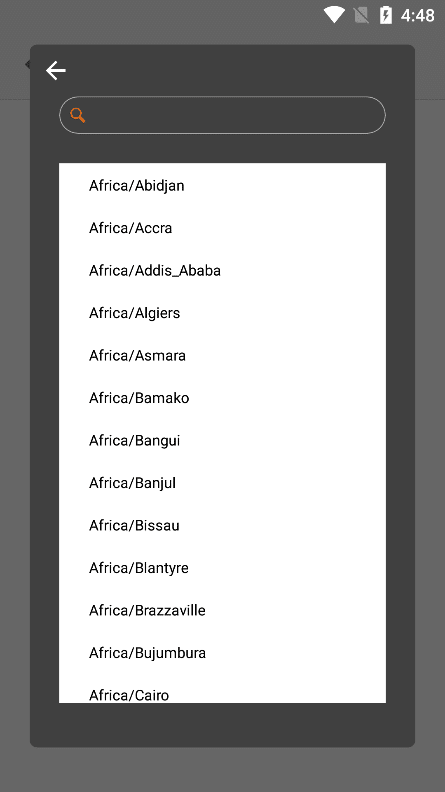
3.9.3.3. Timezone
Click the "Timezone" button or the icon on the right to enter the "Timezone" list interface, Click any "Timezone" , and the "Date" and "Time" content will automatically switch to the selected regional time.

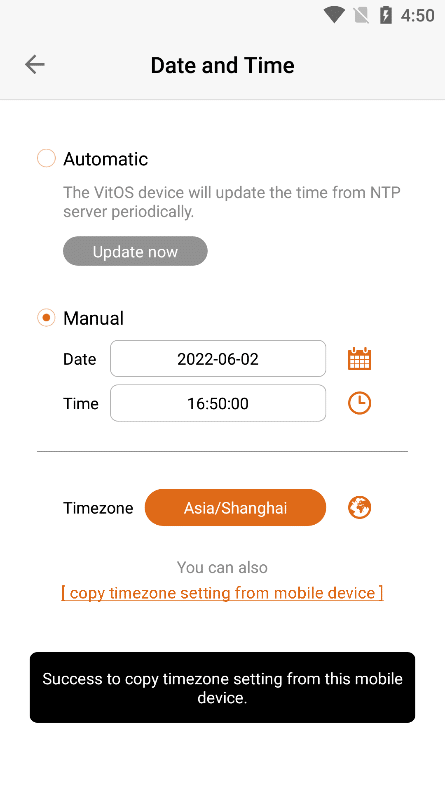
Click "Copy timezone setting from mobile device" to update the "Date" and "Time" in the current region .

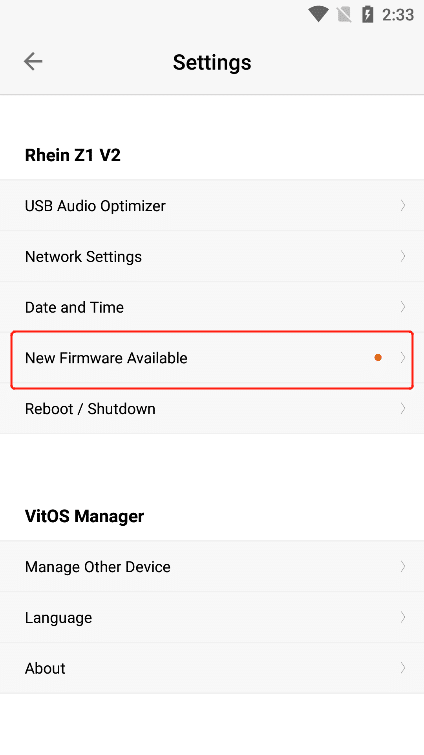
3.9.4. New Firmware Available
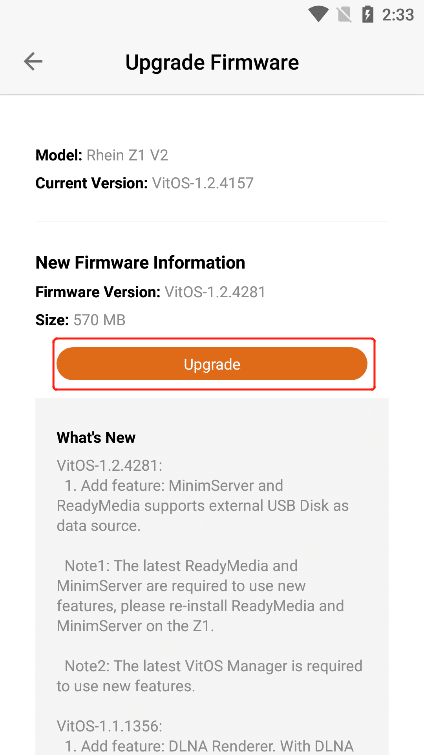
Click " New Firmware Available " to enter the " Update Firmware " interface, where you can view the current firmware version, new firmware version and installation size of the Z1 device.

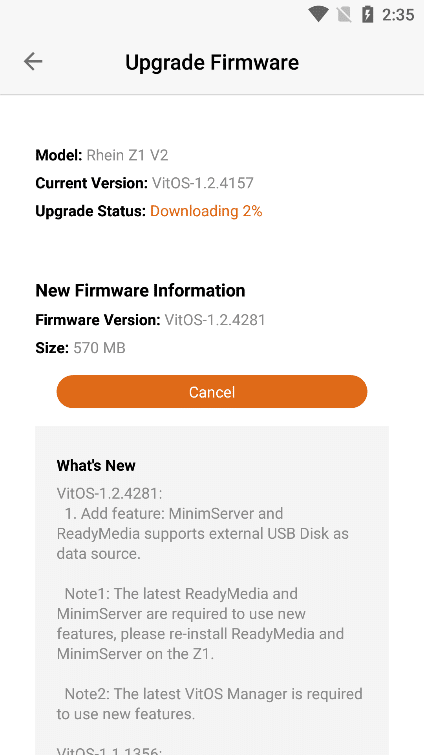
Click the "Upgrade" button to start updating the firmware.
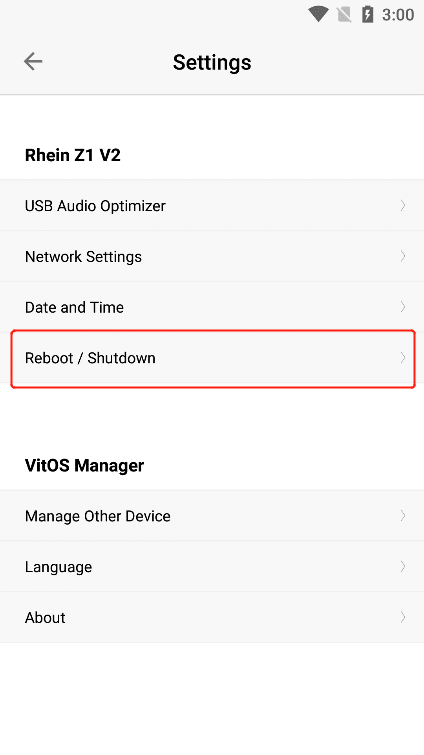
After the firmware update is complete, Click "Reboot to apply new firmware", and then Click the "Reboot" or "Shutdown" button to restart the Z1 device before using the new firmware.


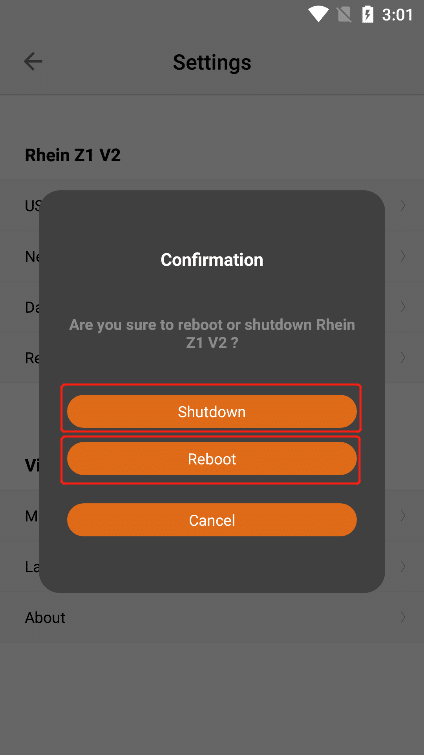
3.9.5. Reboot/Shutdown
Click "Reboot/Shutdown" , and then Click the corresponding button to "Reboot" or "Shutdown" the Z1 device .
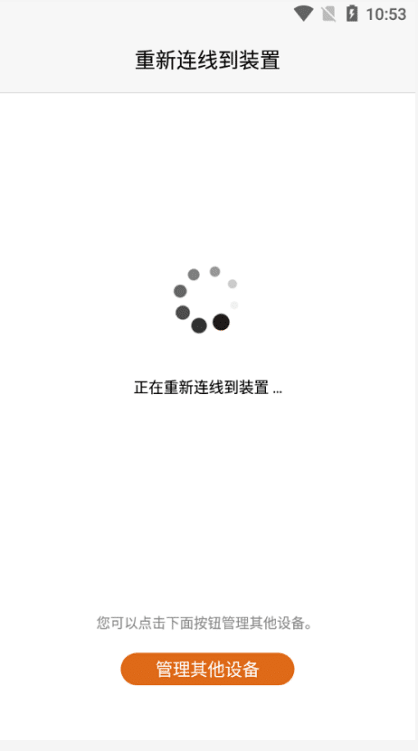
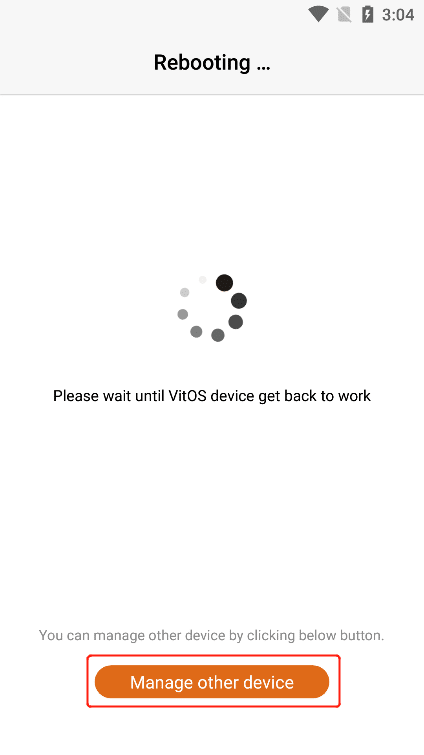
Click the "Reboot" button to restart the current device. After the " Rebooting..." interface waits for the startup to complete, it will automatically connect to the device you connected before restarting.
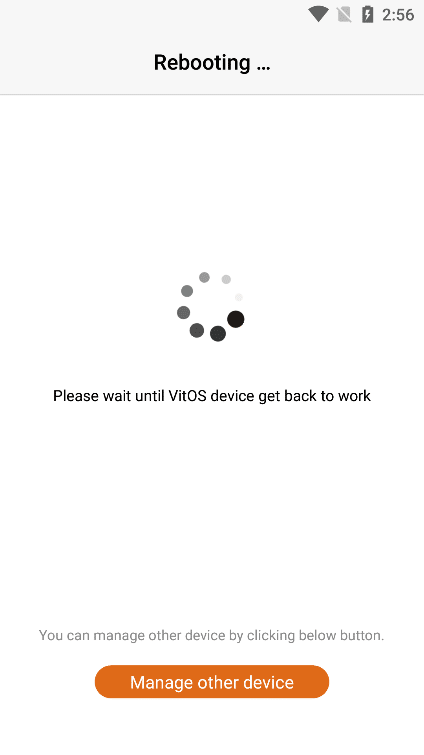

Click "Manage other device" in the "Rebooting" interface to enter the "Select Device" interface and reselect the device for management.

3.9.6. Manage Other Devices
Click " Manage Other Devices " , you can re-select the Z1 device you need to connect, and Click the "Manage" button on the right side of the device to connect.
3.9.6.1. Language
Select the selection box of "Language" to switch the language of the software.

3.9.7. Language
Click "Language" to switch the language of the software.
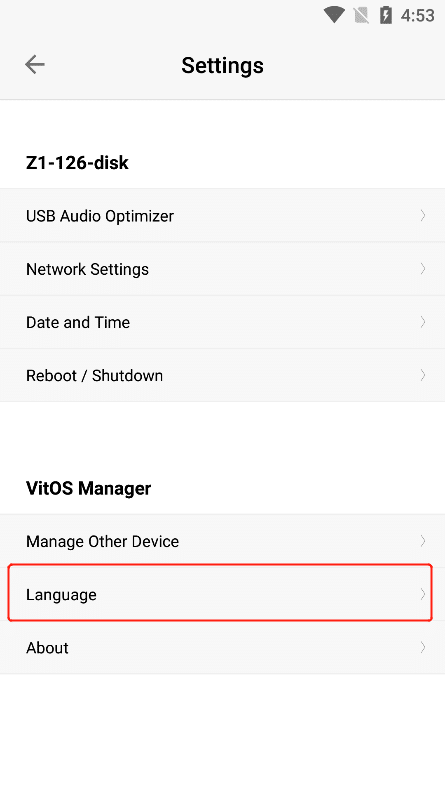

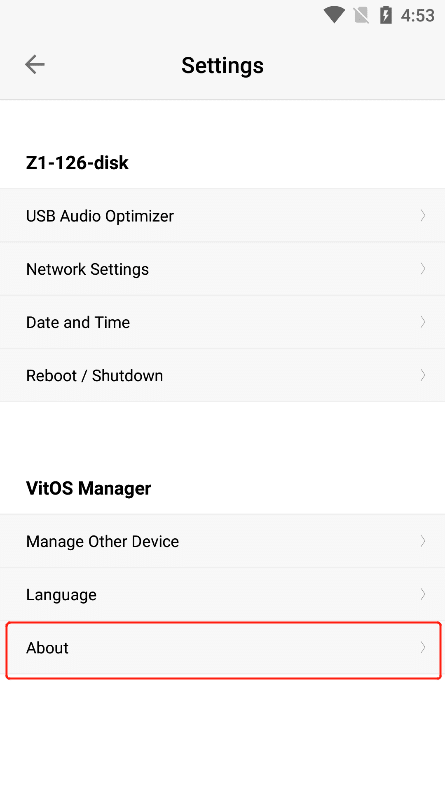
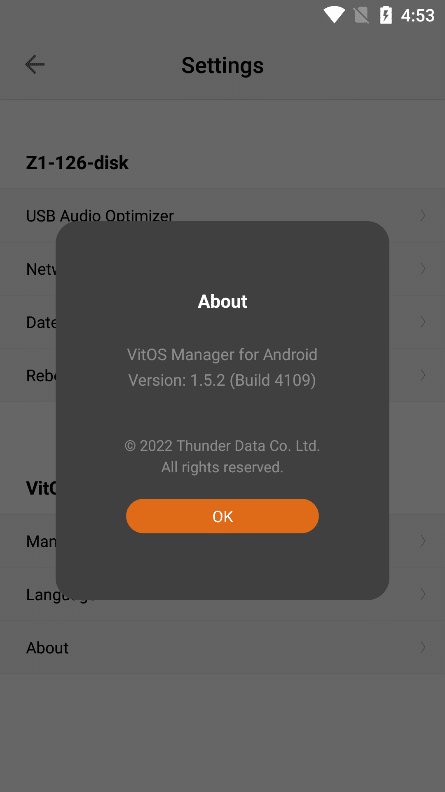
3.9.8. About
Click "About" to enter the "About" interface, where you can view the current APP version information .